Guys/girls/car nuts,
I have been fixing up a 4 door and the first job on the agenda was rust repairs. This is the first car that I have done metal work on (got a few cars on the road with some quick and nasty bog jobs) and was quite surprised at how attainable a half decent job was. A lot of other people have been shown interest in the work, so I thought I would show a few of the things that I have learnt along the way. P.S. My build thread is in my signature if you would like to see more photos of my car.
I’ll add to this thread as I see other panels/tips worth sharing. Please feel free to add to this thread if you have tips to share.
Note, this is my first time doing this kind of work, so you can do it too.
Forming Panel Work
Re: Forming Panel Work
Tip #1 JUST GIVE IT A GO!
This is probably the most important thing you need to know about working on cars. You can rear books/internet forums/watch how to videos, but in the end if you don’t just try it, you will never learn how to do it properly. It is only sheet metal and chances are you will stuff up your first couple of goes, but that is the great thing about metal, it is forgiving, you can fix it. If you do take it too far, you just start with a fresh sheet, no harm no foul. Best thing about failure is learning what you did wrong. Most of my first panels I have done several times before I was happy with them (and if I did them again I would still do things differently).
This is probably the most important thing you need to know about working on cars. You can rear books/internet forums/watch how to videos, but in the end if you don’t just try it, you will never learn how to do it properly. It is only sheet metal and chances are you will stuff up your first couple of goes, but that is the great thing about metal, it is forgiving, you can fix it. If you do take it too far, you just start with a fresh sheet, no harm no foul. Best thing about failure is learning what you did wrong. Most of my first panels I have done several times before I was happy with them (and if I did them again I would still do things differently).
Re: Forming Panel Work
Tip #2 GET SOME GOOD INSTRUCTIONAL CLASSES OR SOME VIDEOS
There are lots of good instructional classes (I plan on doing one one day, but so far I’m still only up to Tip #1 and partially Tip #2) out there. I got a video from a Brit called David Gardiner. It was great for showing some general metal shaping techniques all using hand tools. The guy is amazing and really shows what can be done with no more then a hammer, a few dollies and some hand made tools.
http://www.metalshapingzone.com/shop/start
There are other good videos out there, but I haven’t seen them, so can’t comment on them. Also, if you want to see some great work and find information on how to make certain panels, check out allmetalshaping.com NOTE: These are useless if you don’t do Tip #1. They give you some good ideas on what can be done, but at the end of the day, you have to JUST GIVE IT GO!
Re: Forming Panel Work
Ok, so you are still reading, which means that you have done first two tips and your still hungry for more. So I’ll indulge and show you some of the things that have helped me.
TOOLS
There are many tools that I would love but you just have to make use with what you can afford and make what you can’t afford.
Below are a few photos of the tools that I use with some explanations of what I use them for.
UNMOVABLE OBJECT[
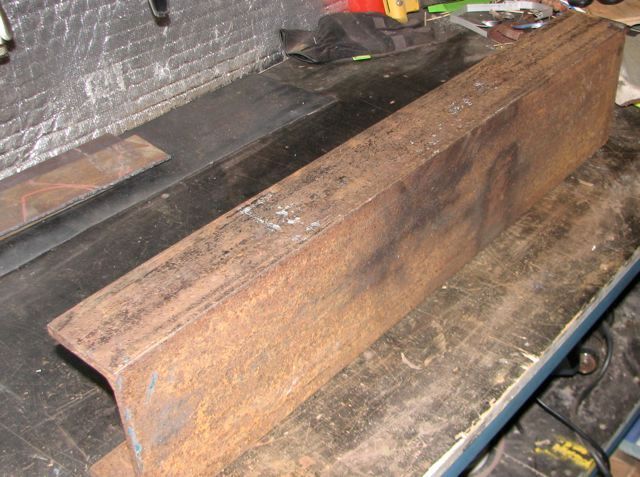
This is my anvil. It is an offcut of a PFC (parallel flange channel). It isn’t fancy, it was free and most important, it is heavy. One day I might replace it with a proper anvil, but for now it is great. Being a PFC it also has very sharp corners (great for sharp folds) as well as curved ends (great for more subtle folds).
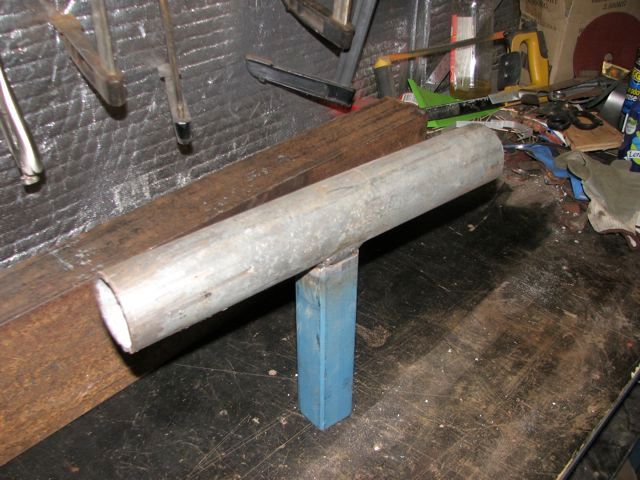
This is my T-stake. Again, this was free, a section of 2” pipe and some 40mm shs. I just clamp it to the bench when I need to use it. For tighter radius’ I just use a broom stick handle.
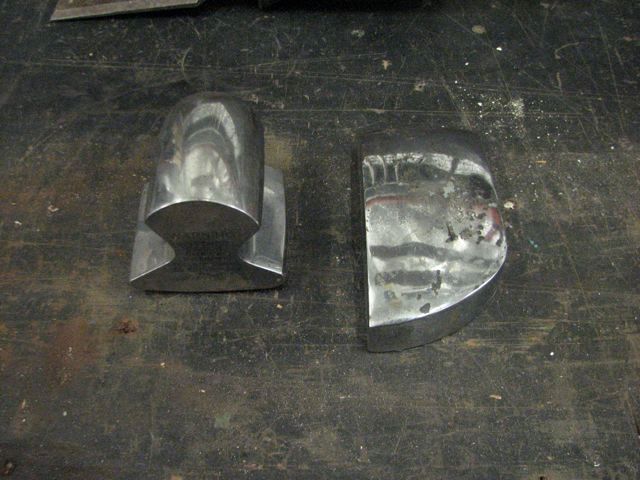
A general purpose dolly and a toe dolly.
UNSTOPPABLE FORCES
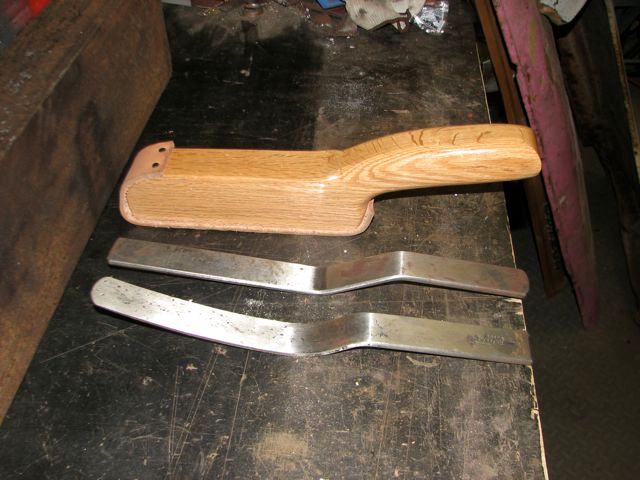
These are my slappers, great for making hits without leaving marks.
From bottom, Spring spoon. This is the lightest and springest of the bunch. With the curved shape it is great where you need a direct hit in a small spot.
Spring slapper. This is a little heavier and I like to use if for shrinking and for throwing flanges.
Wooden slapper, this one is a nice heavy slapper. This is great for fast work. Throws flanges in almost one hit.
A couple of cheap ball pein hammers. This is what I use when I need to make indented curves.
A couple of dinging hammers, one was expensive, one cheap. Great for general purpose work.
My 4lb sledge hammer. I’m a bit embarrassed how much I use this, but it is a great resource. I ground the face so it didn’t have any sharp edges.
CLAMPS
Get as many clamps and as many different types as you can. This is a selection of what I have. The more the merrier. When you are trying to bend a section the way you want it to go or you are trying to shrink some metal, clamps are your friend. I have found as I have done more panels that I often will make quick changes without clamps, but they really help to get you to understand where the metal wants to go.
CHASING TOOLS
Chasing tools are what you use to make metal follow a form and when you need controlled hits.
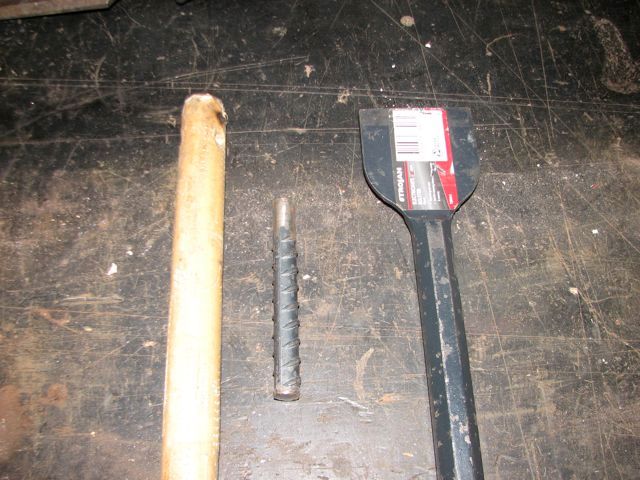
First is just a broom handle. Has limited uses though as it doesn’t transfer as much of the blow and it splits a bit. I also used it as a form for my rear quarter panel section.
Second is a 12mm reinforcing bar. Ground the end smooth.
Third is an electrician’s bolster which I ground a round edge into so it didn’t mark the metal.
CUTTING TOOLS
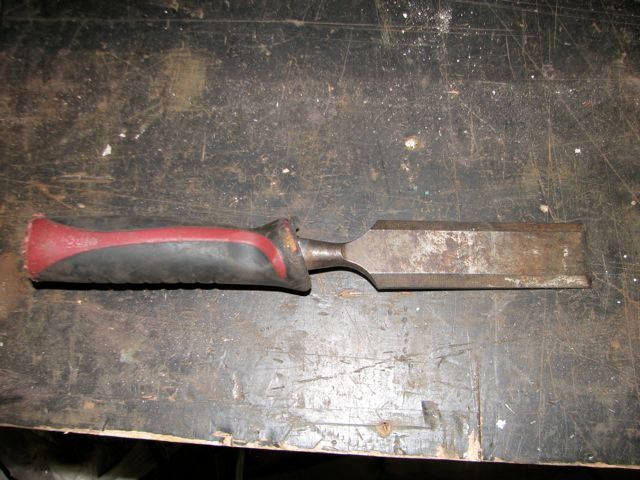
I use a cheap chisel which I sharpen often. I use this for removing spot welds/cutting metal. I also use a 4” grinder, aviation snips and my favourite tool “Plasma cutter”.
HEAT
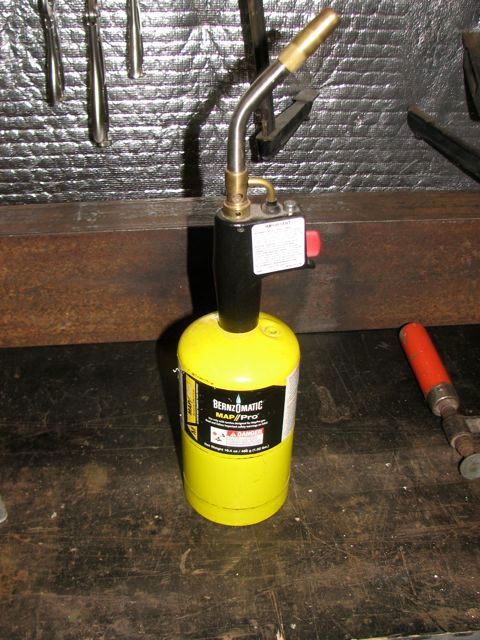
I really want to get myself an oxy set for welding and heat shrinking. What I have found to work really well though for heat shrinking (heat up high spots then hammer them down) is MAPP gas. Probably not as quick as an oxy but gets the metal blue (even gets it red if you are not to careful) and ready for heat shrinking.
TOOLS
There are many tools that I would love but you just have to make use with what you can afford and make what you can’t afford.
Below are a few photos of the tools that I use with some explanations of what I use them for.
UNMOVABLE OBJECT[
This is my anvil. It is an offcut of a PFC (parallel flange channel). It isn’t fancy, it was free and most important, it is heavy. One day I might replace it with a proper anvil, but for now it is great. Being a PFC it also has very sharp corners (great for sharp folds) as well as curved ends (great for more subtle folds).
This is my T-stake. Again, this was free, a section of 2” pipe and some 40mm shs. I just clamp it to the bench when I need to use it. For tighter radius’ I just use a broom stick handle.
A general purpose dolly and a toe dolly.
UNSTOPPABLE FORCES
These are my slappers, great for making hits without leaving marks.
From bottom, Spring spoon. This is the lightest and springest of the bunch. With the curved shape it is great where you need a direct hit in a small spot.
Spring slapper. This is a little heavier and I like to use if for shrinking and for throwing flanges.
Wooden slapper, this one is a nice heavy slapper. This is great for fast work. Throws flanges in almost one hit.
A couple of cheap ball pein hammers. This is what I use when I need to make indented curves.
A couple of dinging hammers, one was expensive, one cheap. Great for general purpose work.
My 4lb sledge hammer. I’m a bit embarrassed how much I use this, but it is a great resource. I ground the face so it didn’t have any sharp edges.
CLAMPS
Get as many clamps and as many different types as you can. This is a selection of what I have. The more the merrier. When you are trying to bend a section the way you want it to go or you are trying to shrink some metal, clamps are your friend. I have found as I have done more panels that I often will make quick changes without clamps, but they really help to get you to understand where the metal wants to go.
CHASING TOOLS
Chasing tools are what you use to make metal follow a form and when you need controlled hits.
First is just a broom handle. Has limited uses though as it doesn’t transfer as much of the blow and it splits a bit. I also used it as a form for my rear quarter panel section.
Second is a 12mm reinforcing bar. Ground the end smooth.
Third is an electrician’s bolster which I ground a round edge into so it didn’t mark the metal.
CUTTING TOOLS
I use a cheap chisel which I sharpen often. I use this for removing spot welds/cutting metal. I also use a 4” grinder, aviation snips and my favourite tool “Plasma cutter”.
HEAT
I really want to get myself an oxy set for welding and heat shrinking. What I have found to work really well though for heat shrinking (heat up high spots then hammer them down) is MAPP gas. Probably not as quick as an oxy but gets the metal blue (even gets it red if you are not to careful) and ready for heat shrinking.
Last edited by Garvice on 12 Feb 2013 02:08, edited 4 times in total.
Re: Forming Panel Work
Ok, so we have got the preliminaries out of the way, lets get to some panels. I haven’t written up the process of the panels that I have formed, so I will make more of an effort from now one to document how I have done it. The first panel I will show you I am showing you the process using paper as I didn’t take photos along the way.
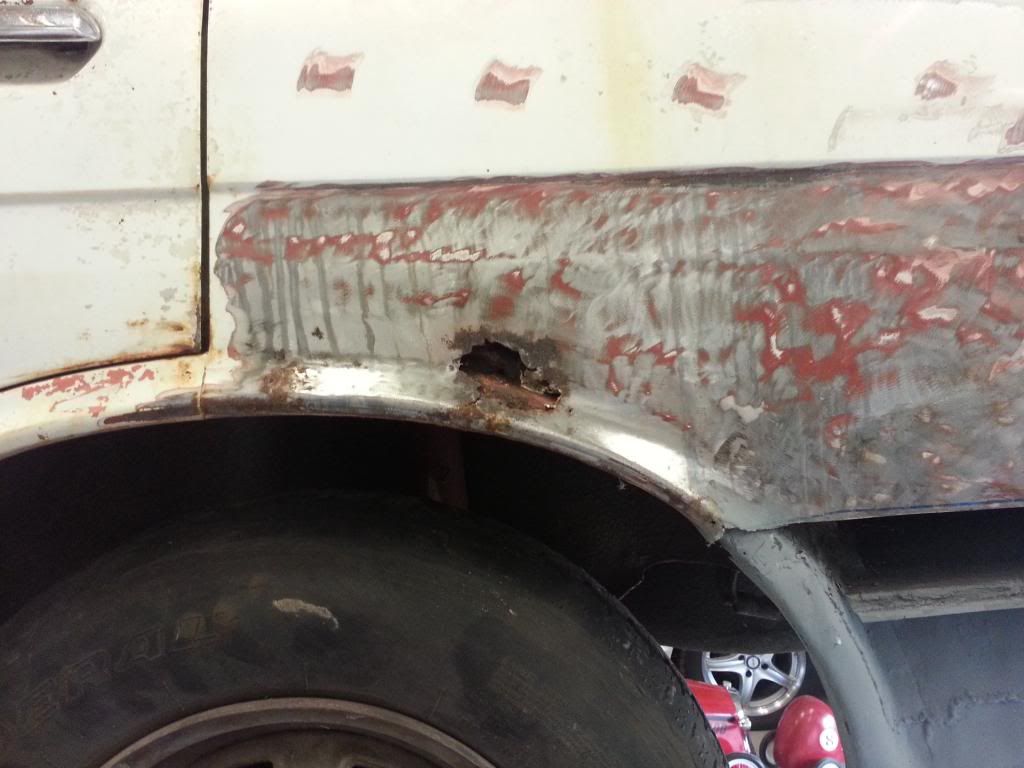
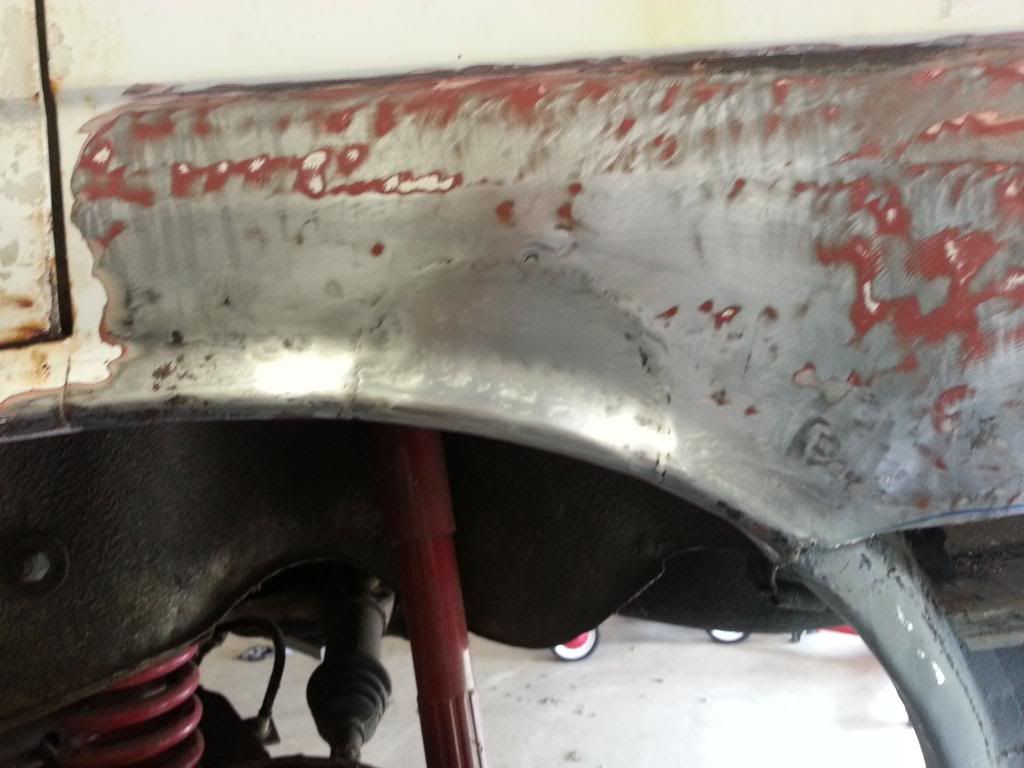
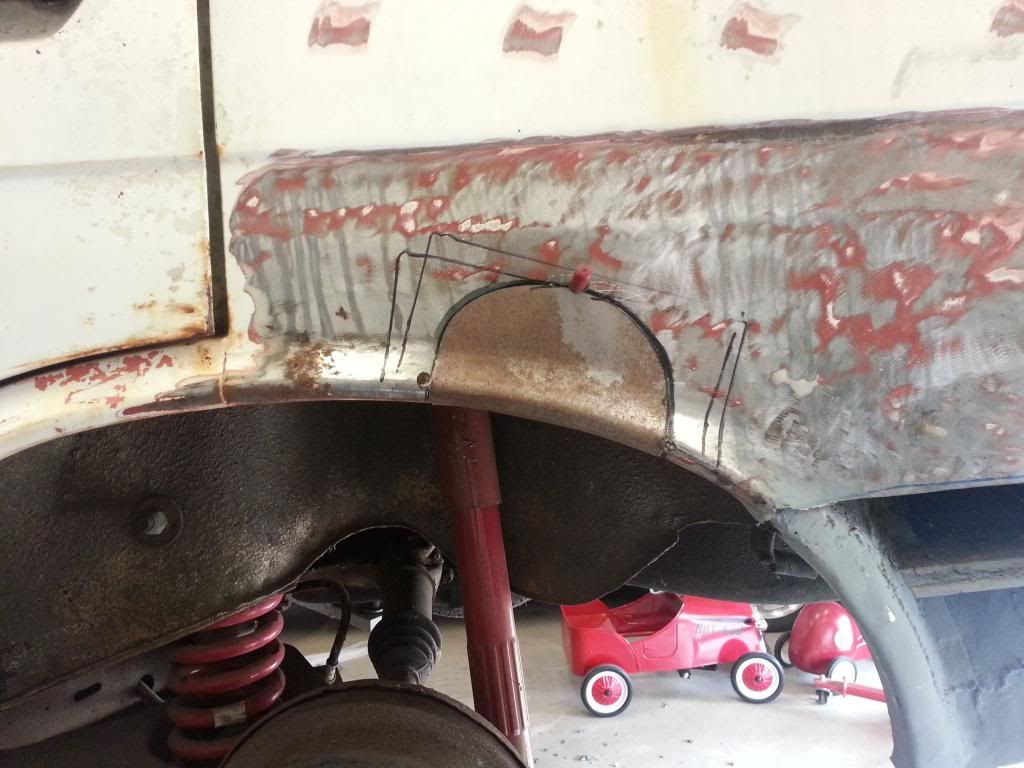
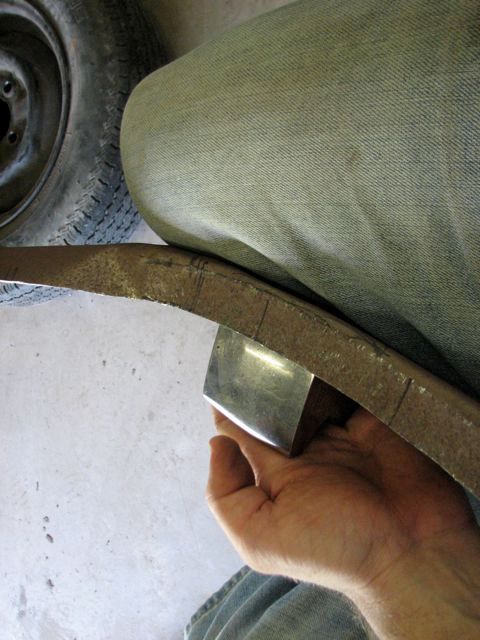
Had this problem with the rear wheel arch (on a 1600).
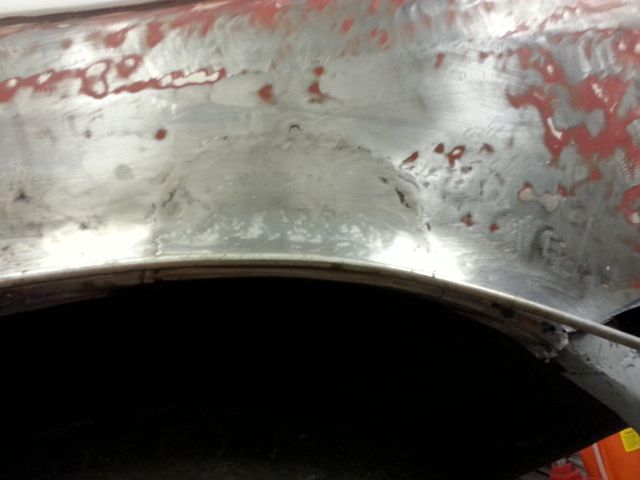
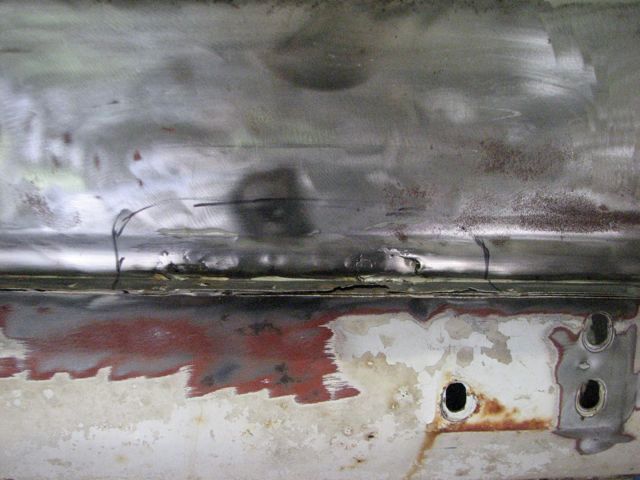
This was the final panel welded in
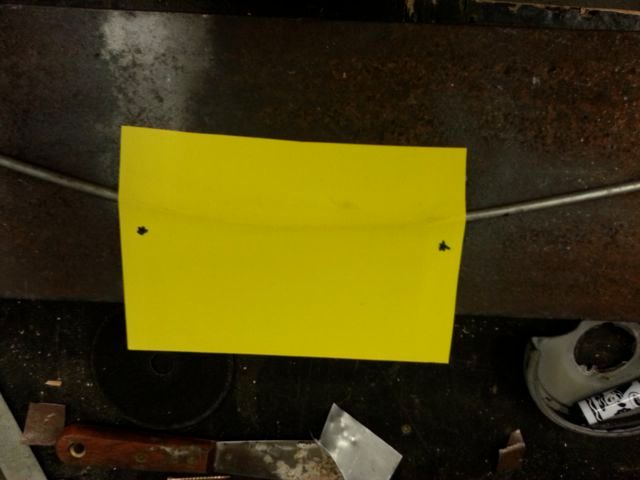
Unfortunately I didn't take many in progress photos. So to try and show you what I did, I went out tonight and recreated it with cardboard. Please note, I didn't use cardboard as a template, the cardboard you see is just representative of what I did in metal.
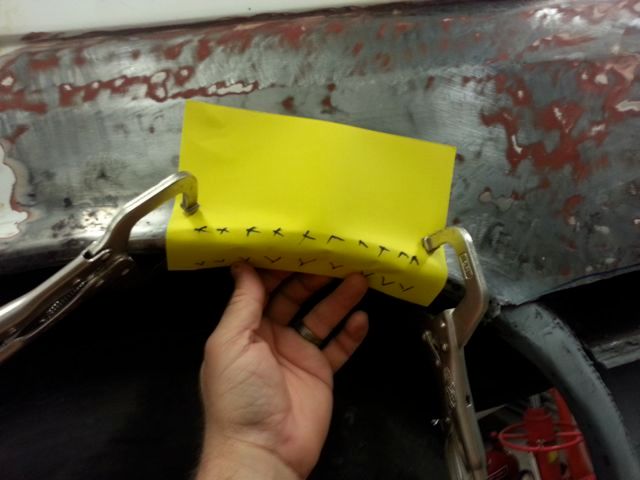
Started by making a quick form out of 1/4" rod which matched the upper curve of the wheel arch to get a bit of a curve started in the metal.
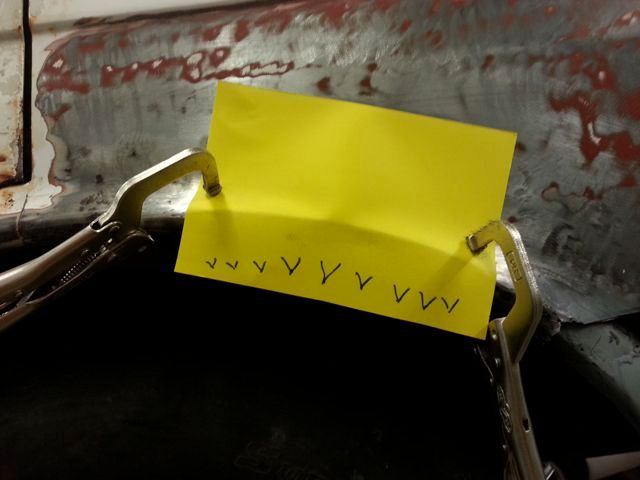
I then did a very quick bend over the form, I only got a very small shape into the metal, but did concentrate on making larger dints where you see the little black dots. This was so that I could clamp it closely to the wheel arch and use the wheel arch as a hammer form.
I then clamped it to the flare like this and started working on folding the bottom flange under. I did this with lots of quick light taps on the v marks. I also didn't fold it all the way under, probably got to about a 45deg section to start with (as you fold the flange under it wants to buckle away from the wheel arch).
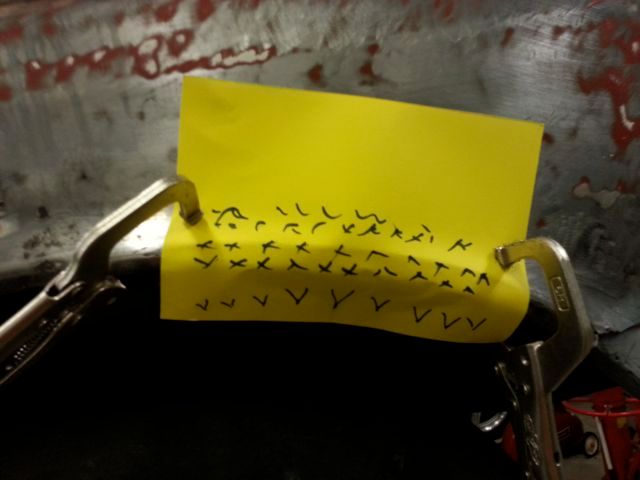
Then I worked on the edge of the wheel arch to get the metal back towards the wheel arch (had only come out a couple of mm).
Then lots of little taps on the top of the wheel arch, and all over. I basically went back and forward, top and bottom and on the wheel arch all over the place. Using the wheel arch as a hammer form worked great.
I then cut it out using a large radius to minimise distortion and welded it in.
More photos can be found on the build thread viewtopic.php?f=3&t=24424&start=15#p209195
Apologies if there are too many photos.
I found that a light (200gram) ball pein hammer was best for this job. Used the ball part for the top of the wheel arch and the flat for the bottom and front of the flange. The ball pein came in handy as even the flat section has a bit of a radius around the edges so it didn't leave any hard marks.
I also started this panel trying to use a stretcher, but since mine only stretches the first inch of the metal I couldn't get it to stretch that large radius of the wheel arch.
Had this problem with the rear wheel arch (on a 1600).
This was the final panel welded in
Unfortunately I didn't take many in progress photos. So to try and show you what I did, I went out tonight and recreated it with cardboard. Please note, I didn't use cardboard as a template, the cardboard you see is just representative of what I did in metal.
Started by making a quick form out of 1/4" rod which matched the upper curve of the wheel arch to get a bit of a curve started in the metal.
I then did a very quick bend over the form, I only got a very small shape into the metal, but did concentrate on making larger dints where you see the little black dots. This was so that I could clamp it closely to the wheel arch and use the wheel arch as a hammer form.
I then clamped it to the flare like this and started working on folding the bottom flange under. I did this with lots of quick light taps on the v marks. I also didn't fold it all the way under, probably got to about a 45deg section to start with (as you fold the flange under it wants to buckle away from the wheel arch).
Then I worked on the edge of the wheel arch to get the metal back towards the wheel arch (had only come out a couple of mm).
Then lots of little taps on the top of the wheel arch, and all over. I basically went back and forward, top and bottom and on the wheel arch all over the place. Using the wheel arch as a hammer form worked great.
I then cut it out using a large radius to minimise distortion and welded it in.
More photos can be found on the build thread viewtopic.php?f=3&t=24424&start=15#p209195
Apologies if there are too many photos.
I found that a light (200gram) ball pein hammer was best for this job. Used the ball part for the top of the wheel arch and the flat for the bottom and front of the flange. The ball pein came in handy as even the flat section has a bit of a radius around the edges so it didn't leave any hard marks.
I also started this panel trying to use a stretcher, but since mine only stretches the first inch of the metal I couldn't get it to stretch that large radius of the wheel arch.

Re: Forming Panel Work
Thanks so much for starting this thread. More photos are no problem, like they say 1 photo is worth a 1000 words. To bring up an old subject, this type of thread should be in the techniques heading. What ever happen to the idea? Seemed that the members liked the idea. Technical problem?
http://www.the510realm.com/viewtopic.php?f=19&t=23423
http://www.the510realm.com/viewtopic.php?f=19&t=23423
Re: Forming Panel Work
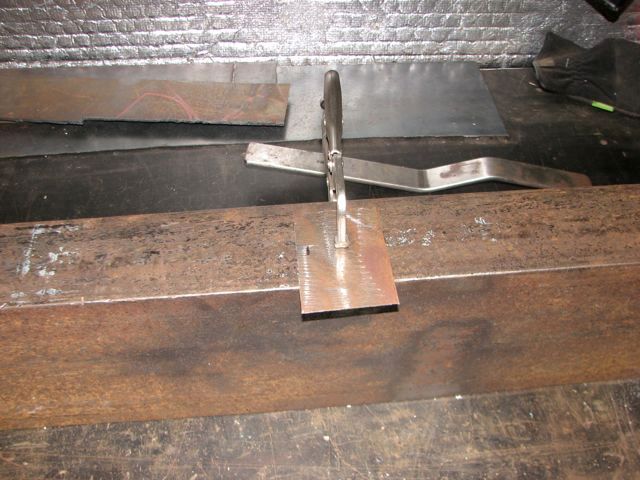
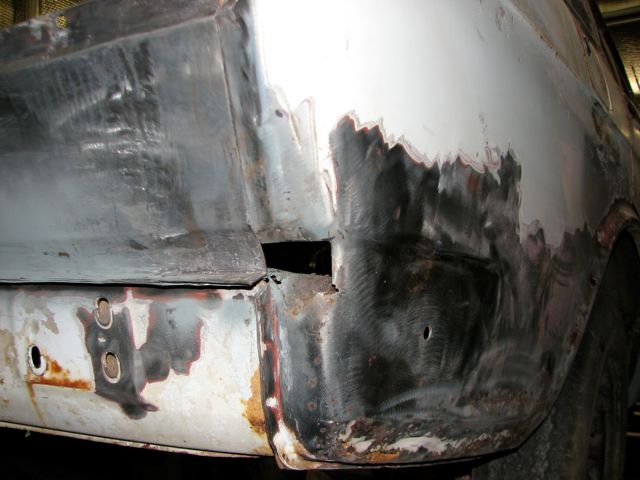
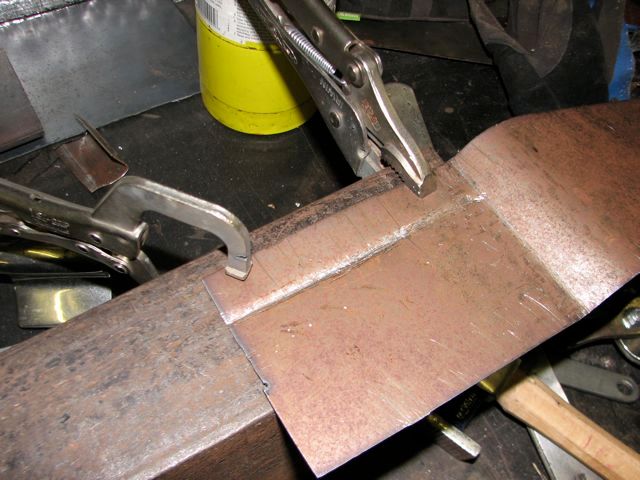
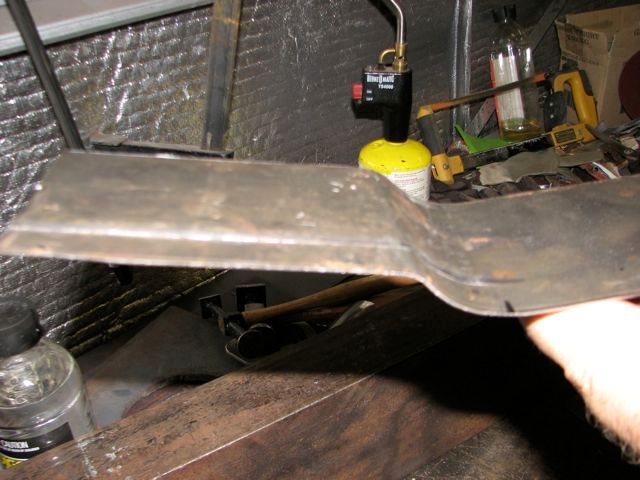
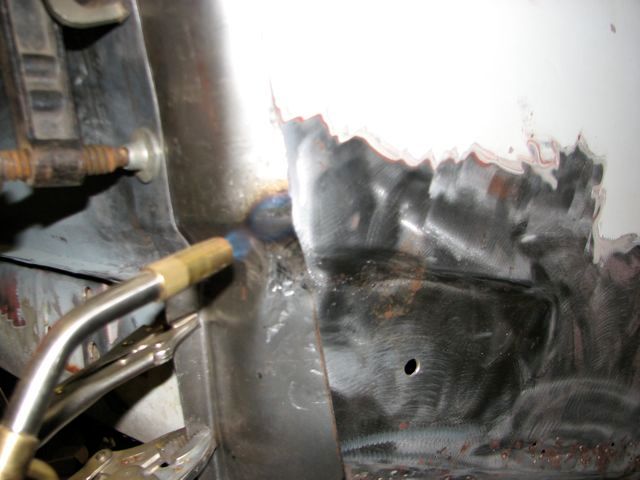
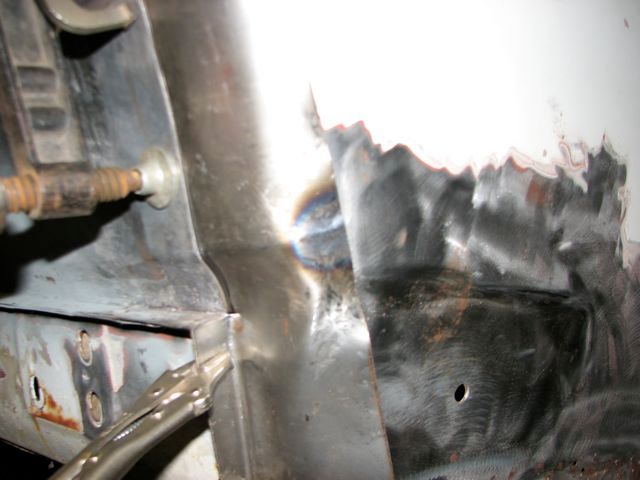
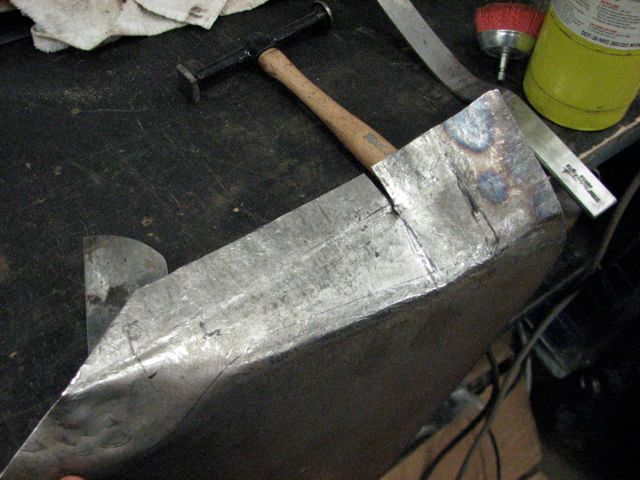
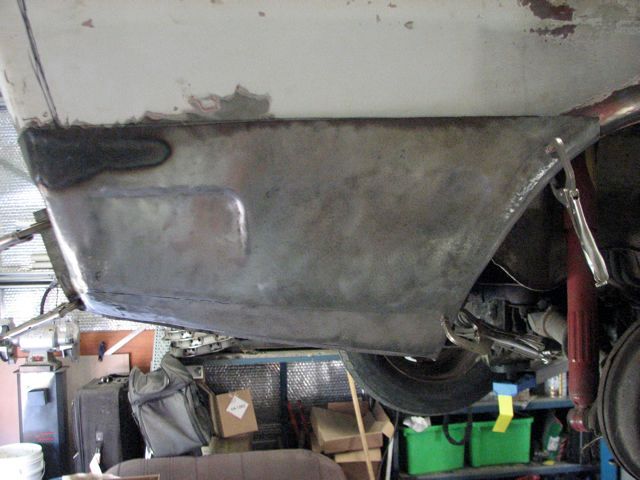
Had a few sections of the rear panel that needed fixing, so thought I would detail how I did it.
This is the section in question.
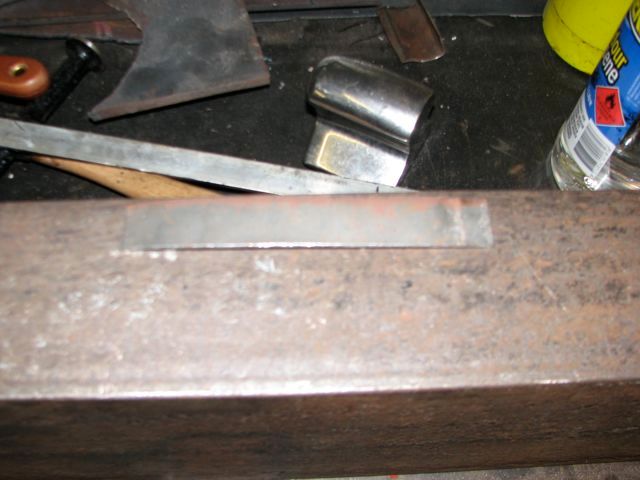
First mistake I made was that I decided to make the cut below the fold. I had done this so that the panel I was welding to would have more strength and distort less. What I did not count on though was how hard it would be to planish the weld and grind back the weld. In future I will always make the second fold and weld above the fold.
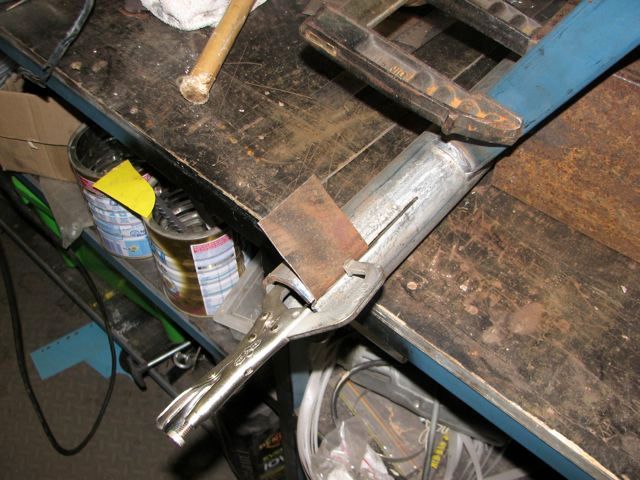
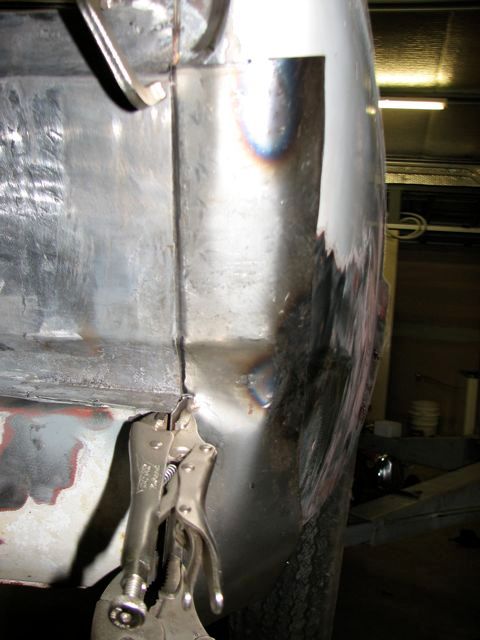
One of the sections clamped to the PFC.
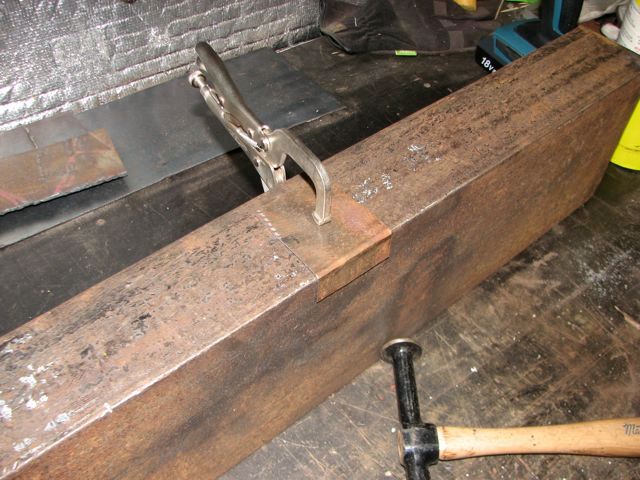
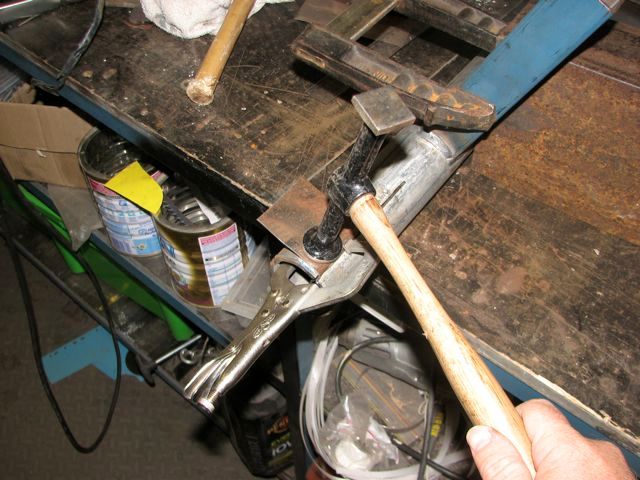
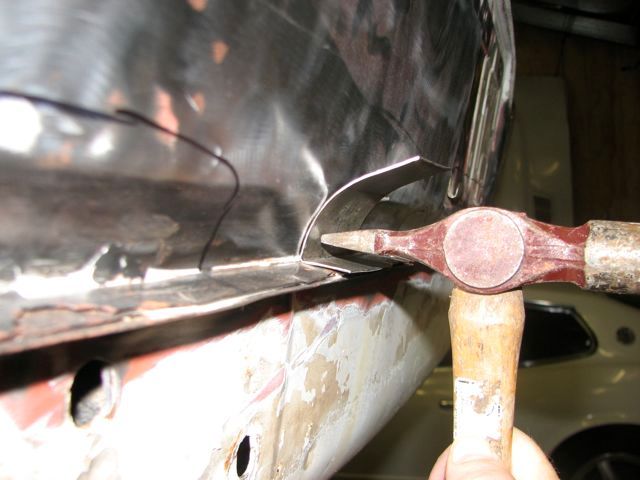
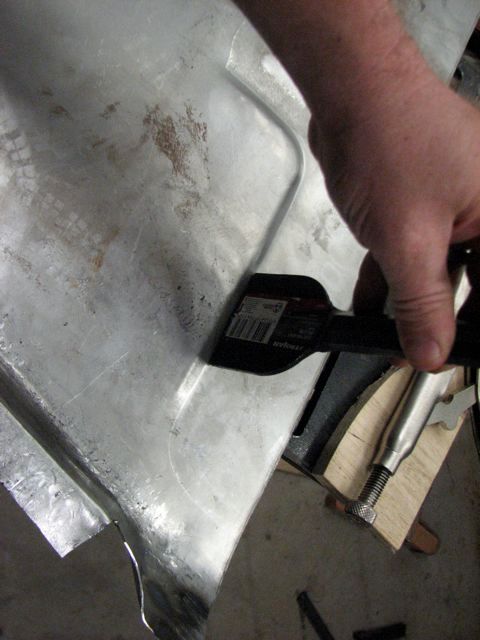
Making the 90deg bend. I try to start the hits on the furthest section of metal and in a sweeping down motion so that you pull the metal down on the crease.

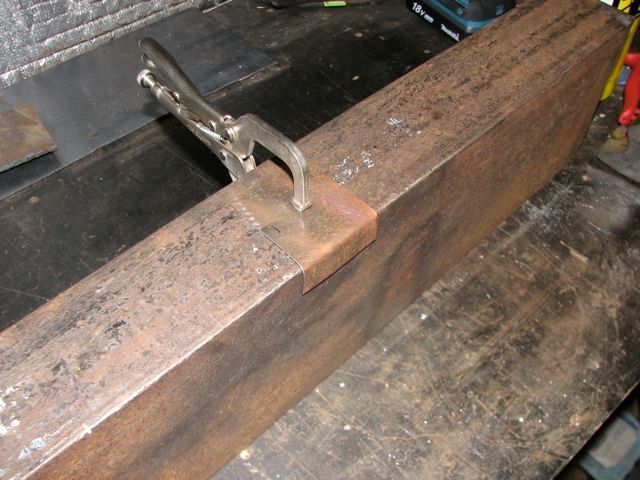
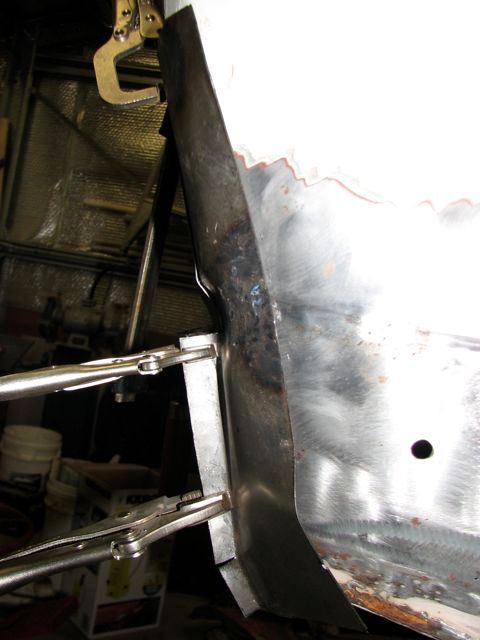
You can sharpen the fold by hitting directly on the corner. After you do this you will have to dress the flat sections again.
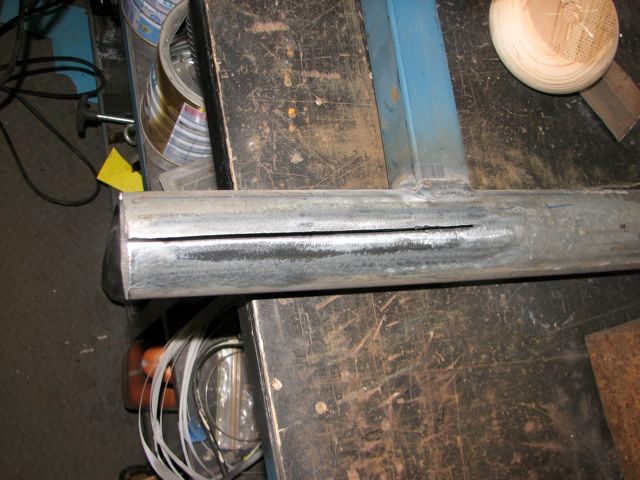
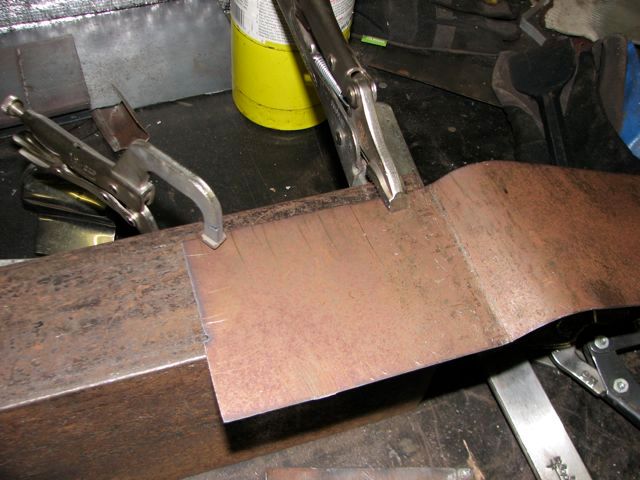
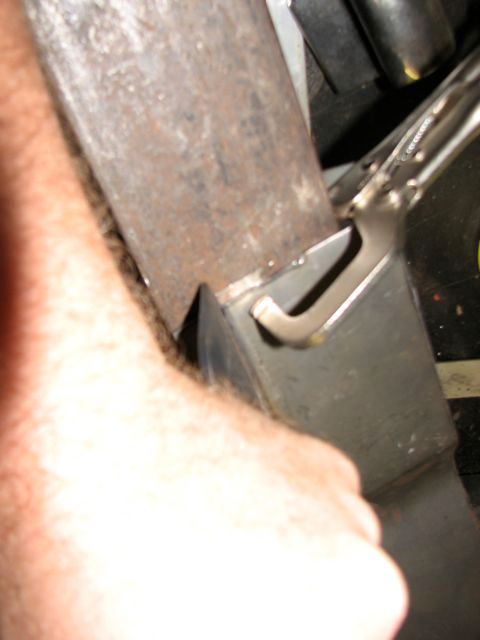
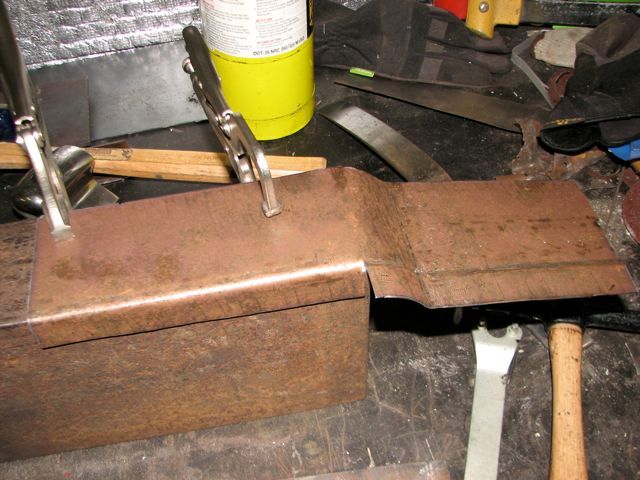
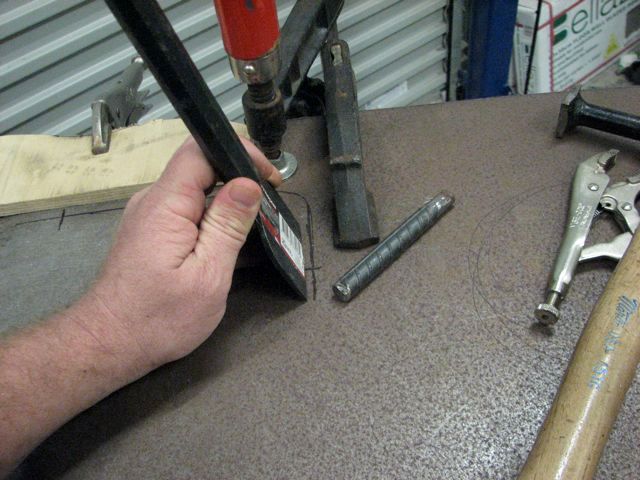
This is the form I made, just a slot in some 2" pipe.
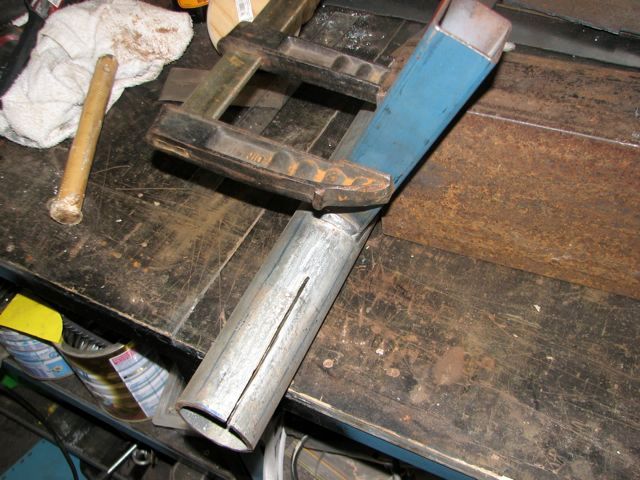
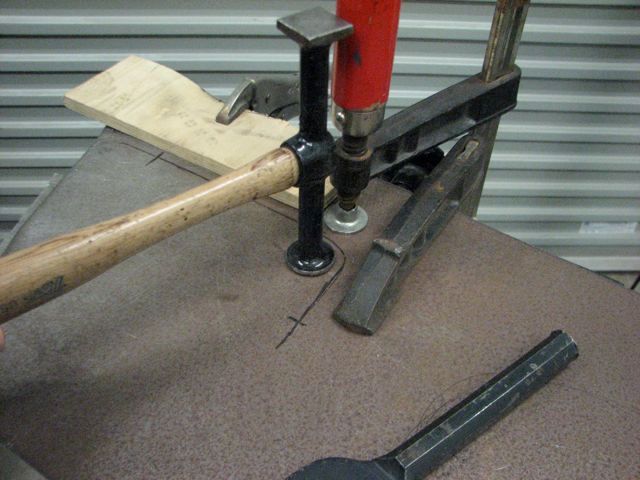
Section clamped in.
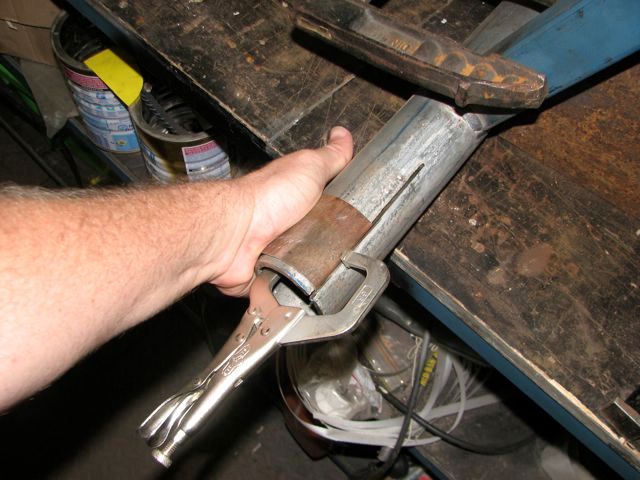
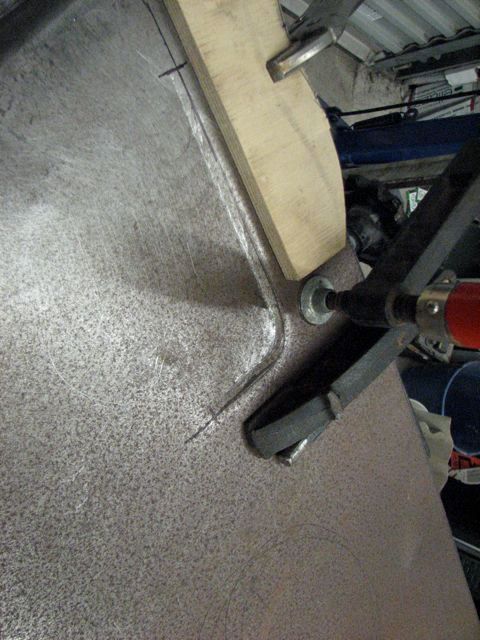
Hammer the section around the form. With a thin section like this you can actually just push it around with your hands.
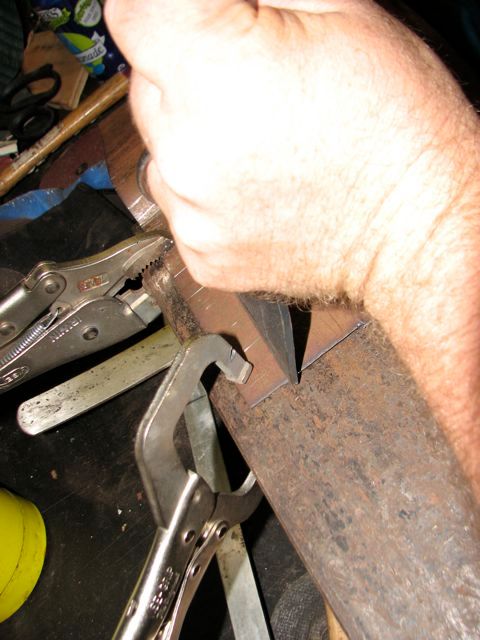
Helps to put some tension on the metal while you are hammering it. I also hold it like this unclamped and hammer the corner to sharpen the curve near the fold.


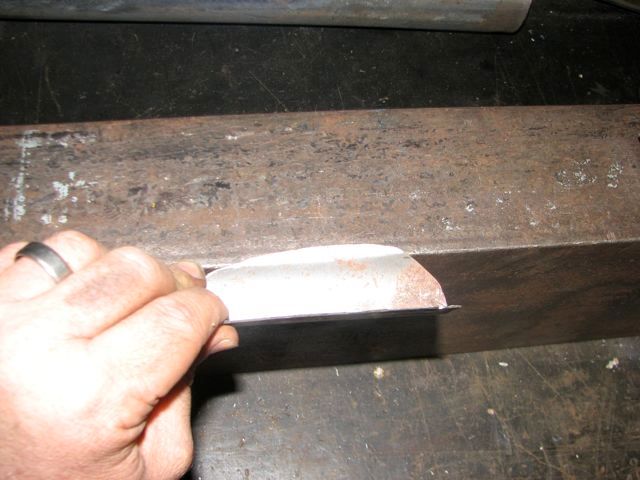
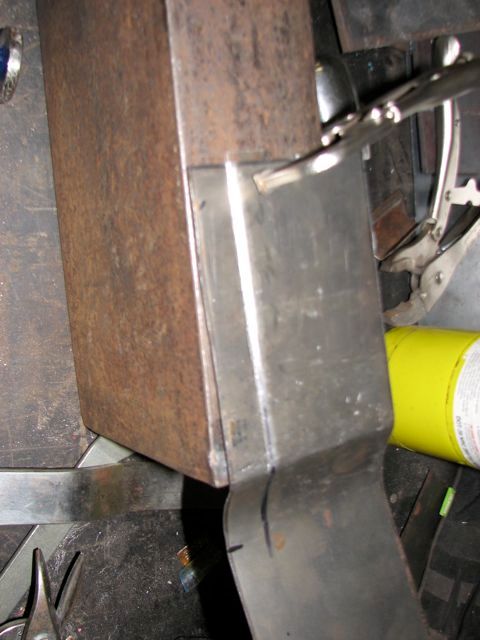
It was a little tightly curved for the car. Easy to fix by hand, just pull it out, or very lightly tap with a hammer (don't need much at all).
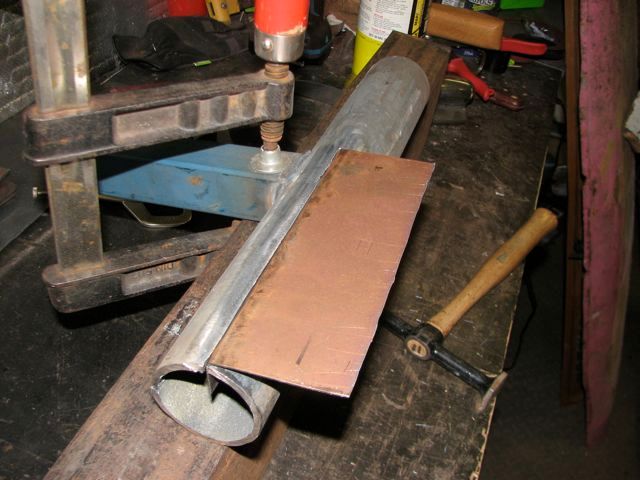
Had to make a bigger form for a longer section.
Same principal as the smaller section, but need to hammer this one. Didn't bother clamping this one as since it is longer you can hold it with your hand as you hammer.
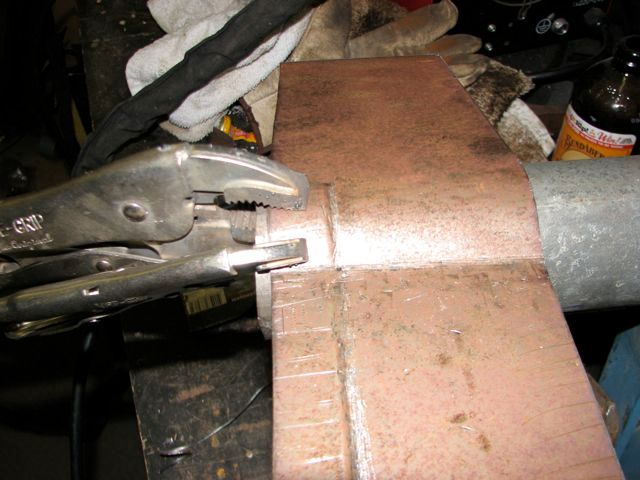
This photo I am trying to show you how to do the upper fold when you have already curved the metal. You rest the metal on the PFC where you want the fold. You need to hit the metal right on the corner of the PFC with a sharp hit. This give a dint to the metal that will let you easily hold the position on the PFC. Now you can slowly hammer down the fold.
This is the section in question.
First mistake I made was that I decided to make the cut below the fold. I had done this so that the panel I was welding to would have more strength and distort less. What I did not count on though was how hard it would be to planish the weld and grind back the weld. In future I will always make the second fold and weld above the fold.
One of the sections clamped to the PFC.
Making the 90deg bend. I try to start the hits on the furthest section of metal and in a sweeping down motion so that you pull the metal down on the crease.
You can sharpen the fold by hitting directly on the corner. After you do this you will have to dress the flat sections again.
This is the form I made, just a slot in some 2" pipe.
Section clamped in.
Hammer the section around the form. With a thin section like this you can actually just push it around with your hands.
Helps to put some tension on the metal while you are hammering it. I also hold it like this unclamped and hammer the corner to sharpen the curve near the fold.
It was a little tightly curved for the car. Easy to fix by hand, just pull it out, or very lightly tap with a hammer (don't need much at all).
Had to make a bigger form for a longer section.
Same principal as the smaller section, but need to hammer this one. Didn't bother clamping this one as since it is longer you can hold it with your hand as you hammer.
This photo I am trying to show you how to do the upper fold when you have already curved the metal. You rest the metal on the PFC where you want the fold. You need to hit the metal right on the corner of the PFC with a sharp hit. This give a dint to the metal that will let you easily hold the position on the PFC. Now you can slowly hammer down the fold.
-
jovial_cynic

- Supporter
- Posts: 628
- Joined: 23 Jun 2003 15:49
- Location: Central Valley, CA
Re: Forming Panel Work
I just came into say that I love this thread. I'm a fellow sheet-metal-forming guy, and I've had to make some major patch-work on my 510. I like that you posted basic hand-tools; not everybody has the budget for electric beadrollers or stretchers and the such, but for the kind of things that typically need to be done on our 510s, what you posted is pretty much all you need.
Oh, and a good mig welder. I strongly recommend the Hobart 140. It's amazing for sheet. The low amp setting allows you to do quite a bit without worrying about blowing through the sheet metal.
Oh, and a good mig welder. I strongly recommend the Hobart 140. It's amazing for sheet. The low amp setting allows you to do quite a bit without worrying about blowing through the sheet metal.
71 510 2-door SR20DET (S13)
------------------
http://www.myagentjosh.com
http://www.newprotest.org/510
------------------
http://www.myagentjosh.com
http://www.newprotest.org/510

Re: Forming Panel Work
thanks for the tipS!Garvice wrote:Tip #1 JUST GIVE IT A GO!
byron wrote:I'd be all over that like a fat kid on a smartie.
okayfine wrote:Sense doesn't always have everything to do with it, and I speak from experience.
-
///FiveOneOh

- Posts: 2136
- Joined: 23 Jun 2003 00:21
- Location: Abbotsford
Re: Forming Panel Work
This gave me the inspiration to fix the rust hole in the floor of my mazda... It worked...its not awesome but it worked!

Re: Forming Panel Work
Thanks Jovial, yes a good welder does help a lot. I am going to try some thinner (0.6mm) wire and see if that helps.I just came into say that I love this thread.
No worries.thanks for the tipS!
EXCELLENT!This gave me the inspiration to fix the rust hole in the floor of my mazda... It worked...its not awesome but it worked!
People. Follow FiveOhOne's lead.
I tried making the rear bumper to rear guard section last weekend and wasn't happy with the result, so I have decided to try making the panel another way. I will post up both ways once I get the panel working (hoping to get a few hours in on the weekend) as I still think the first way is viable and shows some good tips that would be transferable elsewhere.
Re: Forming Panel Work
I am going to break the next post into two. The first attempt (and second attempt) didn't work out like I was expecting, so the second post will show how I finished the panel. I think the first method is still valid and with enough patience I think I could have made it work, hence why I am showing it here. I also think it shows some methods that are transferable to other panels.
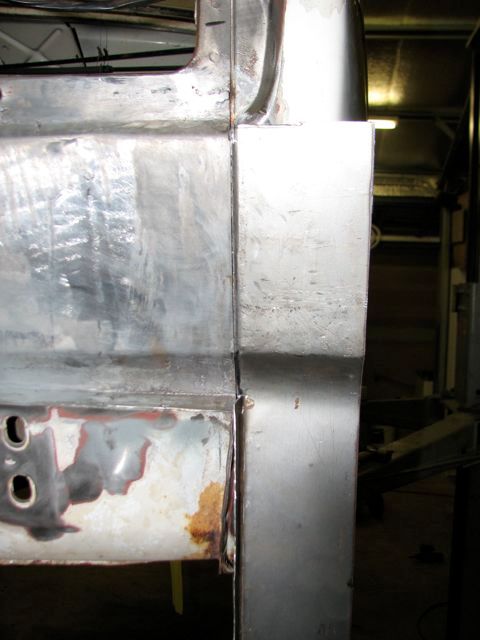
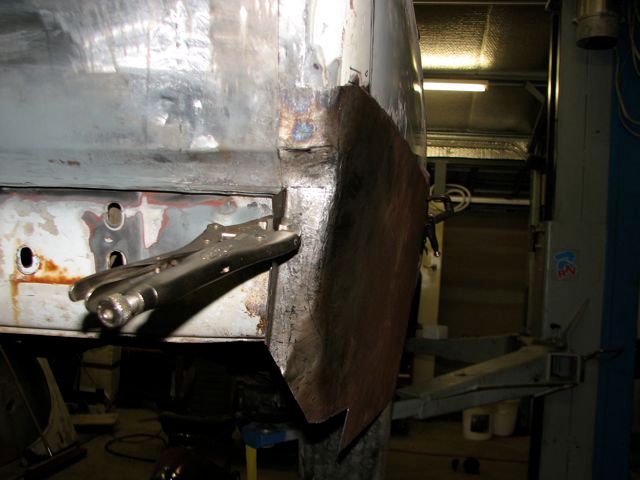
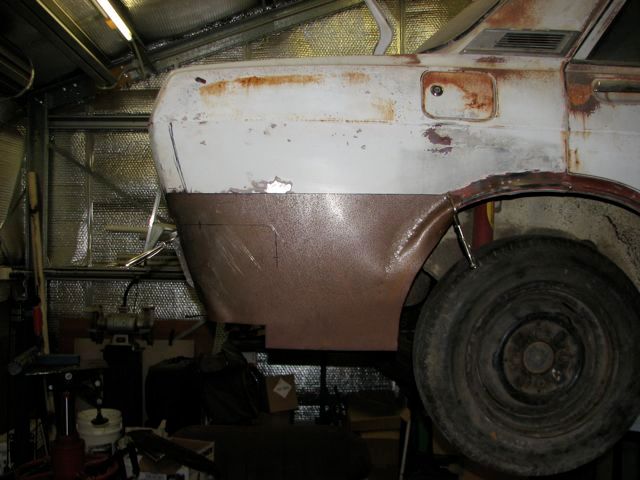
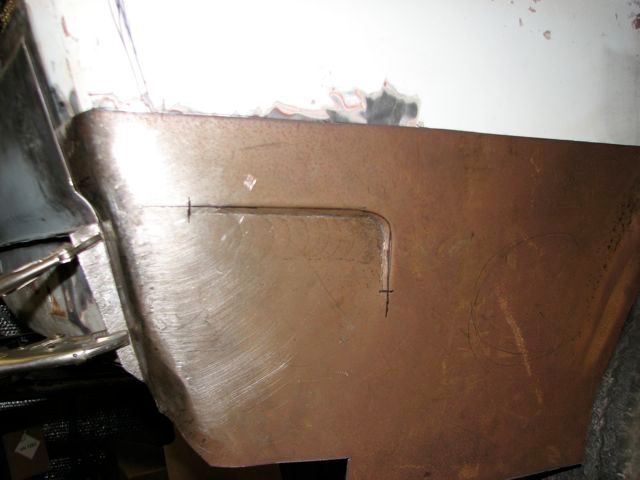
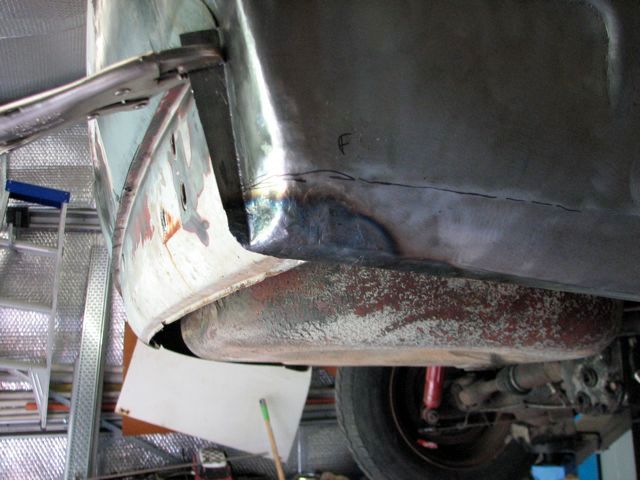
This is the panel that I was trying to fix.
I started off by making the same curve I needed for the rear of the car (see above posts).
I then wanted to put a step in the panel as the quarter panel sits behind the rear panel.
This is what is sitting behind the panel (just a strip of 1mm metal sheet).
Clamped the metal over the strip.
I then chased along the strip with my blunted bolster. Trick is to sit it off the strip by a few mm. The deeper your step, the further you sit the chase off.
After chasing
I then flipped the panel to chase the other side so that the step gets a sharper step.
After chasing the other side
Then I needed a step in the curve section.

Same process required.
Panel with the step
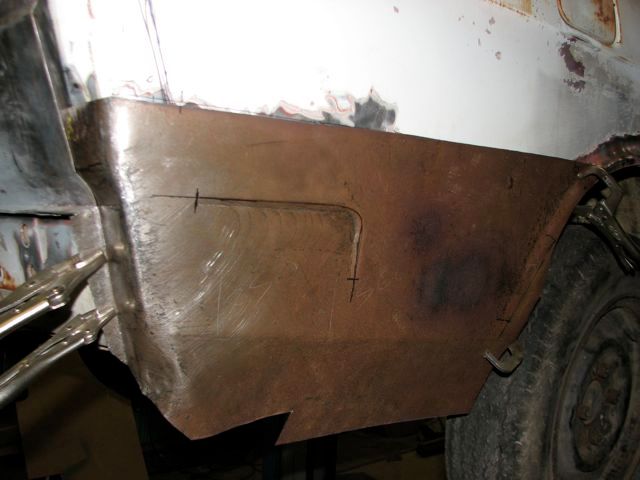
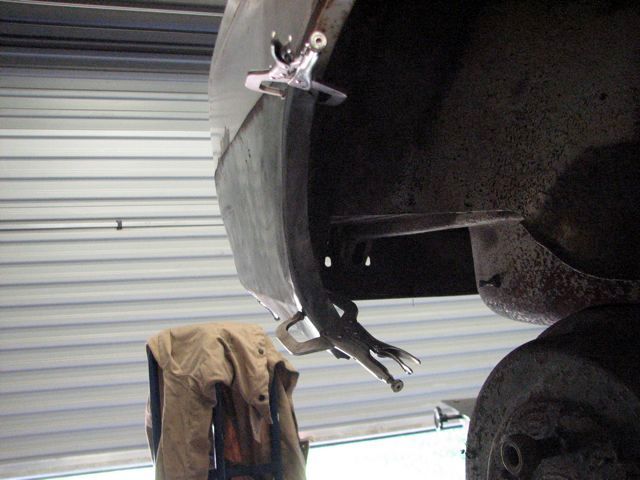
I then needed a flange on the lower side of the panel, just made a cut and offset it on my PFC.
Panel sitting on car
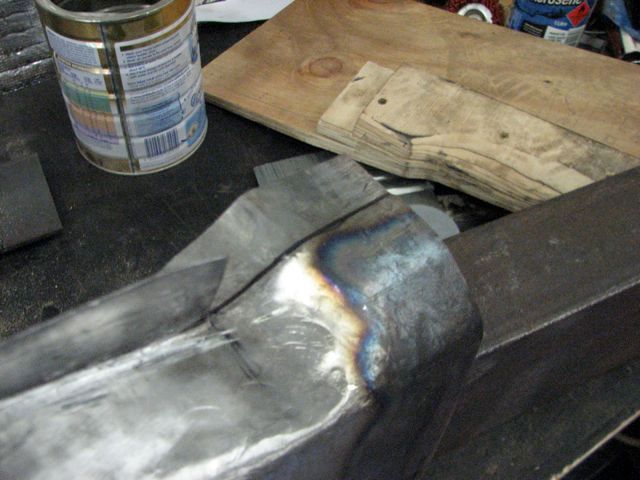
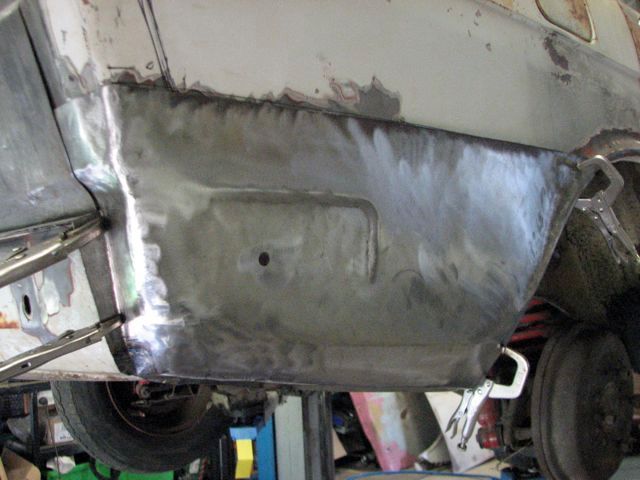
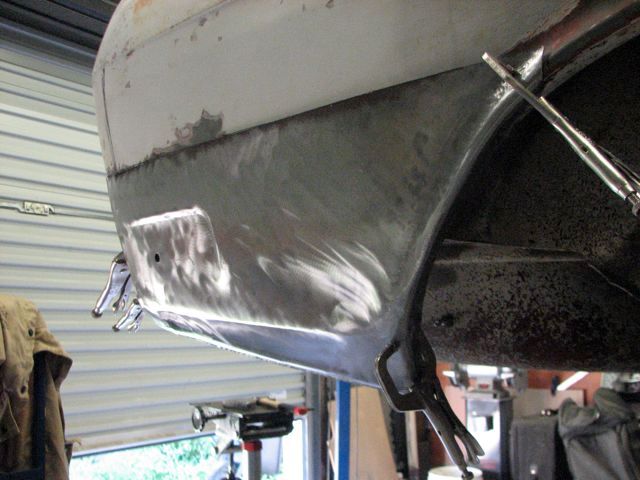
I then started hammering the panel around the corner. As you can see bending this around the corner creates excess material which needs shrinking.
You heat the puckered metal up till its blue.
And hammer it flat to shrink the metal.
After a little more shrinking this is what I ended up with. I wasn't real happy with how the panel didn't flow vertically.
Part two coming soon, will show you another way to do the panel.
This is the panel that I was trying to fix.
I started off by making the same curve I needed for the rear of the car (see above posts).
I then wanted to put a step in the panel as the quarter panel sits behind the rear panel.
This is what is sitting behind the panel (just a strip of 1mm metal sheet).
Clamped the metal over the strip.
I then chased along the strip with my blunted bolster. Trick is to sit it off the strip by a few mm. The deeper your step, the further you sit the chase off.
After chasing
I then flipped the panel to chase the other side so that the step gets a sharper step.
After chasing the other side
Then I needed a step in the curve section.
Same process required.
Panel with the step
I then needed a flange on the lower side of the panel, just made a cut and offset it on my PFC.
Panel sitting on car
I then started hammering the panel around the corner. As you can see bending this around the corner creates excess material which needs shrinking.
You heat the puckered metal up till its blue.
And hammer it flat to shrink the metal.
After a little more shrinking this is what I ended up with. I wasn't real happy with how the panel didn't flow vertically.
Part two coming soon, will show you another way to do the panel.
Re: Forming Panel Work
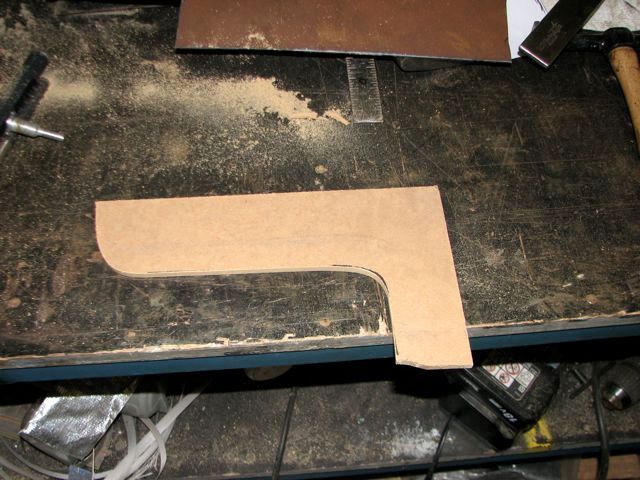
Ok, so the third attempt at doing this panel I decided to take a different method. I decided since I couldn't make a little section of panel, I thought I would make the whole bottom quarter, ha! Actually, what I decided to do was make the curve from the rear quarter to the rear panel, rather then the other way around. I thought this would require less shrinking and I thought I might get a better vertical line this way.
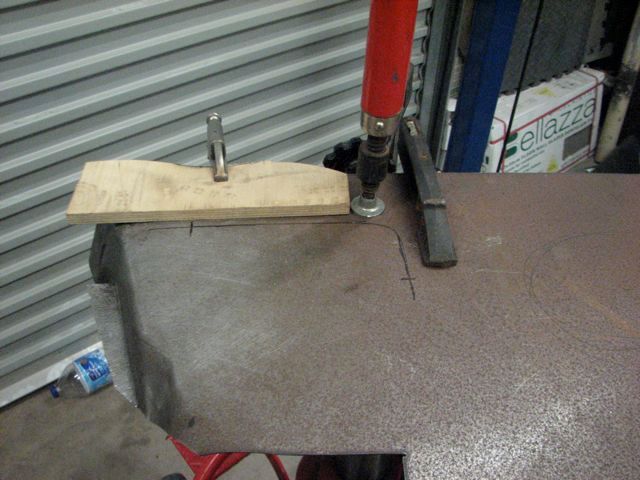
I made a wooden form out of plywood. This only took about 30mins with a jigsaw and lots of cardboard to get the right template before cutting.
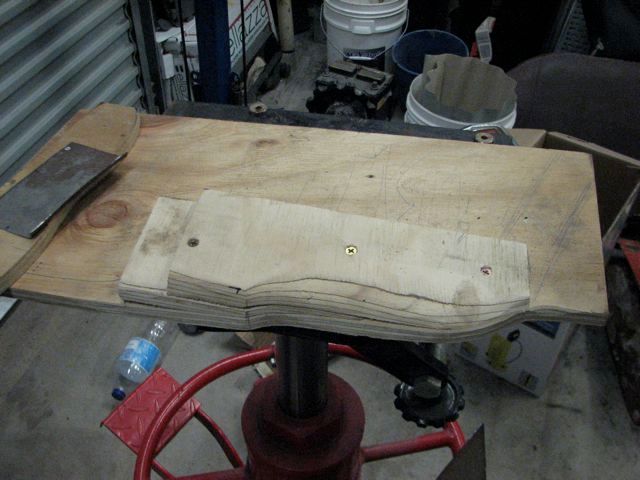
I sandwhiched the panel between the form and another piece of plywood and started hammer the metal over the form.
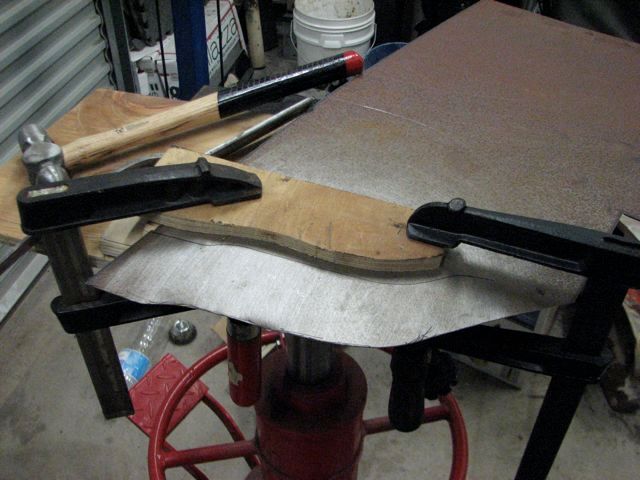
You will see below that my metal did not follow the curve of the form very well, this is because I was too lazy and didn't take my time hammering neatly over the form. It also meant that I had to spend a lot of time hammering the shape with a dolly to get some more radius into the fold.
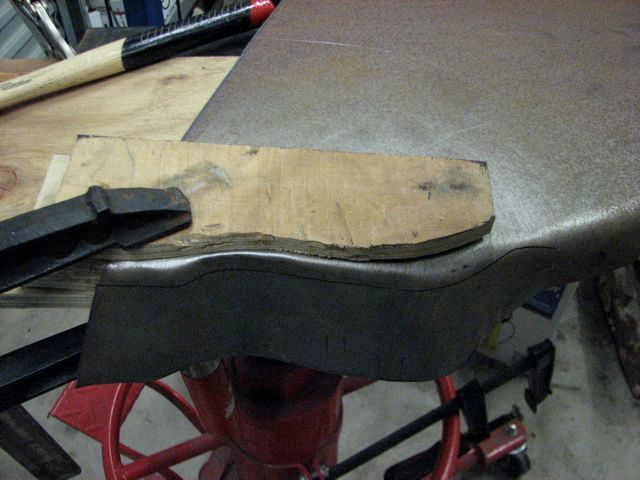
I think I had done a bit of work on the corner for this photo.
This was after adding a lot more radius into the fold and planishing the corner a lot. Essentially you place a curved dolly under the panel and hammer onto the dolly.
TIP: REMEMBER, METAL IS FORGIVING, IT CAN BE FIXED IF YOU DINT IT, JUST KEEP HAMMERING AWAY.
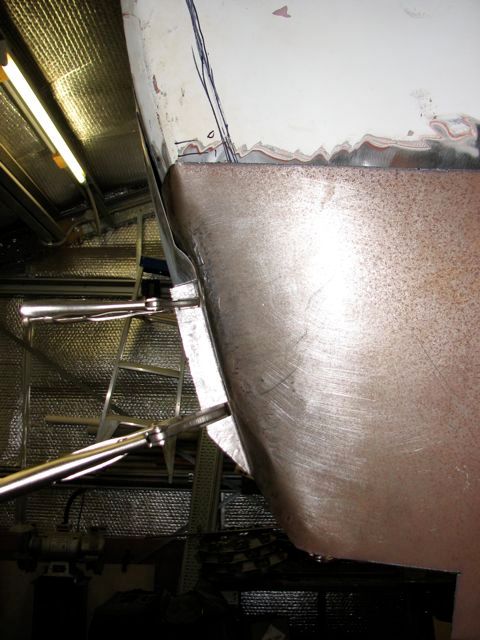
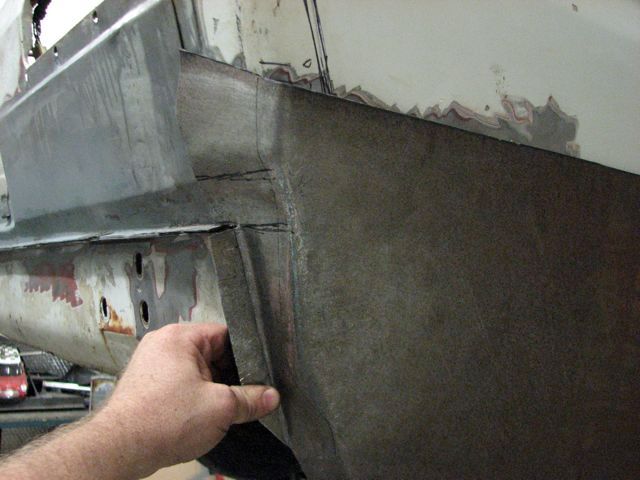
The top of my panel stuck out from the car too much and I needed to shrink the top corner to bring it in.
I started by making a puck. You grab the metal with a pair of pliers and twist. Then repeat the other way.
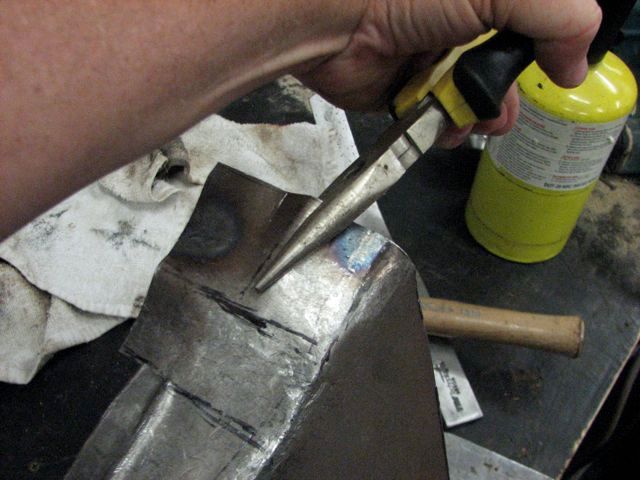
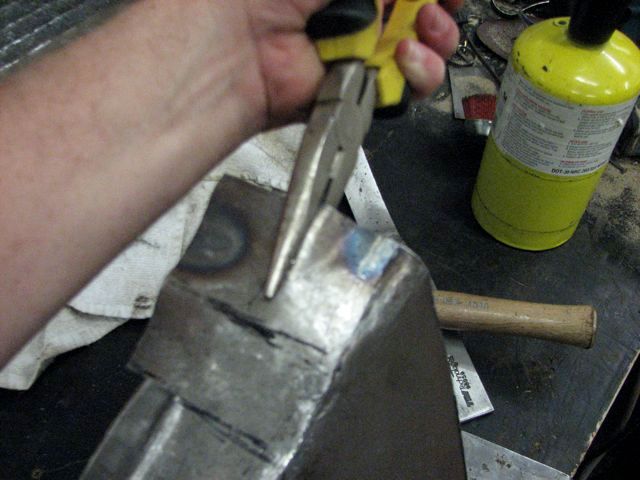
Then as before, you heat till blue and hammer flat.
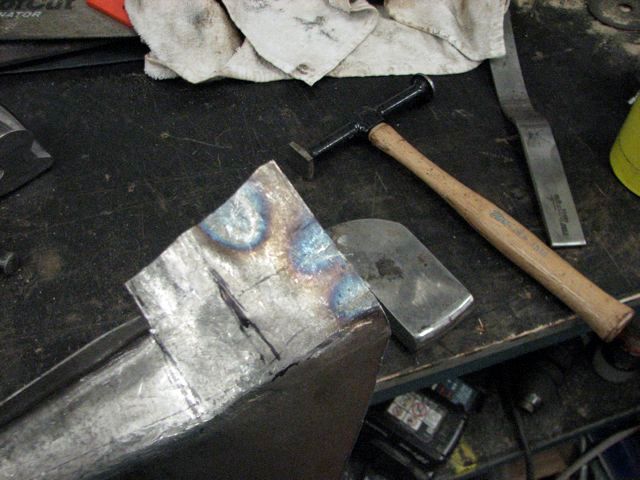
Remember that tip above? METAL IS FORGIVING.
I put the flange in at the wrong angle, so hammered it flat and put a new flange in.

Can barely tell where the previous flange was, bit of planishing and sanding (I don't sand till the very end, leaves you with more metal to play with) and you will never know
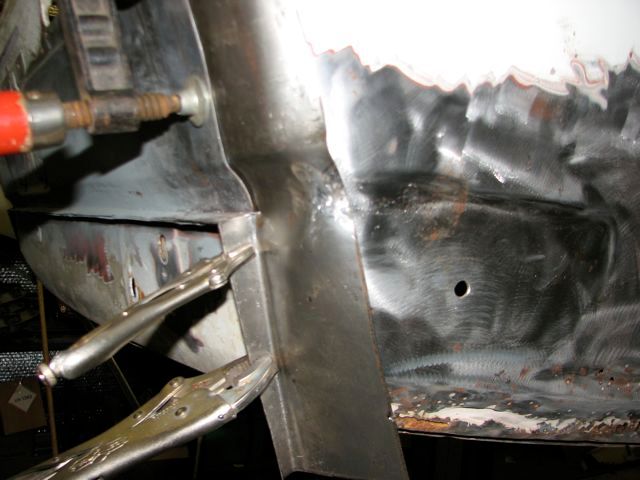
Here I had started hammering the wheel arch, using the existing wheel arch as a form (see previous posts). I also marked out the original bumper recess.
I used some 6mm MDF as I needed a deeper step. I also cut the MDF so that the top of MDF was the top of the panel, made it easier to position.
Panel clamped.
I used the electrical bolster for the straights and a round hammer (hit with a second hammer) for the corners. I stepped this more then a 1/4" off for this step.
Result
Again, sharpened by flipping and doing the other side too.
Result
Started making the bottom line of the panel, I just made sure I stopped the line before the arch and before the back of the panel. Also more work on the wheel arch.
I used a dolly to flatten out the wheel arch flange.
I started folding the rear corner over, this required lots of shrinking. I reckon I could have got this corner to work, but after this point I decided to make a slit, and hammer shut and weld. But only one slit was required (don't have photo). This photo is before cutting.
More shrinking required on top of panel.
More shrinking and bottom corner after cutting and welding.
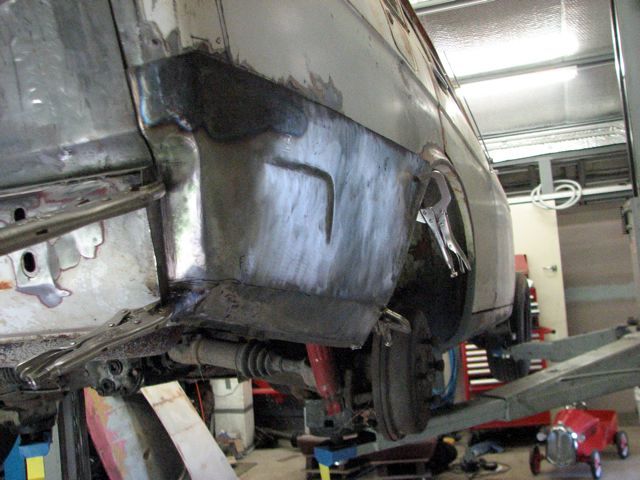
Bottom flanges folded. Just used a dolly to fold these flanges.
Few finished photos before panel is welded in.
I made a wooden form out of plywood. This only took about 30mins with a jigsaw and lots of cardboard to get the right template before cutting.
I sandwhiched the panel between the form and another piece of plywood and started hammer the metal over the form.
You will see below that my metal did not follow the curve of the form very well, this is because I was too lazy and didn't take my time hammering neatly over the form. It also meant that I had to spend a lot of time hammering the shape with a dolly to get some more radius into the fold.
I think I had done a bit of work on the corner for this photo.
This was after adding a lot more radius into the fold and planishing the corner a lot. Essentially you place a curved dolly under the panel and hammer onto the dolly.
TIP: REMEMBER, METAL IS FORGIVING, IT CAN BE FIXED IF YOU DINT IT, JUST KEEP HAMMERING AWAY.
The top of my panel stuck out from the car too much and I needed to shrink the top corner to bring it in.
I started by making a puck. You grab the metal with a pair of pliers and twist. Then repeat the other way.
Then as before, you heat till blue and hammer flat.
Remember that tip above? METAL IS FORGIVING.
I put the flange in at the wrong angle, so hammered it flat and put a new flange in.
Can barely tell where the previous flange was, bit of planishing and sanding (I don't sand till the very end, leaves you with more metal to play with) and you will never know
Here I had started hammering the wheel arch, using the existing wheel arch as a form (see previous posts). I also marked out the original bumper recess.
I used some 6mm MDF as I needed a deeper step. I also cut the MDF so that the top of MDF was the top of the panel, made it easier to position.
Panel clamped.
I used the electrical bolster for the straights and a round hammer (hit with a second hammer) for the corners. I stepped this more then a 1/4" off for this step.
Result
Again, sharpened by flipping and doing the other side too.
Result
Started making the bottom line of the panel, I just made sure I stopped the line before the arch and before the back of the panel. Also more work on the wheel arch.
I used a dolly to flatten out the wheel arch flange.
I started folding the rear corner over, this required lots of shrinking. I reckon I could have got this corner to work, but after this point I decided to make a slit, and hammer shut and weld. But only one slit was required (don't have photo). This photo is before cutting.
More shrinking required on top of panel.
More shrinking and bottom corner after cutting and welding.
Bottom flanges folded. Just used a dolly to fold these flanges.
Few finished photos before panel is welded in.
-
two_68_510s

- Supporter
- Posts: 3894
- Joined: 18 Apr 2010 11:20
- Location: Ben Lomond California
Re: Forming Panel Work
Man, if you had a shrinking tool you would be dangerous!!
Very nice hand work, really shows what can be done.
Deep Throat (5.5")
http://www.lazzemetalshaping.com/index. ... t/cat3.htm
Very nice hand work, really shows what can be done.
Deep Throat (5.5")
- prd_zm_13.jpg (125.52 KiB) Viewed 11881 times
Last edited by two_68_510s on 16 Mar 2013 11:51, edited 1 time in total.
Joel
2 '68 510 2 door sedans
'95 240SX
“We will either find a way, or make one.” – Hannibal
2 '68 510 2 door sedans
'95 240SX
“We will either find a way, or make one.” – Hannibal
Re: Forming Panel Work
I'm really surprised at how well you were able and to form the crisp definition into that bumper recess.
Very nice work, thanks again for continually sharing your experience with us, very interesting to follow.
Byron
Very nice work, thanks again for continually sharing your experience with us, very interesting to follow.
Byron
Love people and use things,
because the opposite never works.
because the opposite never works.