Shawn’s ‘72 Driver
-
tycot1

- Supporter
- Posts: 1295
- Joined: 12 Oct 2006 18:22
- Location: maple ridge, british columbia, canada
Re: Shawn’s ‘72 Driver
i forgot to mention something else. the 546 colour would call for a ground coat like a g3 which is a light grey-green. this will obviously make your colour coverage much easier and quicker, which if you are using a single stage urethane or enamel you will want to keep your build down a bit so you dont lose your body lines. you can also get a high build primer that can be reduced at a slightly different rate that will work as a pre-paint sealer and will be the correct groung coat all in one. this stuff is called dps or you can use ncp,( around same price as k38 ) they are awesome products. lordco would take the k38 back if you like this idea. anyways ill shut up.
http://bigtimemotors.ca 1972 datsun 510 220 hp ka "couped", 1971 510 westwood champ gt4 '81& "83, 1979 550 hp trans am, 1962 cadillac hrdtp, 2005 subaru sti, 1999 triumph daytona 955i.
Re: Shawn’s ‘72 Driver
Thanks Tyson,
I have started filling some of them...
The car is covered in rock chips, pretty typical of 40 years of use I'm sure. But each chip is to the metal, and I wanty to polish off each tiny rust spot right to the metal so they don't come back.
I have started filling some of them...
The car is covered in rock chips, pretty typical of 40 years of use I'm sure. But each chip is to the metal, and I wanty to polish off each tiny rust spot right to the metal so they don't come back.
Love people and use things,
because the opposite never works.
because the opposite never works.
Re: Shawn’s ‘72 Driver
Well I spent the last two days working on Shawn’s car, progress is happening. Shawn, out father and me were on the project today. Shawn got his first lesson in Bondo 101 - Basic course. To flatten panel, lay thin skim, then sand off 95% of it  truth is that ever panel has small dents, and it takes time to correct it all.
I guess the real trick to body work is to never do the same spot twice, and keep as little filler on the area to be worked on as possible. Other than my DA, my method is pretty much totally done with blocks.
Dad found a spot in the trunk with a pin hole, yet the metal around the spot looks fine - quite strange. It’s right above the muffler, who knows - maybe something happened there in years past. It’s patched now. Dad took care of the work in the welding department. Then he started some panel beating on the front valence... see below...
We decided that the front valence is not worth saving, so I'm going to install one of my fiber glass units and make it a bolt on - I haven't decided yet if I'll make the nuts captive. I've done this in the past and it works well. Of all my glass parts, this part I like the best!
I also placed a different set of front fenders on the car. These ones I picked up at Canby three years ago - $400 for the pair. They are pretty darn good, but we'll need to take the undercoat off the back side so that proper paint can be put on the in order to make them last. Also some one decided to shave the marker lights, so the hole had been filled. Shawn decided to go with the smooth no marker light look, and we glued panels over the rear quarter side marker light holes tonight. I'll fill them flat next time I'm out there.
Car is coming along. I still have to decide what hood to use. There are a couple of options available to me. A spare that I painted for the Bronze which didn't get used, the yellow one that came on the car (many coats of paint and some bondo...), and I have one more that needs a little work but is all original in the paint department so no real surprises.
Jason made an offer that I can't refuse for the 5 spd, but I forgot to let Shawn know about it - I'll do that next time we talk - thanks Jason. I dug out a manual pedal box from a past parts car, so aside from the hydraulic parts and line, we're good to go.
Photo's in the next post...
Love people and use things,
because the opposite never works.
because the opposite never works.
Re: Shawn’s ‘72 Driver
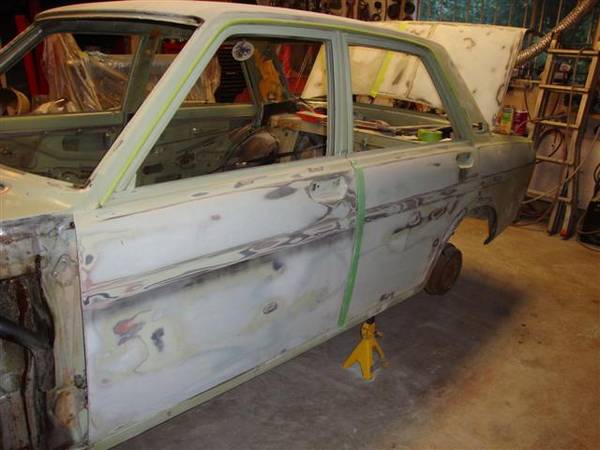
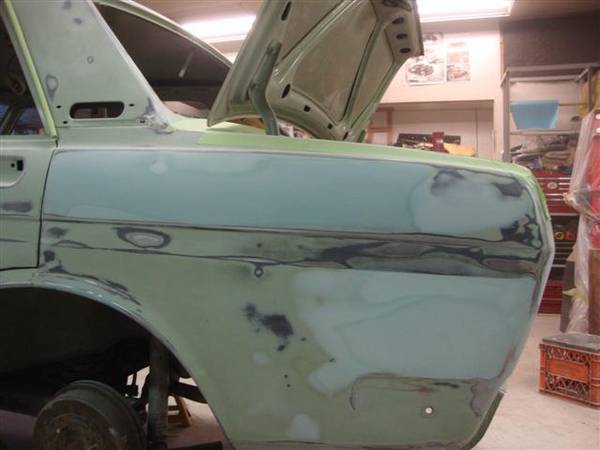
Drivers side up to the doors ready for the K38, you can see where I was blocking out the "phantom" body l;ine below the supersonic line - it's easy to loose this one, especially on panels with more than one layer of paint.
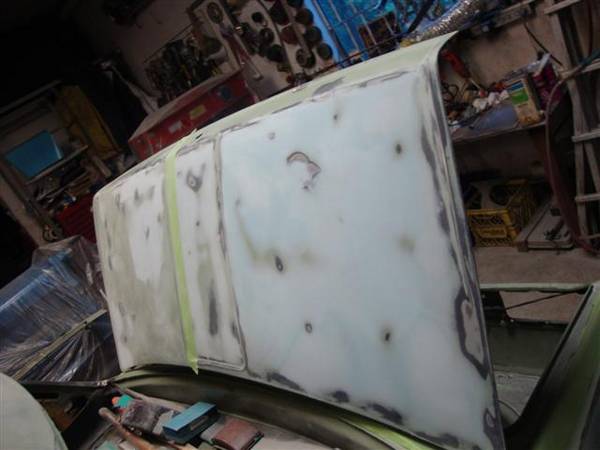
Shawn’s first hand at flattening panels – his trunk lid, 2/3ds done…
I got going on the pass side rear quarter and the top section of the door. The car was riddled with little stone chips, and if you sanded to the metal each had a little rust spot under the paint, so this is why all the polished off spots on the car – sometimes I think I should have just bought a couple hundred dollars of paint removing wheels and started from the metal up!

I think I’m throwing in the towel on this valence panel – it’s not rusty, and I’ve fixed worse, but since I have a lass replacement, it’ll just be faster to replace this panel and call it done…

No photos, but dad spent the time to polish the metal on the inner fenders, and then applied a coating of rust mort on anything that even started to look like surface rust. He also did most of the area inside the cowl vent cavity; Just a preventative step to preserving the car a bit longer.
Shawn’s first hand at flattening panels – his trunk lid, 2/3ds done…
I got going on the pass side rear quarter and the top section of the door. The car was riddled with little stone chips, and if you sanded to the metal each had a little rust spot under the paint, so this is why all the polished off spots on the car – sometimes I think I should have just bought a couple hundred dollars of paint removing wheels and started from the metal up!
I think I’m throwing in the towel on this valence panel – it’s not rusty, and I’ve fixed worse, but since I have a lass replacement, it’ll just be faster to replace this panel and call it done…
No photos, but dad spent the time to polish the metal on the inner fenders, and then applied a coating of rust mort on anything that even started to look like surface rust. He also did most of the area inside the cowl vent cavity; Just a preventative step to preserving the car a bit longer.
Love people and use things,
because the opposite never works.
because the opposite never works.

Re: Shawn’s ‘72 Driver
damn you and your team of experts!
you'll have yours done before I figure out what primer to use... haha!
looks like great progress guys!
you'll have yours done before I figure out what primer to use... haha!
looks like great progress guys!
richard norrish
'68 'goon resto / '71 ice racer / '72 'goon project / '70 4-door rust pile / '67 520 project
----------------------------------------------------------------------
'68 'goon resto / '71 ice racer / '72 'goon project / '70 4-door rust pile / '67 520 project
----------------------------------------------------------------------
shardik wrote: My swap will be made of solid gold and it will run on puppy farts.
Re: Shawn’s ‘72 Driver
i'm With President Richard... your progress and motivation are making us look bad... stop or we will be forced to.... to go nyaaaaaahhhh!!! ... and do it alot.
Merlin from Datsunhistory.com
"test mule? I don't need no stinkin' test mule... Bert Vorgon is my test mule"
"test mule? I don't need no stinkin' test mule... Bert Vorgon is my test mule"
Re: Shawn’s ‘72 Driver
Byron I don't no where you get all the energy to keep all the progects going. it seems like you never slow down, but it makes some good reading.
Re: Shawn’s ‘72 Driver
Actually, the motivation and time came in the fact that I took a week’s vacation time to work on my brother’s car. I try to plan everything well up front before touching project. Then when the flag drops - no stopping till it's done.
When I start a project, I want to get it done ASAP - I hate looking at unfinished work; can’t stand worrying about it! I admit I get side tracked way too easily, so the best thing for me is to keep the nose to the grind stone, as they say. The plan was actually to paint the car this weekend, but that isn't happening. I have a couple weeks away from home this month for work, hence why I was training my brother in the ART OF BODYWORK... I'm by far no expert, but any progress is good progress. I kind relate to the book – Zen, and the art or motor cycle maintenance – interesting read. I kind of put myself in the position when I tackle projects like this – it’s a trip, not a job – and it leaves you lots of time to think while working.
It's my son's birthday today - turns one. I just finished decorating a cake for him (I baked it on Saturday between 11pm and 1am!); it's a monkey which my wife and I felt fitting for the little chap.
As for time -I live in an apartment, and rent a warehouse to use as mu workshop- strata's take care of the maintenance - Aron, Merlin and other home owner types – I’ve been there, I know you spend as much time on your homes as on your projects. It's more expensive for me, but it leave the time factor a bit more open for family and projects.
I'll be back on Shawn’s car tomorrow. I'll post progress as usual.
Byron
When I start a project, I want to get it done ASAP - I hate looking at unfinished work; can’t stand worrying about it! I admit I get side tracked way too easily, so the best thing for me is to keep the nose to the grind stone, as they say. The plan was actually to paint the car this weekend, but that isn't happening. I have a couple weeks away from home this month for work, hence why I was training my brother in the ART OF BODYWORK... I'm by far no expert, but any progress is good progress.
It's my son's birthday today - turns one. I just finished decorating a cake for him (I baked it on Saturday between 11pm and 1am!); it's a monkey which my wife and I felt fitting for the little chap.
As for time -I live in an apartment, and rent a warehouse to use as mu workshop- strata's take care of the maintenance - Aron, Merlin and other home owner types – I’ve been there, I know you spend as much time on your homes as on your projects. It's more expensive for me,
I'll be back on Shawn’s car tomorrow. I'll post progress as usual.
Byron
Love people and use things,
because the opposite never works.
because the opposite never works.
Re: Shawn’s ‘72 Driver
Well, today’s progress - got another 10 hours into the car.
I can say one thing for sure - I'd never make money at a body shop doing this for a living! And besides this - I hate body work! Only for my brother...
It's funny - his comment tonight: "I didn't think painting a car involved so much time and effort!" I didn't have the heart to tell him that this is a comparatively easy job (but Shawn will read this here now), since the car was in such good shape to begin with. I spent two years painting the Bronze! And the guys who’ve tackled truly rusty cars…
So, we ended the last work day gluing in the blanking panels for the rear marker lights - we’ve gone for the shaved look. There was some stainless lying around - dad cut up the pieces and we glued them in on Saturday so that the glue could set well and undisturbed.
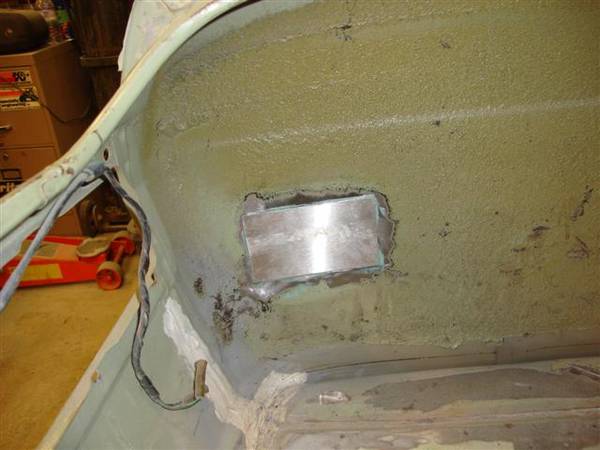
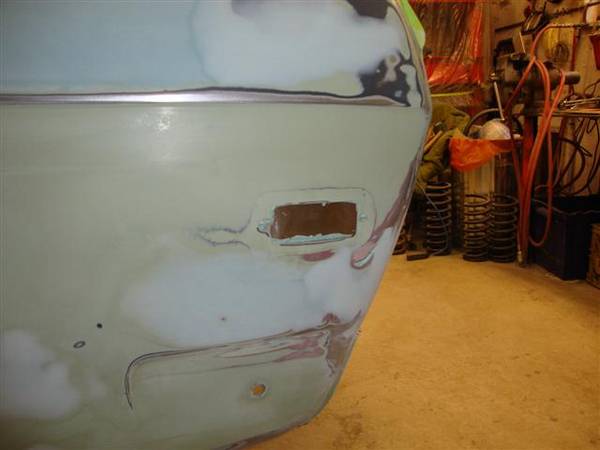
Today I started the task of filling the holes. This didn’t take too long, but as you can see blocking the fine supersonic or phantom line is always tedious. You can see the black spray bomb I used as a guide coat to find the line on the driver’s side – I was using a pencil to lay down the guide for the pass side – didn’t show in the photo...
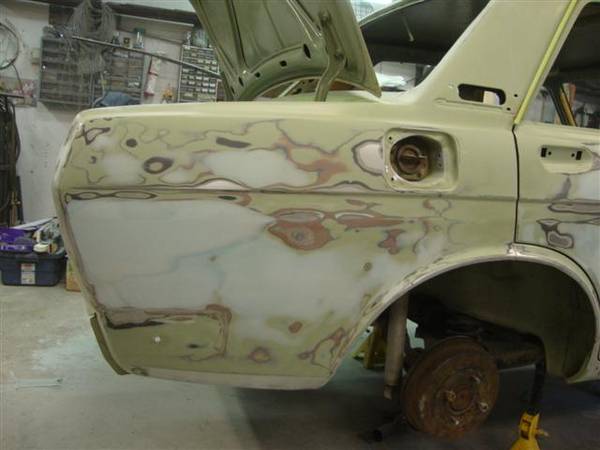
The pass rear quarter also had a different problem – someone had filled and pretty much sanded the phantom line off the car, so it was a bit of a challenge getting it back – more panel beating happening in the process as I found the high spots.
Then I moved onto the only really damaged panel on the car - the pass rear door. I thought I'd done a pretty good job of pushing out the dent, but after 3 hours of work, I realized I got it wrong. I had to off-dolly a couple high spots and then the panel "popped"… and I started all over. The various layers of filler are visible, but there isn’t a spot on this door that has more than 1/32" deep.
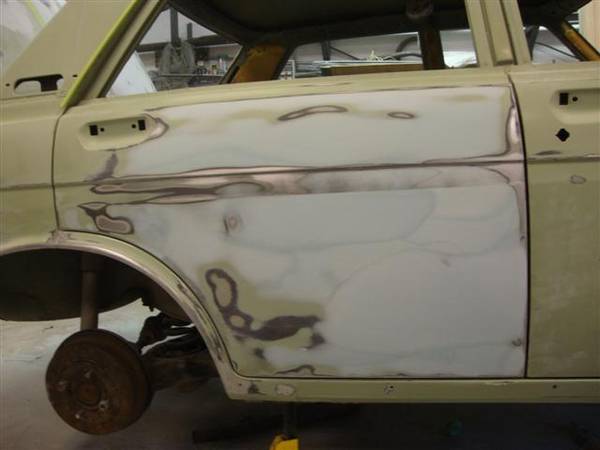
The photo doesn’t show it, but you can see the paint through the filler in most spots it's so thin… I spent 6 hours on this panel! My arms are killing me. I can't wait to go back to work and take a rest from my "week off"!
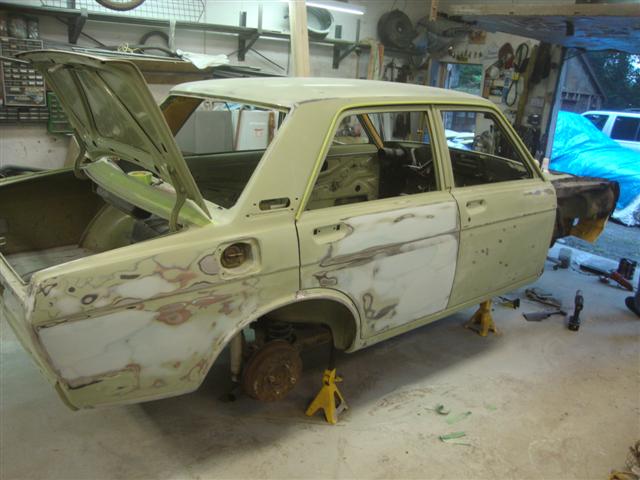
So a shot down the pass side shows my next panel to attack, we’re getting closer.
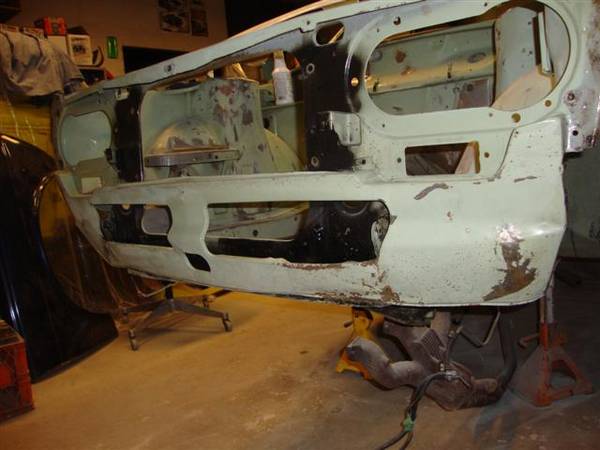
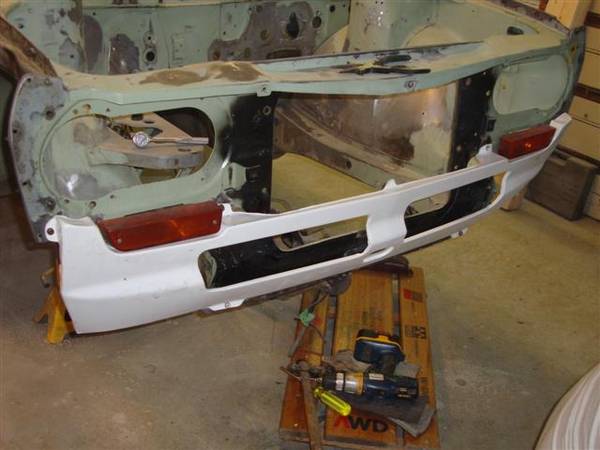
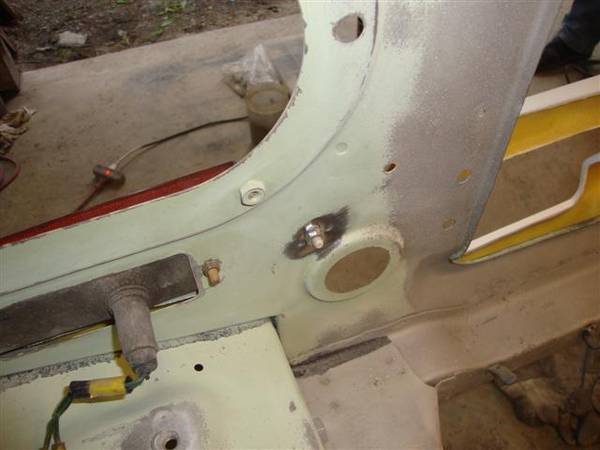
Dear old dad got to work on the one damaged panel that we decided to scrap- the front valence. He cut off the sheet metal this morning and started the fitting process. He got into it for a couple hours before getting distracted, but he’ll likely to get on it this week. It must be good to be retired and do things at your own pace. Unfortunately my time is limited, so when I’m there - I go like hell.
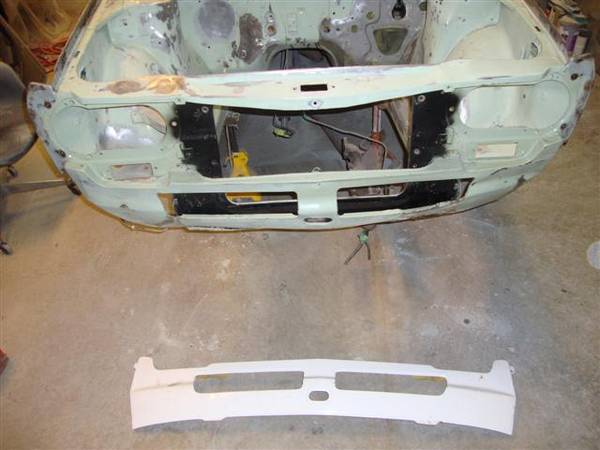
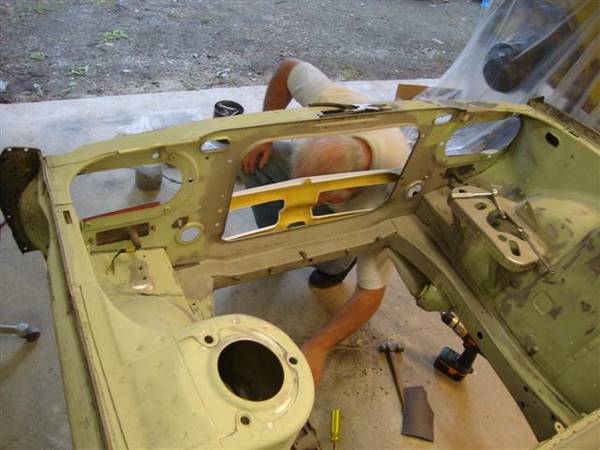
This photo shows the captive nut placement – these wil get welded into place to make this a bolt on panel. I did this with my first true resto on my green 68, and it’s a very good mod.
This past week was a good upper body work out, I can tell you that. All work has been done by hand with boards and blocks. I have a DA, but it doesn’t get used a whole lot – not too good for keeping panels flat. The boards and blocks do a pretty good job of keeping the lines, but there is a physical price. I bought a nice new 3M board last week – it is nice and the bridge is extremely stiff, so flatness is easier to obtain. However the progress is good and I can start to see the light at the end of the tunnel. I’ll be happy when we’re both blocking out the high build, and then the nerve racking, but immensely satisfying job of putting down the colour
I can say one thing for sure - I'd never make money at a body shop doing this for a living! And besides this - I hate body work! Only for my brother...
It's funny - his comment tonight: "I didn't think painting a car involved so much time and effort!" I didn't have the heart to tell him that this is a comparatively easy job (but Shawn will read this here now), since the car was in such good shape to begin with. I spent two years painting the Bronze! And the guys who’ve tackled truly rusty cars…
So, we ended the last work day gluing in the blanking panels for the rear marker lights - we’ve gone for the shaved look. There was some stainless lying around - dad cut up the pieces and we glued them in on Saturday so that the glue could set well and undisturbed.
Today I started the task of filling the holes. This didn’t take too long, but as you can see blocking the fine supersonic or phantom line is always tedious. You can see the black spray bomb I used as a guide coat to find the line on the driver’s side – I was using a pencil to lay down the guide for the pass side – didn’t show in the photo...
The pass rear quarter also had a different problem – someone had filled and pretty much sanded the phantom line off the car, so it was a bit of a challenge getting it back – more panel beating happening in the process as I found the high spots.
Then I moved onto the only really damaged panel on the car - the pass rear door. I thought I'd done a pretty good job of pushing out the dent, but after 3 hours of work, I realized I got it wrong. I had to off-dolly a couple high spots and then the panel "popped"… and I started all over. The various layers of filler are visible, but there isn’t a spot on this door that has more than 1/32" deep.
The photo doesn’t show it, but you can see the paint through the filler in most spots it's so thin… I spent 6 hours on this panel! My arms are killing me. I can't wait to go back to work and take a rest from my "week off"!
So a shot down the pass side shows my next panel to attack, we’re getting closer.
Dear old dad got to work on the one damaged panel that we decided to scrap- the front valence. He cut off the sheet metal this morning and started the fitting process. He got into it for a couple hours before getting distracted, but he’ll likely to get on it this week. It must be good to be retired and do things at your own pace. Unfortunately my time is limited, so when I’m there - I go like hell.
This photo shows the captive nut placement – these wil get welded into place to make this a bolt on panel. I did this with my first true resto on my green 68, and it’s a very good mod.
This past week was a good upper body work out, I can tell you that. All work has been done by hand with boards and blocks. I have a DA, but it doesn’t get used a whole lot – not too good for keeping panels flat. The boards and blocks do a pretty good job of keeping the lines, but there is a physical price. I bought a nice new 3M board last week – it is nice and the bridge is extremely stiff, so flatness is easier to obtain. However the progress is good and I can start to see the light at the end of the tunnel. I’ll be happy when we’re both blocking out the high build, and then the nerve racking, but immensely satisfying job of putting down the colour
Love people and use things,
because the opposite never works.
because the opposite never works.
-
two_68_510s

- Supporter
- Posts: 3894
- Joined: 18 Apr 2010 11:20
- Location: Ben Lomond California
Re: Shawn’s ‘72 Driver
Love the bolt on valance, I am at that point and I am going to do it, thanks!
I have drilled out one of them twice!!
I have drilled out one of them twice!!
Joel
2 '68 510 2 door sedans
'95 240SX
“We will either find a way, or make one.” – Hannibal
2 '68 510 2 door sedans
'95 240SX
“We will either find a way, or make one.” – Hannibal
-
blueridgespeed
- Supporter
- Posts: 121
- Joined: 11 Feb 2008 03:58
- Location: Asheville NC
Re: Shawn’s ‘72 Driver
thanks for posting this with pics. What is essentially a "cherry" original example of a 510, undergoing paint and bodywork, demonstrates well all the work involved - and why it costs so much to pay a professional to do it.
Still, it's true, most folks have NO IDEA how much work is involved to get to a top-level finish.
Congratulations on a job well-done. We look forward to the next steps, but understand that your fingerprints may need a while to re-grow after all the sanding.
Is most of this at the 180 and 220-grit phase right now?
Re: Shawn’s ‘72 Driver
Your right, until you’ve done it, you really have no idea! I’ll keep the pics coming. I’ve been out of town, so no progress on my part. Shawn has been out there, though…blueridgespeed wrote:thanks for posting this with pics. What is essentially a "cherry" original example of a 510, undergoing paint and bodywork, demonstrates well all the work involved - and why it costs so much to pay a professional to do it.
And this won’t be a top level finish. However since my brother has got involved, he to had no idea. I told him the other day that he should keep the “imperial beater” for the bad days. He laughed, knowing the work that’s being put into this car.blueridgespeed wrote:Still, it's true, most folks have NO IDEA how much work is involved to get to a top-level finish.
Actually I’m taking this down to 280 grit before the high build. I have a few sanding marks now showing up on the Bronze, and I know it’s because the high build is shrinking into the rough sanding marks. It may not look like it, but there is hardly any filler on this car. What you see is so paper thin. So I’ll spend the time to get it down a little finer, then high build and block flat. This is a really forgiving colour, so I don’t think I’ll have any problem.blueridgespeed wrote:Congratulations on a job well-done. We look forward to the next steps, but understand that your fingerprints may need a while to re-grow after all the sanding.
Is most of this at the 180 and 220-grit phase right now?
Thanks for the kind comments, really it keeps me going. I’ll be the first to admit I absolutely HATE bodywork! Only because it’s my brother am I here doing this. But it will look very cool, especially with these wheels. I can’t wait to see it painted, and better yet to see my brother drive it down the road.
Byron
PS The Datsport Package arrived today – Yeah! But no one was home to accept it - Booooo! I’ll pick it all up tomorrow afternoon after work. I can’t wait to see all that rubber in packages
Love people and use things,
because the opposite never works.
because the opposite never works.
-
tycot1
- Supporter
- Posts: 1295
- Joined: 12 Oct 2006 18:22
- Location: maple ridge, british columbia, canada
Re: Shawn’s ‘72 Driver
looks good guys. have you been keeping an hour count? most 510 restos we do take anywhere from 250- 600 hours, which usually doesnt include any assembly. if you are worried about beating the sanding scratches you may want to put down a guide coat between each grit. the coat will sit in the scratches so you know where you are at. sinkage sucks balls. tyson.
http://bigtimemotors.ca 1972 datsun 510 220 hp ka "couped", 1971 510 westwood champ gt4 '81& "83, 1979 550 hp trans am, 1962 cadillac hrdtp, 2005 subaru sti, 1999 triumph daytona 955i.
Re: Shawn’s ‘72 Driver
Eh Tyson,tycot1 wrote:looks good guys. have you been keeping an hour count? most 510 restos we do take anywhere from 250- 600 hours, which usually doesnt include any assembly. if you are worried about beating the sanding scratches you may want to put down a guide coat between each grit. the coat will sit in the scratches so you know where you are at. sinkage sucks balls. tyson.
Thanks, that's exactly what I was doing. I just have a can of semi gloss black that I'me guide coating with. I'm also using this to block in the second phantom supersonic line.
I should sit down and count the hours before it’s too late. At this point I think I can add up all three guys time – I may be surprised as I don’t feel I’ve put too much in. But if I added it up, I’ll bet that hour count is getting high already!
Byron
Love people and use things,
because the opposite never works.
because the opposite never works.

Re: Shawn’s ‘72 Driver
Looks awesome Byron!!!!!!!!!! I didn't expect you guys to restore it! Wait yeah I did 
When are you guys working on it next? Maybe I can plan a trip up there to help.
When are you guys working on it next? Maybe I can plan a trip up there to help.
"People don't like it when shit doesn't match their rule of thumb." Sam