I'll be on it this Sunday again. I appreciate the offer, but 6 hours of driving.....that seems like a lot. You would be welcome to drop in anytime, but that's a real comitment.
Saw the pis of your 68 - so one's now black, the other teal - looks good! Actually looks great. I love your 68 2 doors, man.
Byron
Shawn’s ‘72 Driver
Re: Shawn’s ‘72 Driver
Love people and use things,
because the opposite never works.
because the opposite never works.
Re: Shawn’s ‘72 Driver
I haven't updated in a while, but we're still going at it - man it's taking a long time…
Put another day into the car today after a two week hiatus (real work as in my daily job!), I spent the day on one half of the hood - that's right, one half! I hat guys who walk across body panels!
Anyways, there is a lot of time in the hood, this is day two on this panel for me, and I think Shawn spent a day or two stripping it of no less than 7 layers of different paint and primer. On top of this, the pass side corner of the hood had been hit, poorly hammered out and filled with bondo in a previous life.
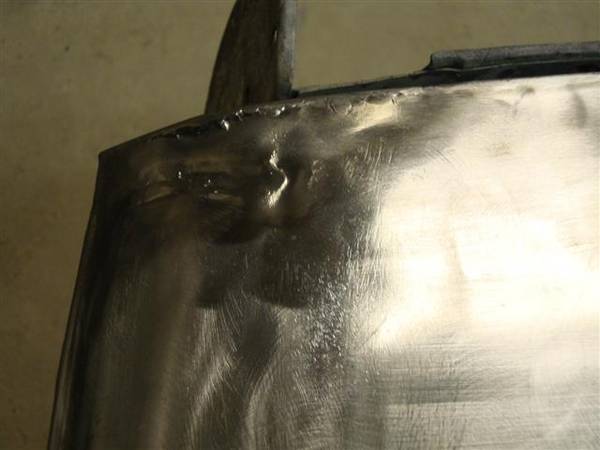
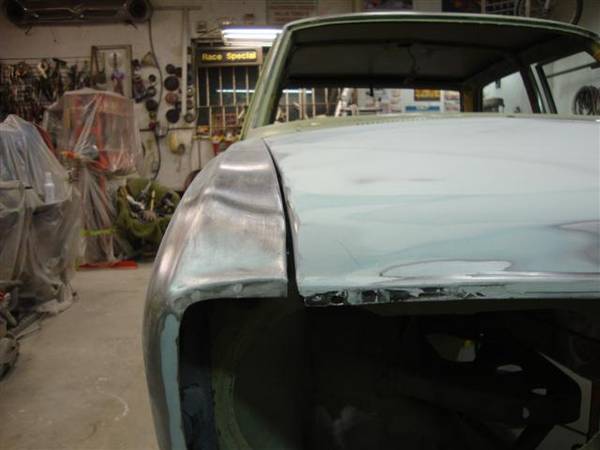
Backing up about as month ago, my father and I spent the better part of four hours aligning the front fenders and hood, which took some work, and extra adjustments added into the hinges to get it all right again. Then we worked on the hood. The damaged front corner is near impossible to reach as the frame on the bottom of the hood prevents access; So we welded a 1/8X1" flat stock rod to the hood, perpendicular to the hood surface and the mounted a slide hammer to this, pulling out a good portion of the dent. But without cutting away the inner frame, this was as far as we could go. Not wanting to fill over a corner (bondo has no strength, so this is a bad idea), I Mig welded a bead of metal to the outer edge, and then filed this back to match the contour of the fender. This gave me a lip to fill to, leaving a metal edge for strength. This is the best I could come up with. I hate to fill a dent, but I didn’t want to go to the effort of removing the inner frame - been there, done that before! So this was last month...
Photos of the bead of weld to regain the proper contour of the hood:

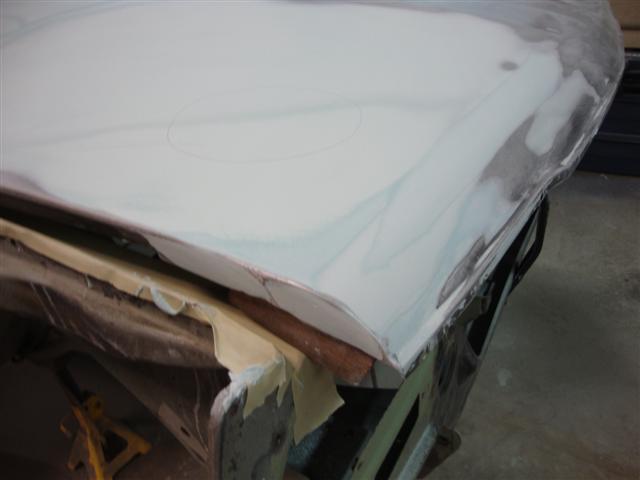
Top view:
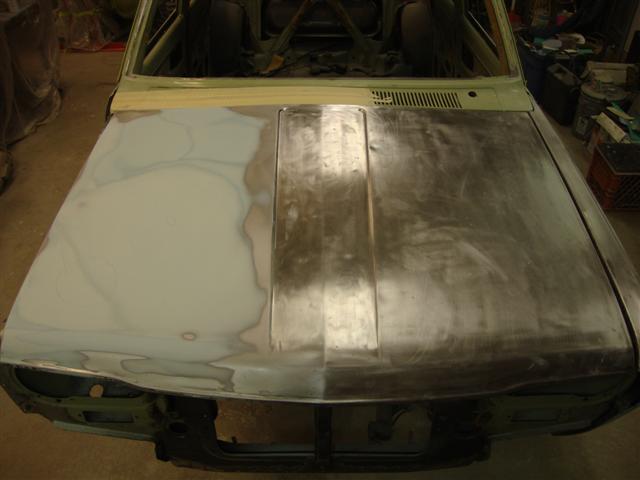
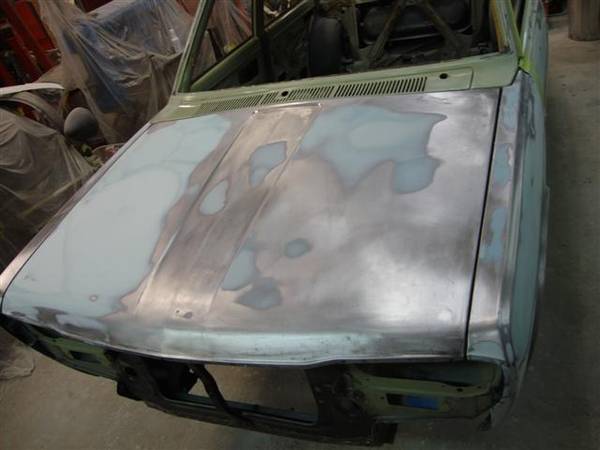
Today I started on the "making it flat routine" - a little fill here, a little fill there, more fill over here, another low spot there… - by the time I was blocking out the panel, it was filled from one end to the other on this half. I would have saved a bunch of time if I'd just covered the whole thing and sanded back to the high spots! (I keep saying this but never follow through when I start a new panel!). To me it looks as if someone was standing on this hood, as there is a low spot between all the braces on the bottom side. The photos are deceiving, it looks like a pile of bondo; but in reality it's so thin that you can see the metal panel through the filler in many spots. The other half of the hood doesn’t look near as bad, but we'll see when I get there next weekend.
The photo below shows the hood, you can see my nice metal bead along the edge – there for strength in case it ever gets knocked. I also filled the pieces of sheet metal perpendicular to the top surface – this looked horrible, and was cut and wrinkled. I welded it up, and hammered it flat as best I could, the filler here was necessary, even though I hate to fill in such a place.
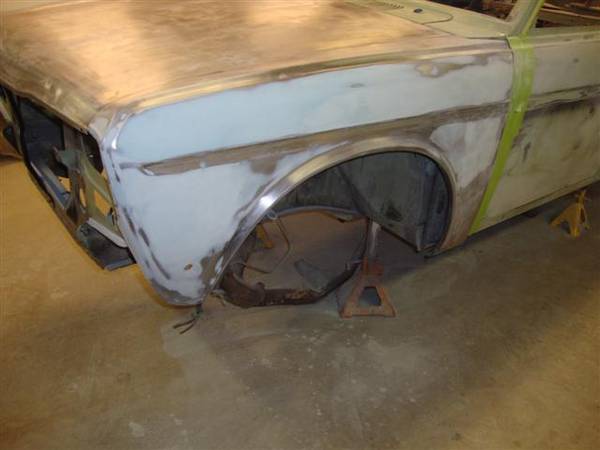
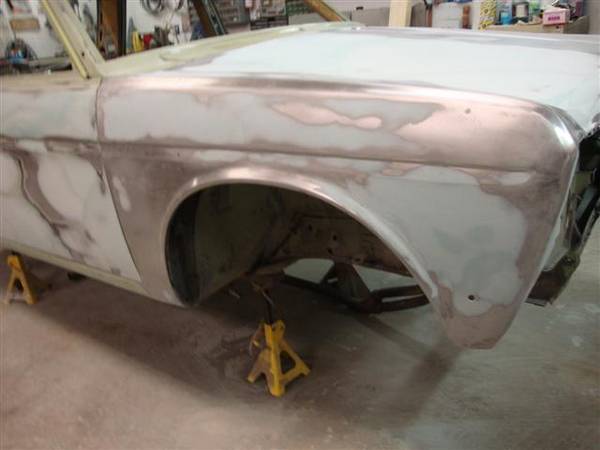
Shawn spent the day in learning Bondo 101. He worked on the driver’s fender all day. I'm certainly no body work master – in fact I absolutely HATE body work - it's just a necessary evil. So I was getting Shawn started on this fender - he spent the day sanding away. Unfortunately some previous body guy had the audacity to strip the fender's paint with an angle grinder, gouging the fender in most spots on the flattest surfaces – thank god all the edges of the body lines are untouched! So filling these rather deep grinder marks will be a must. At least there's no rust to deal with, and only a couple of minor dents. Here's his work for the day;
Shawn’s doing pretty good – I think back to the disasters that were my first attempts at body work…Onward and upward, but each day we are getting closer to the paint which was the goal! In the end we have a full body restoration which wasn’t planned, but it will last.
Put another day into the car today after a two week hiatus (real work as in my daily job!), I spent the day on one half of the hood - that's right, one half! I hat guys who walk across body panels!
Anyways, there is a lot of time in the hood, this is day two on this panel for me, and I think Shawn spent a day or two stripping it of no less than 7 layers of different paint and primer. On top of this, the pass side corner of the hood had been hit, poorly hammered out and filled with bondo in a previous life.
Backing up about as month ago, my father and I spent the better part of four hours aligning the front fenders and hood, which took some work, and extra adjustments added into the hinges to get it all right again. Then we worked on the hood. The damaged front corner is near impossible to reach as the frame on the bottom of the hood prevents access; So we welded a 1/8X1" flat stock rod to the hood, perpendicular to the hood surface and the mounted a slide hammer to this, pulling out a good portion of the dent. But without cutting away the inner frame, this was as far as we could go. Not wanting to fill over a corner (bondo has no strength, so this is a bad idea), I Mig welded a bead of metal to the outer edge, and then filed this back to match the contour of the fender. This gave me a lip to fill to, leaving a metal edge for strength. This is the best I could come up with. I hate to fill a dent, but I didn’t want to go to the effort of removing the inner frame - been there, done that before! So this was last month...
Photos of the bead of weld to regain the proper contour of the hood:
Top view:
Today I started on the "making it flat routine" - a little fill here, a little fill there, more fill over here, another low spot there… - by the time I was blocking out the panel, it was filled from one end to the other on this half. I would have saved a bunch of time if I'd just covered the whole thing and sanded back to the high spots! (I keep saying this but never follow through when I start a new panel!). To me it looks as if someone was standing on this hood, as there is a low spot between all the braces on the bottom side. The photos are deceiving, it looks like a pile of bondo; but in reality it's so thin that you can see the metal panel through the filler in many spots. The other half of the hood doesn’t look near as bad, but we'll see when I get there next weekend.
The photo below shows the hood, you can see my nice metal bead along the edge – there for strength in case it ever gets knocked. I also filled the pieces of sheet metal perpendicular to the top surface – this looked horrible, and was cut and wrinkled. I welded it up, and hammered it flat as best I could, the filler here was necessary, even though I hate to fill in such a place.
Shawn spent the day in learning Bondo 101. He worked on the driver’s fender all day. I'm certainly no body work master – in fact I absolutely HATE body work - it's just a necessary evil. So I was getting Shawn started on this fender - he spent the day sanding away. Unfortunately some previous body guy had the audacity to strip the fender's paint with an angle grinder, gouging the fender in most spots on the flattest surfaces – thank god all the edges of the body lines are untouched! So filling these rather deep grinder marks will be a must. At least there's no rust to deal with, and only a couple of minor dents. Here's his work for the day;
Shawn’s doing pretty good – I think back to the disasters that were my first attempts at body work…Onward and upward, but each day we are getting closer to the paint which was the goal! In the end we have a full body restoration which wasn’t planned, but it will last.
Love people and use things,
because the opposite never works.
because the opposite never works.

Re: Shawn’s ‘72 Driver
funny how those just seem to happen, when least expecting it!Byron510 wrote:... In the end we have a full body restoration which wasn’t planned, but it will last.
richard norrish
'68 'goon resto / '71 ice racer / '72 'goon project / '70 4-door rust pile / '67 520 project
----------------------------------------------------------------------
'68 'goon resto / '71 ice racer / '72 'goon project / '70 4-door rust pile / '67 520 project
----------------------------------------------------------------------
shardik wrote: My swap will be made of solid gold and it will run on puppy farts.
Re: Shawn’s ‘72 Driver
I know - I sit here tonight infront of the computer - my arms are burning and killing me - and that's after soakig in the tub! It's not often I see a heavy body work guy - now I know why - it's like an upper body work out all day long! Especially for guys like me who like to do every aspect of the job 4 times more than nessesary due to lack of experience and a critical eye!rnorrish wrote:funny how those just seem to happen, when least expecting it!Byron510 wrote:... In the end we have a full body restoration which wasn’t planned, but it will last.
I actually had to walk away for a couple hours mid day today as I was just getting frustrated - it worked as when I came back, I put sharpe new paper on the long board and it worked out in the end.
Byron
Love people and use things,
because the opposite never works.
because the opposite never works.

Re: Shawn’s ‘72 Driver
Byron I’m also not a big fan of doing bodywork on a project car, but every panel you do is getting you closer to paint. That’s when things start to get fun again. Keep up the good work. It will be worth it in the end when you and Shawn take it out for its first test drive.
Chad
Chad
In just two days from now, tomorrow will be yesterday.
Re: Shawn’s ‘72 Driver
Well, another 12 hour workout into the body work – even worked up a sweat a few times – man do I feel beat after a day of this!
Progress went well yesterday – got up at 6am, left the workshop at 7:30pm; I’ll call that a full day.
Thankfully the driver’s side of the hood was in better shape. There were two little dents in the center section that needed a bit of dolly work to get below the flat surface, and a fill on each – then a dent near the rear which flowed into the body seam in the center, with a couple more small dents at the front.
After my last frustrating day on the pass side of the hood, I took the long board back to it again, and filed off some more filler. It turned out pretty good, and I’m happy with the front cornet now. It’s hard to believe how thick the bondo was on this corner previously – I honestly didn’t think I was going to be able to save this panel – with all the time I spent I likely should have scrapped it. However it’s done now;
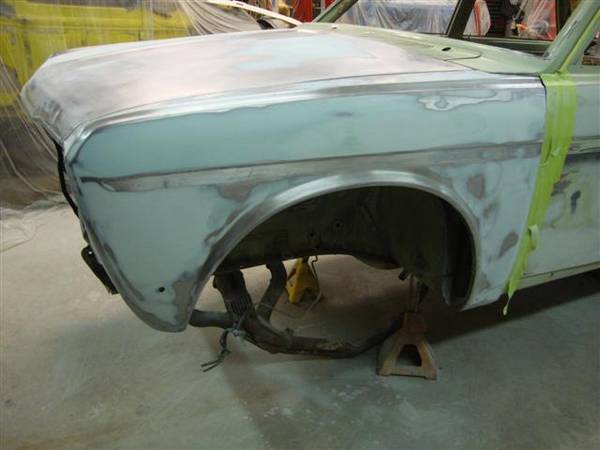
Then I turned my attention to the pass front fender. Aside from some previous moron using an angle grinder and stone to take off the paint, this panel was in pretty good shape. There was evidence of a hit. Just behind where the late style marker light used to be, however the repair showed signs of metal shrinking, so someone knew what they were doing there. It still took 4 hours to get this panel to this point, but it’s also now done;
All this time I was playing on these two panels Shawn continues to hone his own body work skills, and was at times getting frustrated himself. But I think he did a pretty good job on the fender, I really don’t think I could have done any better;
Shawn then moved onto a few little rock chips on the roof for the rest of the day.
Shawn’s wife had a door dent put into her CRV this past week, and asked him what would happen if he caught someone putting a dent in his 510 – after all this work, Shawn said he’d just calmly, and casually approach the offender… and kill him! I guess I know that the work will be appreciated.
The high build will be coming soon, then block out, then finally PAINT. It’s still a ways off, but we’re getting there.
Byron
Progress went well yesterday – got up at 6am, left the workshop at 7:30pm; I’ll call that a full day.
Thankfully the driver’s side of the hood was in better shape. There were two little dents in the center section that needed a bit of dolly work to get below the flat surface, and a fill on each – then a dent near the rear which flowed into the body seam in the center, with a couple more small dents at the front.
After my last frustrating day on the pass side of the hood, I took the long board back to it again, and filed off some more filler. It turned out pretty good, and I’m happy with the front cornet now. It’s hard to believe how thick the bondo was on this corner previously – I honestly didn’t think I was going to be able to save this panel – with all the time I spent I likely should have scrapped it. However it’s done now;
Then I turned my attention to the pass front fender. Aside from some previous moron using an angle grinder and stone to take off the paint, this panel was in pretty good shape. There was evidence of a hit. Just behind where the late style marker light used to be, however the repair showed signs of metal shrinking, so someone knew what they were doing there. It still took 4 hours to get this panel to this point, but it’s also now done;
All this time I was playing on these two panels Shawn continues to hone his own body work skills, and was at times getting frustrated himself. But I think he did a pretty good job on the fender, I really don’t think I could have done any better;
Shawn then moved onto a few little rock chips on the roof for the rest of the day.
Shawn’s wife had a door dent put into her CRV this past week, and asked him what would happen if he caught someone putting a dent in his 510 – after all this work, Shawn said he’d just calmly, and casually approach the offender… and kill him!
The high build will be coming soon, then block out, then finally PAINT. It’s still a ways off, but we’re getting there.
Byron
Love people and use things,
because the opposite never works.
because the opposite never works.
-
hammer_down

- Posts: 15
- Joined: 21 Sep 2010 13:04
Re: Shawn’s ‘72 Driver
Byron, I rescued that car from the torch and crusher here in Kennewick WA (Dry side of the state). I had it for a couple of years with the thought of doing a father-son project and so the son could have a decent car to drive to school. He didn't like the shape nor anything else about it... Hmmmmm. So he bought a 1995 Nissan pick-up for $300 and is happy with that. Meantime, the 4 door sat. I knew I was never going to get to it so offered it up to whomever wanted it, free. Jeff Hino stepped up and said that he and Frank would take it. The fenders were gone when I got it so I just threw on Fenders and hood from a Rusty 1969 car I sent to the crusher... Hey, all the picture link appear to be dead... Anyway, glad to hear it is being saved. That is all I really wanted. It was a solid chassis.
Re: Shawn’s ‘72 Driver
Hammerdown,
It will be saved. Jeff got it going mechanically, now it's a brother and brother project. It should be painted by Christmas, and will be on the road next spring. You are right, the chassis is really solid, The hood I managed to save from your old 69 car (lots of work) but I didn’t save the fenders. They are repairable, I just don't have the time.
I hope the Dastsun510.com photopost gets going soon; otherwise I'll have ot start hosting the photos again elsewhere - but I'll get 'em back somehow. Glad to hear from you, and I'll bet you're glad the car was saved from the crusher again. Jeff made me promise that I'd do the right thing with this car! We'll do our best.
Love people and use things,
because the opposite never works.
because the opposite never works.
Re: Shawn’s ‘72 Driver
Spent the afternoon making a booth out of my father’s garage, hanging up plastic all over the place - paint day tomorrow under the hood, door jambs and in the trunk, back side of the front fenders ect... man do I look forward to this, so does Shawn. Our quick two month job has drug out pretty good, here we are approaching X-mass 
I'll post pictures.
Byron
I'll post pictures.
Byron
Love people and use things,
because the opposite never works.
because the opposite never works.
Re: Shawn’s ‘72 Driver
Well, we got paint on her toady! Whoo, does it feel good to do this. Its funny when you take a on a project for paint, you, fuss, change your mind, want to re-do stuff, find things you missed or didn’t like, go back fuss some more…that eventually you just have to say “it’s good enough!” I could have kept going, but I needed to constantly remind myself that this isn’t a Concours car – it’s a driver for my brother. So with that, Shawn and I started masking the car, blowing her off, wiping her down, tacking her off again… and it’s time for DP40 followed by a couple coats of PPG Concept Acrylic Urethane in the stock colour. The day started early at 6am, and it’s now 9:22PM and I just got out of the shower. Man it was a long day, but it sure is rewarding to see paint on the car. It’s not even close to being done, but it’s getting closer! Next week we work on the reverse masking – covering up all that we just sprayed on today. Photos tell the story. And I’m very much liking the new Devilbus HVLP gun. It’s good for the waterborne paints too (which I’m not using this time – obviously since its Acrylic Enamel), and I got three tips for it so I should be covered for now. It’s not as fancy as Tyson’s new toy a couple weeks ago, but it sure is a huge step from the old Devilbus conventional siphon gun I’ve used for the past 20 years! Today’s biggest challenge was not blowing up my father’s garage (gas furnace, no fresh air intake) where we are doing this project for Shawn. Tonight it was only 2 degrees above freezing, and it didn’t feel a whole lot warmer throughout the day. So I got real proficient getting the shop up to some tropical temperature, blow out the pilot light, spray a coat of primer/paint, then turning on the exhaust fan, clear the air in the shop, calculate when I thought the fumes were below an explosive range, light the pilot light, turn on the gas furnace and get the shop back up to a tropic temperature again. Dad’s heater is huge, and since I had made a booth out of was is really a large one bay shop; that heater could take the room from 10 degrees to 25 degrees (from 50 to 80 deg F) in less than 4 minutes – it was great, worked well – you’d have sweat running off your forhead literally in a few minutes. But I’ll tell ya; I was sure nervous the first few times I lit the thing, wondering if that was my last moment on the planet!
Byron
Byron
- Attachments
-
- The "booth" as it were...1 roll of 20X100' 6mil...
- DSC01224 (Small).JPG (55.19 KiB) Viewed 3661 times
-
- DSC01226 (Small).JPG (59.06 KiB) Viewed 3661 times
-
- The 'Uber' heater that made the day possible with near freezing temps outside.
- DSC01227 (Small).JPG (44.63 KiB) Viewed 3661 times
Love people and use things,
because the opposite never works.
because the opposite never works.
Re: Shawn’s ‘72 Driver
some more...
- Attachments
-
- The last time I sprayed DP 40, I could have sworn it was a bit more green than this - this one was almost grey, but it works just the same...
- DSC01232 (Small).JPG (57.78 KiB) Viewed 3660 times
-
- DSC01230 (Small).JPG (33.66 KiB) Viewed 3660 times
-
- DSC01228 (Small).JPG (58.54 KiB) Viewed 3660 times
Love people and use things,
because the opposite never works.
because the opposite never works.
Re: Shawn’s ‘72 Driver
and more...
- Attachments
-
- Mixing the toxic mess that makes the cars look so good. The 3M respirator has served me well over the years - with a clean shaven face, I don't get the slightest whiff of the paint at all.
- DSC01233 (Small).JPG (35.76 KiB) Viewed 3659 times
-
- DSC01241 (Small).JPG (58.72 KiB) Viewed 3659 times
-
- DSC01242 (Small).JPG (46.76 KiB) Viewed 3659 times
Love people and use things,
because the opposite never works.
because the opposite never works.
Re: Shawn’s ‘72 Driver
still more...
- Attachments
-
- After the second coat on the bottom side of the hood.
- DSC01255 (Small).JPG (38.91 KiB) Viewed 3657 times
-
- DSC01256 (Small).JPG (42.1 KiB) Viewed 3657 times
-
- My only sag - not bad for a rusty old guy!
- DSC01258 (Small).JPG (33 KiB) Viewed 3657 times
Love people and use things,
because the opposite never works.
because the opposite never works.
Re: Shawn’s ‘72 Driver
I painted the edges of the front fenders and valence panel as I intend to mount them all on the car and paint it whole, this way everything has paint where it needs to be, even between the panels. I even put a good coat of paint on top of the front box section just under the top of the front fenders, to help with corrosion in the future.
- Attachments
-
- DSC01271 (Small).JPG (40.48 KiB) Viewed 3656 times
-
- DSC01261 (Small).JPG (39.49 KiB) Viewed 3656 times
Love people and use things,
because the opposite never works.
because the opposite never works.
Re: Shawn’s ‘72 Driver
And lastly... the engine bay turned out good. But man is it hard getting paint on all surfaces of that damn battery tray and it's supports! I was spraying from up under the car, through the head light hole, even through the signal light hole - and I'm hoping I got it all. I'll have to wait until I can get out there next weekend to make sure.
- Attachments
-
- DSC01265 (Small).JPG (52.63 KiB) Viewed 3653 times
-
- DSC01268 (Small).JPG (44.14 KiB) Viewed 3653 times
Love people and use things,
because the opposite never works.
because the opposite never works.