Stu's 1972 4 Door
Re: Stu's 1972 4 Door
Nice touch.

Re: Stu's 1972 4 Door
I hope you agree that imitation is the sincerest form of flattery? Stealing this for sure... not sure where the heck I can find one like that or similar, but I love that it seems almost period correct.
Regards,
Owen
70 Datsun 510 2 door - SR20DET - https://www.the510realm.com/viewtopic.php?t=34572
64 Studebaker Daytona - Supercharged 289 4 speed
65 Sunbeam Tiger MkI
Owen
70 Datsun 510 2 door - SR20DET - https://www.the510realm.com/viewtopic.php?t=34572
64 Studebaker Daytona - Supercharged 289 4 speed
65 Sunbeam Tiger MkI
Re: Stu's 1972 4 Door
By all means, copy away. I am lucky that there are three pick-n-pulls in my area, so am able to roam when I need inspiration. I also have alerts for cars I ‘want’ to pick through. But if you ever want to pay too much for an OEM part is 67860-06F10.
Stu
1972 4-door 510
2004 Volvo V70R 6spd manual
Factory Five Racing Cobra
1991 Ford F250 4x4 extended cab
2005 Mini Cooper S - death via forklift :(
1972 4-door 510
2004 Volvo V70R 6spd manual
Factory Five Racing Cobra
1991 Ford F250 4x4 extended cab
2005 Mini Cooper S - death via forklift :(
Exhaust installed
Took the car to my muffler local shop to get the exhaust installed today. When I originally got the car, it had an Ermish 2.25" exhaust system in boxes so it made for a great start for the shop to use. The flowmaster muffler that came in the kit is super cool, but I know it would be louder than I wanted, so I bought a Holley Red Hot glasspack resonator to add to the system.


V bands are installed at the flex pipe and right at the rear cross member so when I need to work on something like the driveline, I can drop the exhaust. The tailpipe is just the simple slash cut pipe that came with the kit.


I might take the rear section off to smooth the tailpipe weld and put some aluminum exhaust paint on to gussy it up a bit without too much bling
V bands are installed at the flex pipe and right at the rear cross member so when I need to work on something like the driveline, I can drop the exhaust. The tailpipe is just the simple slash cut pipe that came with the kit.
I might take the rear section off to smooth the tailpipe weld and put some aluminum exhaust paint on to gussy it up a bit without too much bling
Stu
1972 4-door 510
2004 Volvo V70R 6spd manual
Factory Five Racing Cobra
1991 Ford F250 4x4 extended cab
2005 Mini Cooper S - death via forklift :(
1972 4-door 510
2004 Volvo V70R 6spd manual
Factory Five Racing Cobra
1991 Ford F250 4x4 extended cab
2005 Mini Cooper S - death via forklift :(
Re: Stu's 1972 4 Door
Nice. I have been contemplating the Ermish kit.
Are you using the hanger location right in front of the rear crossmember?
Does the LR half shaft clear at full extension?
Are you using the hanger location right in front of the rear crossmember?
Does the LR half shaft clear at full extension?
Re: Stu's 1972 4 Door
Stu , very impressive sir . Looking for clean
1971 PL510 4DOOR AUTO
1969 PL510 WAGON 4SPD
1969 PL510 2DR 4SPD
1969 PL510 WAGON 4SPD
1969 PL510 2DR 4SPD
Re: Stu's 1972 4 Door
I think the kit was a great start, but since I have the SR20 and the kit is for an L series, I'm not sure if it is 'required'.
I used a Summit Racing Weld-On Exhaust Hanger SUM-610330 at the cross member. I welded a couple of nuts right next to the exhaust pass-through way back when I modified the crossmember.

I think it will clear at full droop since Ermish plans for this type of thing.
Thanks!
Stu
1972 4-door 510
2004 Volvo V70R 6spd manual
Factory Five Racing Cobra
1991 Ford F250 4x4 extended cab
2005 Mini Cooper S - death via forklift :(
1972 4-door 510
2004 Volvo V70R 6spd manual
Factory Five Racing Cobra
1991 Ford F250 4x4 extended cab
2005 Mini Cooper S - death via forklift :(
some exhaust noises, a Steering Wheel, and trunk carpet
Here is a video of the exhaust. It is not super quiet, but I think it sounds good and am looking forward to getting it out on the road to see how it really sounds.
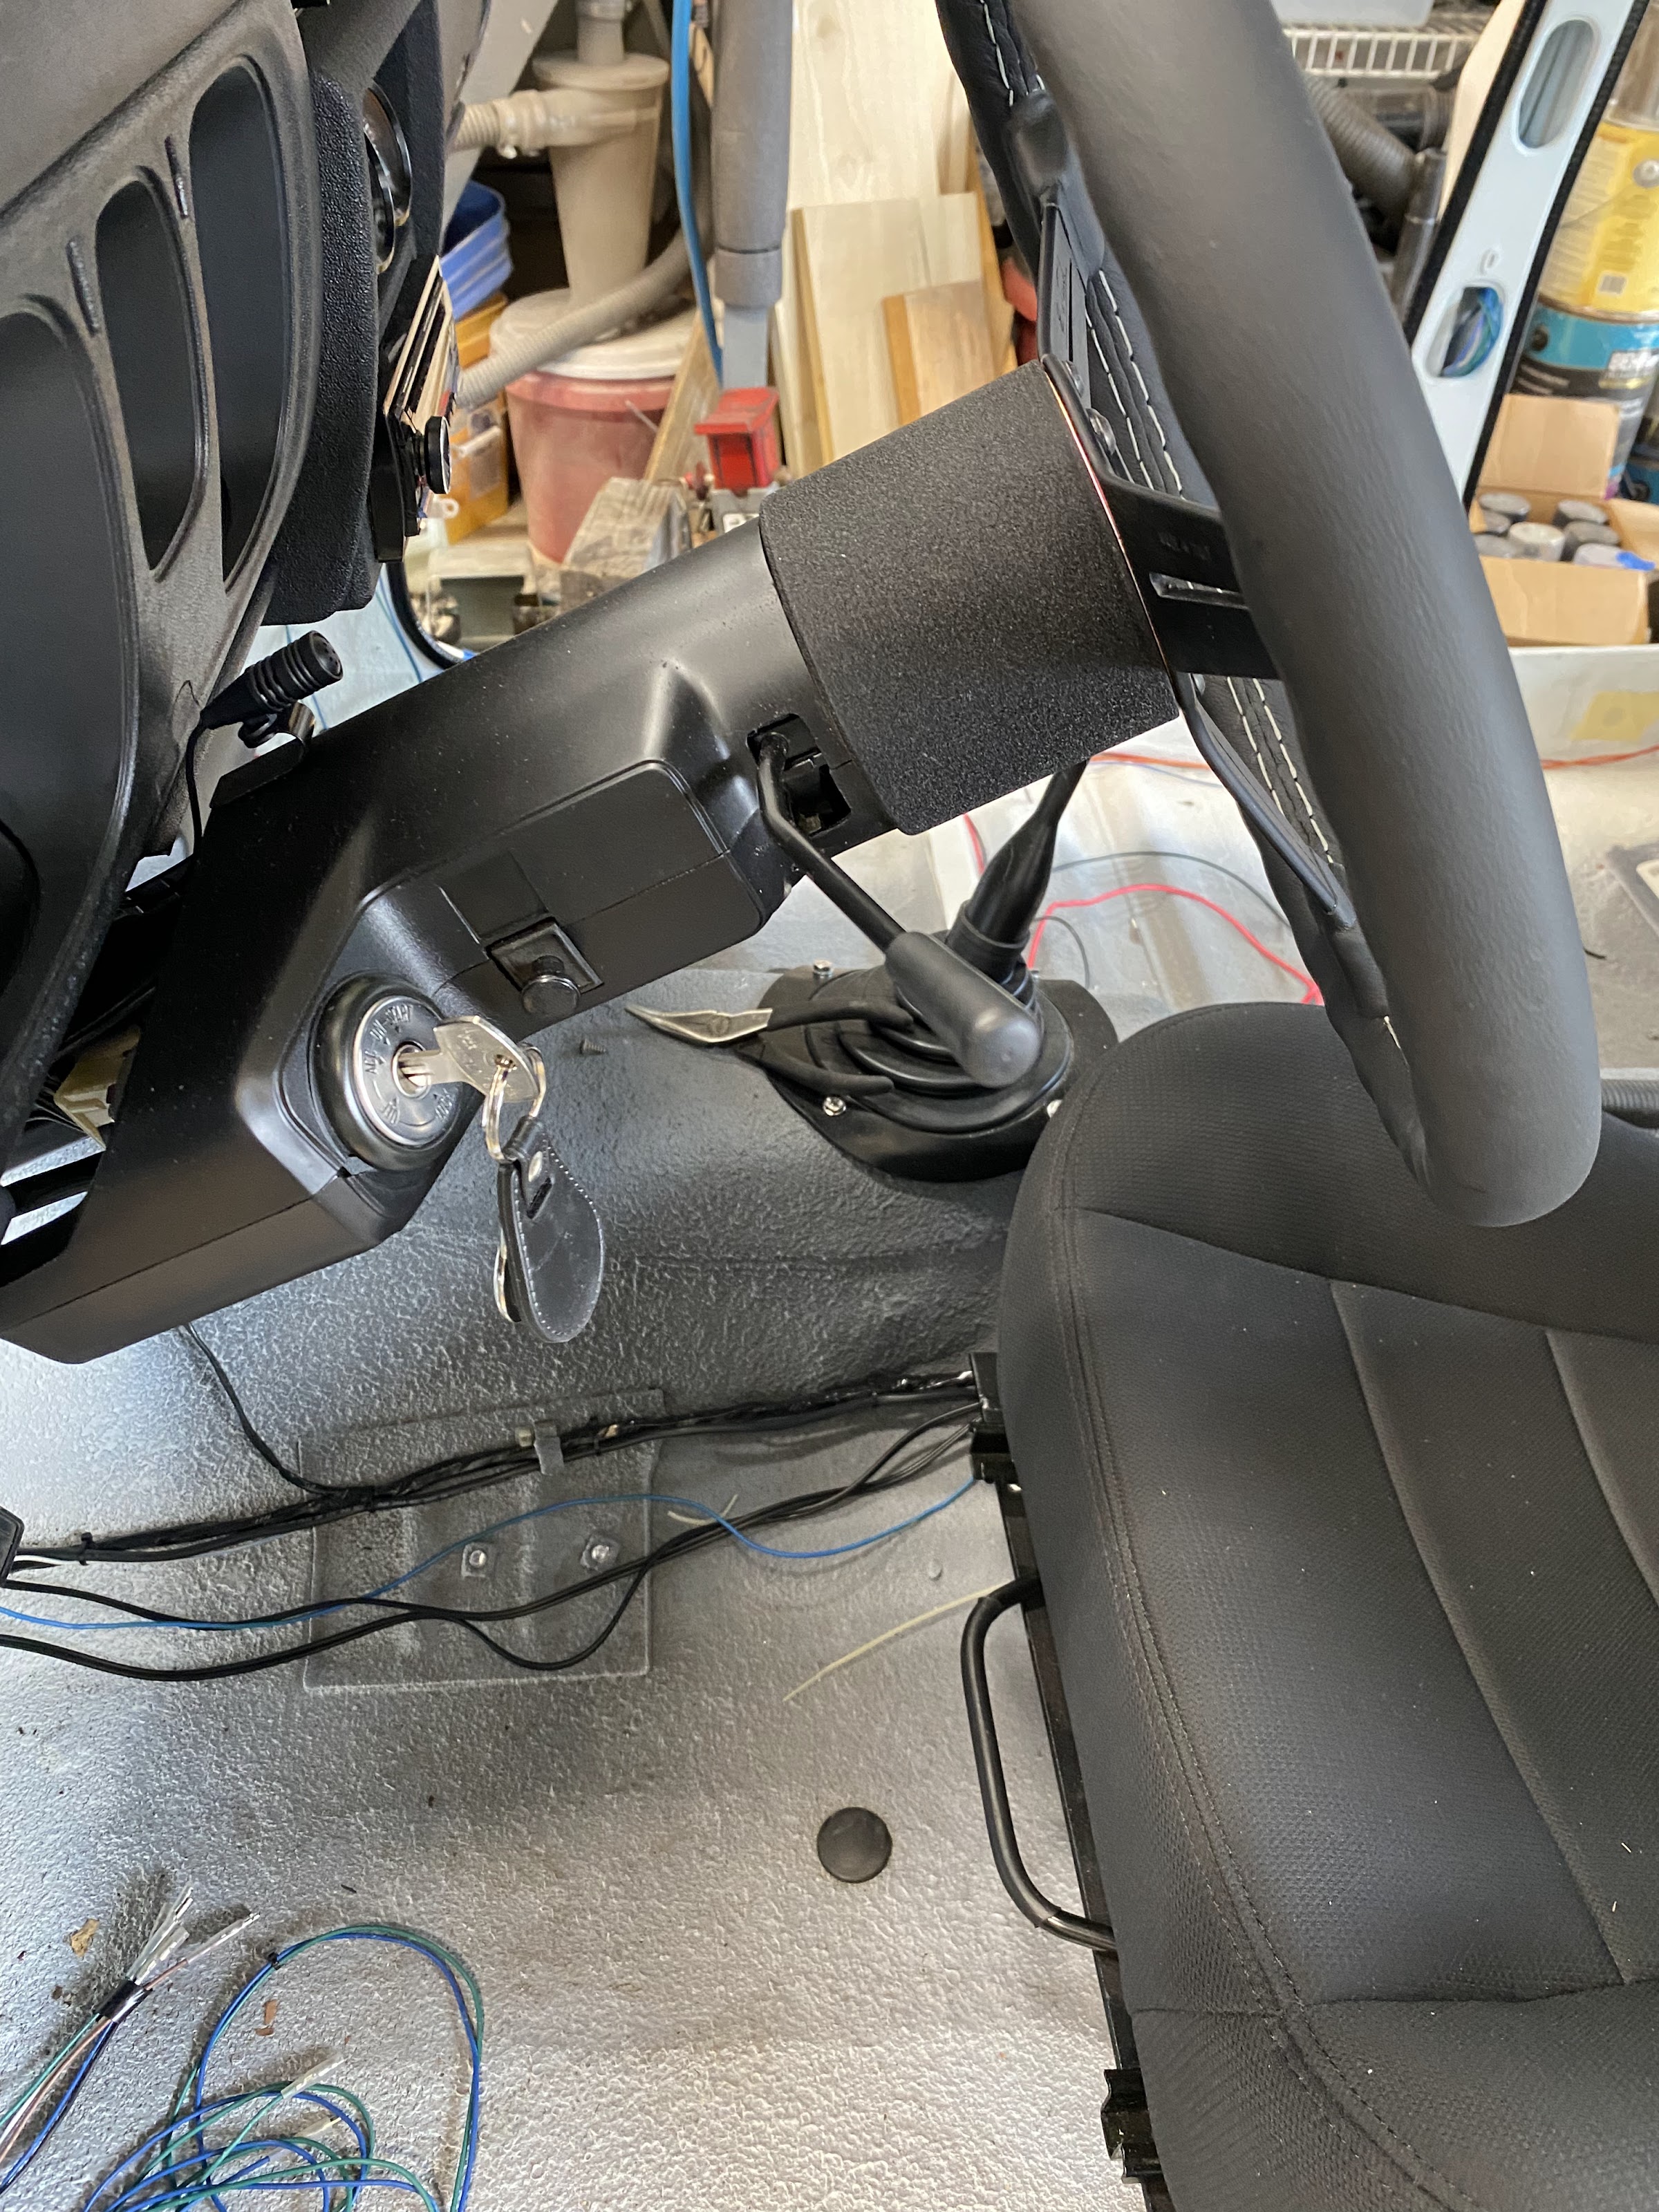
My car came with a Grant GT steering wheel and while 80s retro cool, I've never been a big fan of the Grant GT. I ended up getting a Nardi Steering Wheel - Classic - 360mm (14.17 inches) - Black Leather with Grey Stitching - Black Anodized Spokes - Part # 6061.36.2001, a Datsun horn button on eBay, and a Boss steering adapter. I was hoping that the Boss hub would not be too bad since they are considerably cheaper than others that would fit the Nardi bolt pattern (bigger than Momo or NRG), but woof, it is cheap and the rubber cover is really short and poorly made. So, off to modification land I go.
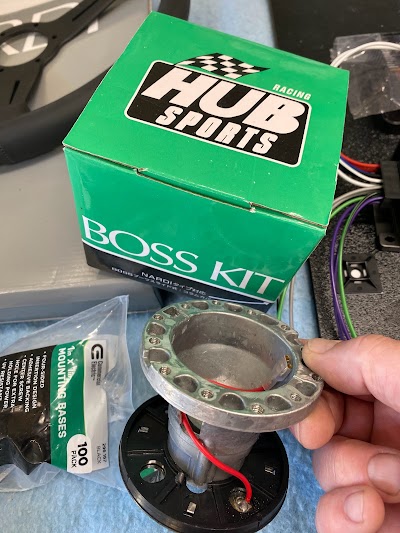

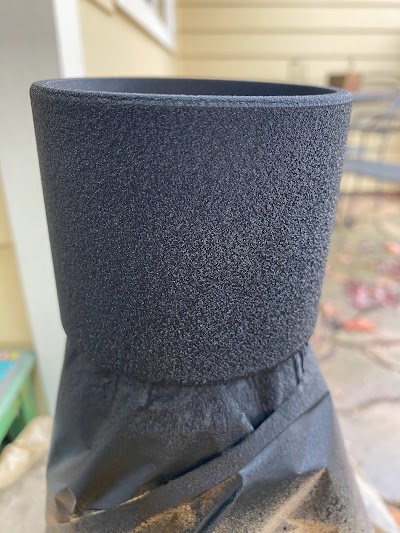
I grabbed a piece of 3.5" OD x 0.2" wall thickness aluminum tubing, turned the OD to clean up the surface, bored the ID deep enough to press onto the hub, cut it to length, bead blasted, then painted with wrinkle paint. I have never had luck with the wrinkle unless forced with a heat gun. I used a small traffic cone on a lazy susan so I could spin to paint and dry.


I then added 1/8" roll pins for the turn signal canceling mechanism interface and trimmed the OD of the horn ring so it would fit inside the aluminum tube


The horn button needed a separate ground

I replaced the bolts and bolt cover that came with the Nardi wheel with button head screws

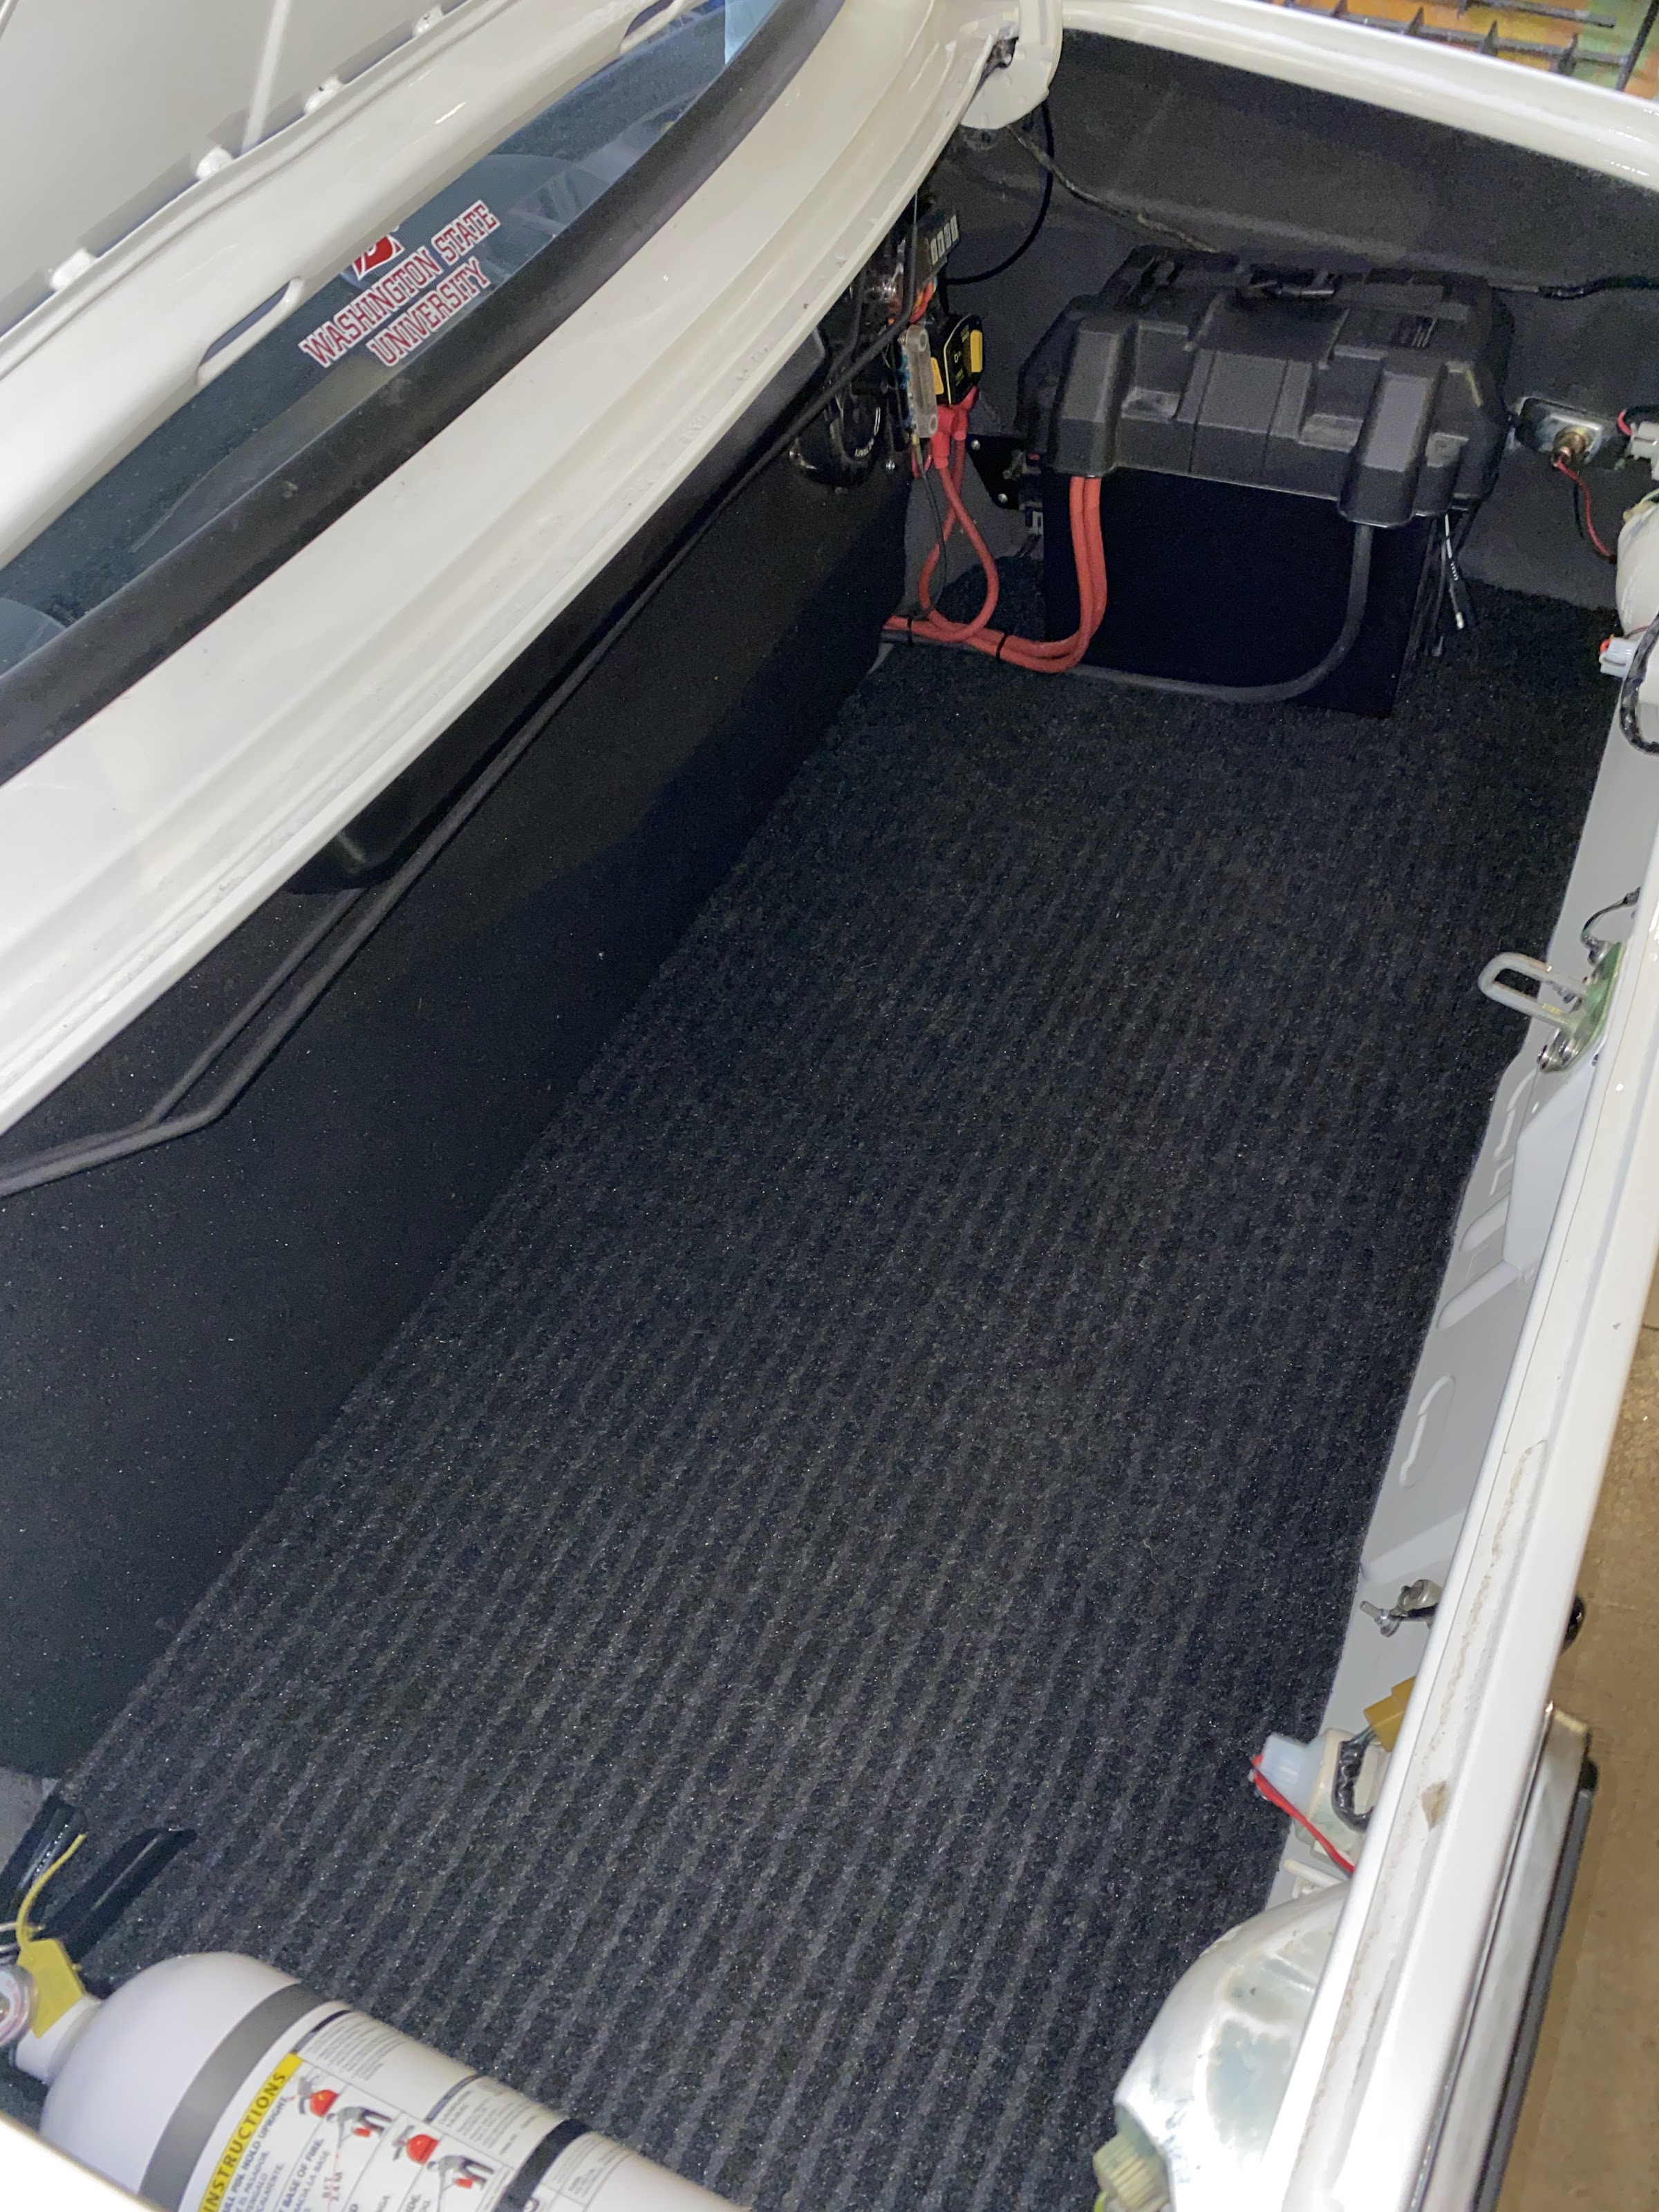
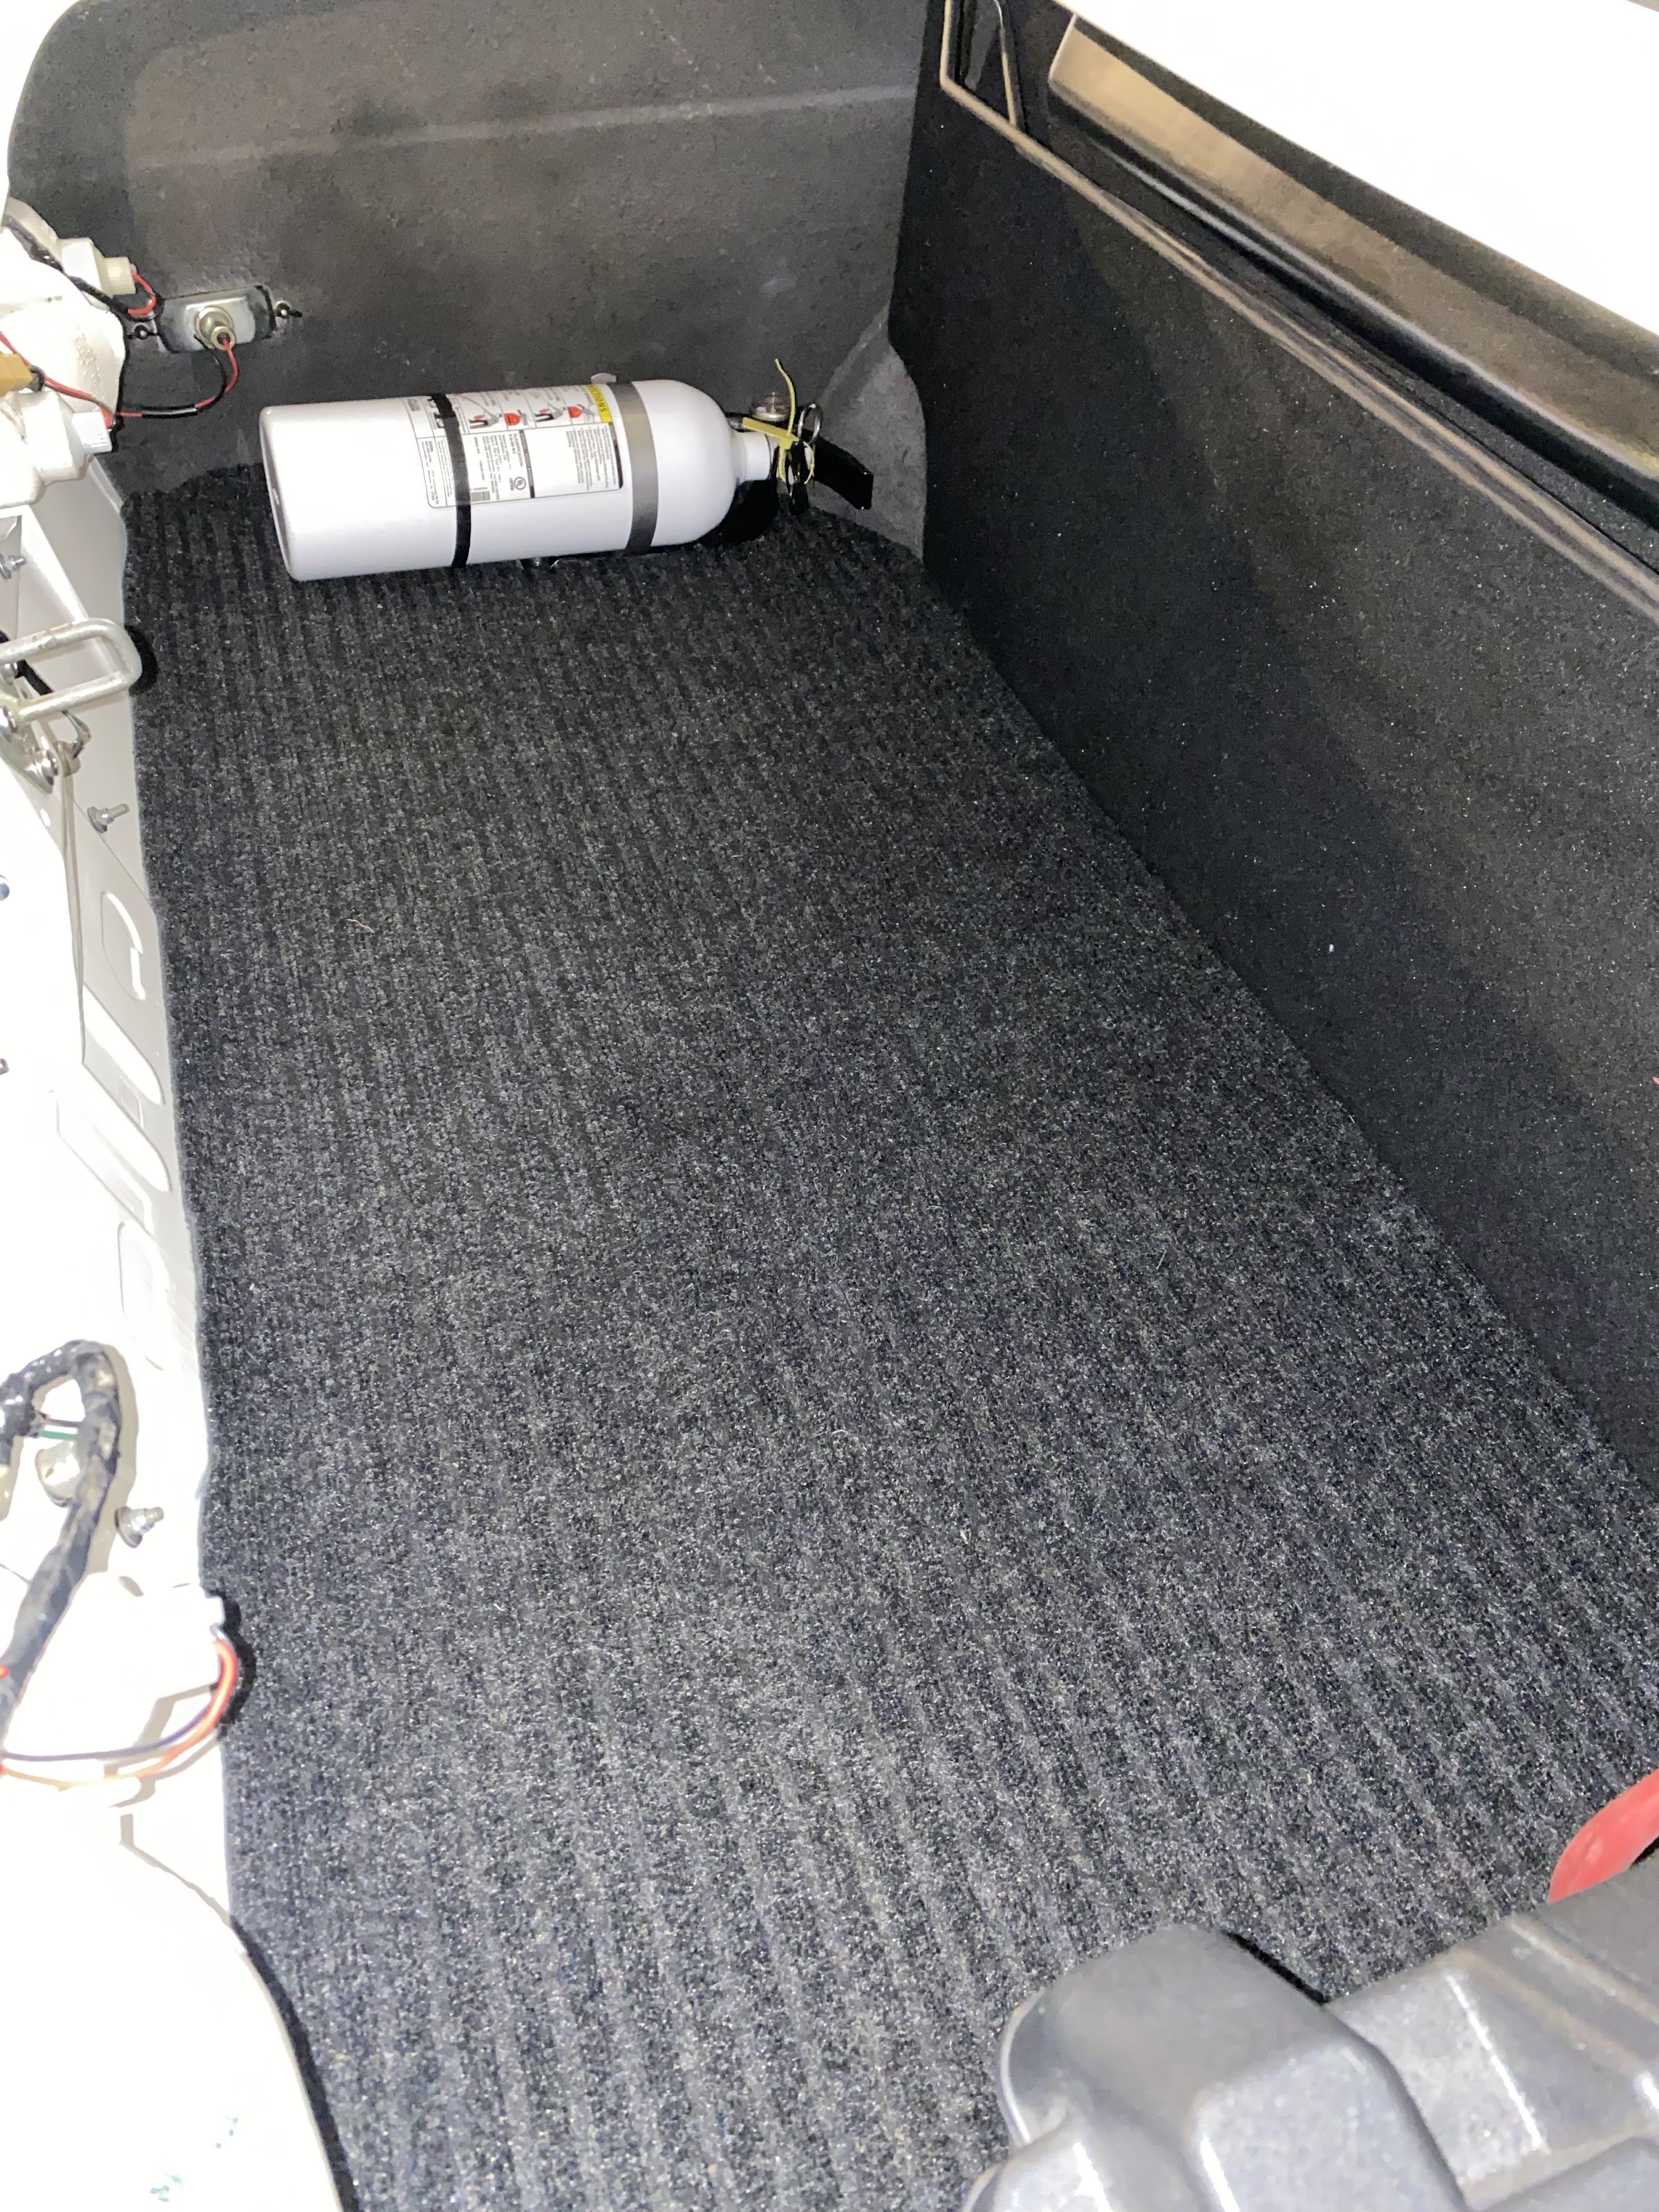
I really like Traffic Master runners for trunk liners. It has a nice rubber back and nice textured front that keeps stuff from moving around a bunch. I made a paper template and cut the runner out

My car came with a Grant GT steering wheel and while 80s retro cool, I've never been a big fan of the Grant GT. I ended up getting a Nardi Steering Wheel - Classic - 360mm (14.17 inches) - Black Leather with Grey Stitching - Black Anodized Spokes - Part # 6061.36.2001, a Datsun horn button on eBay, and a Boss steering adapter. I was hoping that the Boss hub would not be too bad since they are considerably cheaper than others that would fit the Nardi bolt pattern (bigger than Momo or NRG), but woof, it is cheap and the rubber cover is really short and poorly made. So, off to modification land I go.
I grabbed a piece of 3.5" OD x 0.2" wall thickness aluminum tubing, turned the OD to clean up the surface, bored the ID deep enough to press onto the hub, cut it to length, bead blasted, then painted with wrinkle paint. I have never had luck with the wrinkle unless forced with a heat gun. I used a small traffic cone on a lazy susan so I could spin to paint and dry.
I then added 1/8" roll pins for the turn signal canceling mechanism interface and trimmed the OD of the horn ring so it would fit inside the aluminum tube
The horn button needed a separate ground
I replaced the bolts and bolt cover that came with the Nardi wheel with button head screws
I really like Traffic Master runners for trunk liners. It has a nice rubber back and nice textured front that keeps stuff from moving around a bunch. I made a paper template and cut the runner out
Stu
1972 4-door 510
2004 Volvo V70R 6spd manual
Factory Five Racing Cobra
1991 Ford F250 4x4 extended cab
2005 Mini Cooper S - death via forklift :(
1972 4-door 510
2004 Volvo V70R 6spd manual
Factory Five Racing Cobra
1991 Ford F250 4x4 extended cab
2005 Mini Cooper S - death via forklift :(
Phone mount
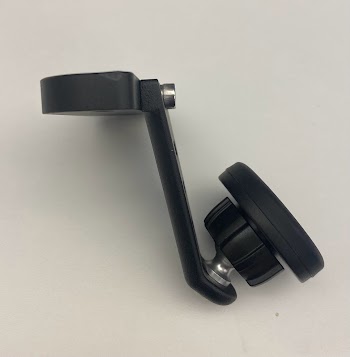
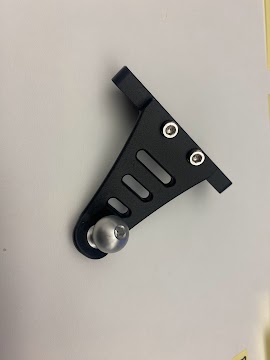
While I have a very basic stereo that has bluetooth, I don't use audible turn-by-turn directions, so like to have my phone visible so I can glance at the map. I have never been a fan of things stuck to my windshield and the dash really does not have a good mounting point, I found a mount that I could modify to mount upside down under the stereo. While this is not in your line of sight, I am OK with glancing down to see the phone/map.
The mount is from Course Motorsports for a 2021+ Ford Bronco and has a swivel magnetic head (not the magsafe style, but that is an option). Since it is mounted upside down, I reversed the ball mount. A couple of holes in the lower dash frame and some bolts attach it right under the stereo.
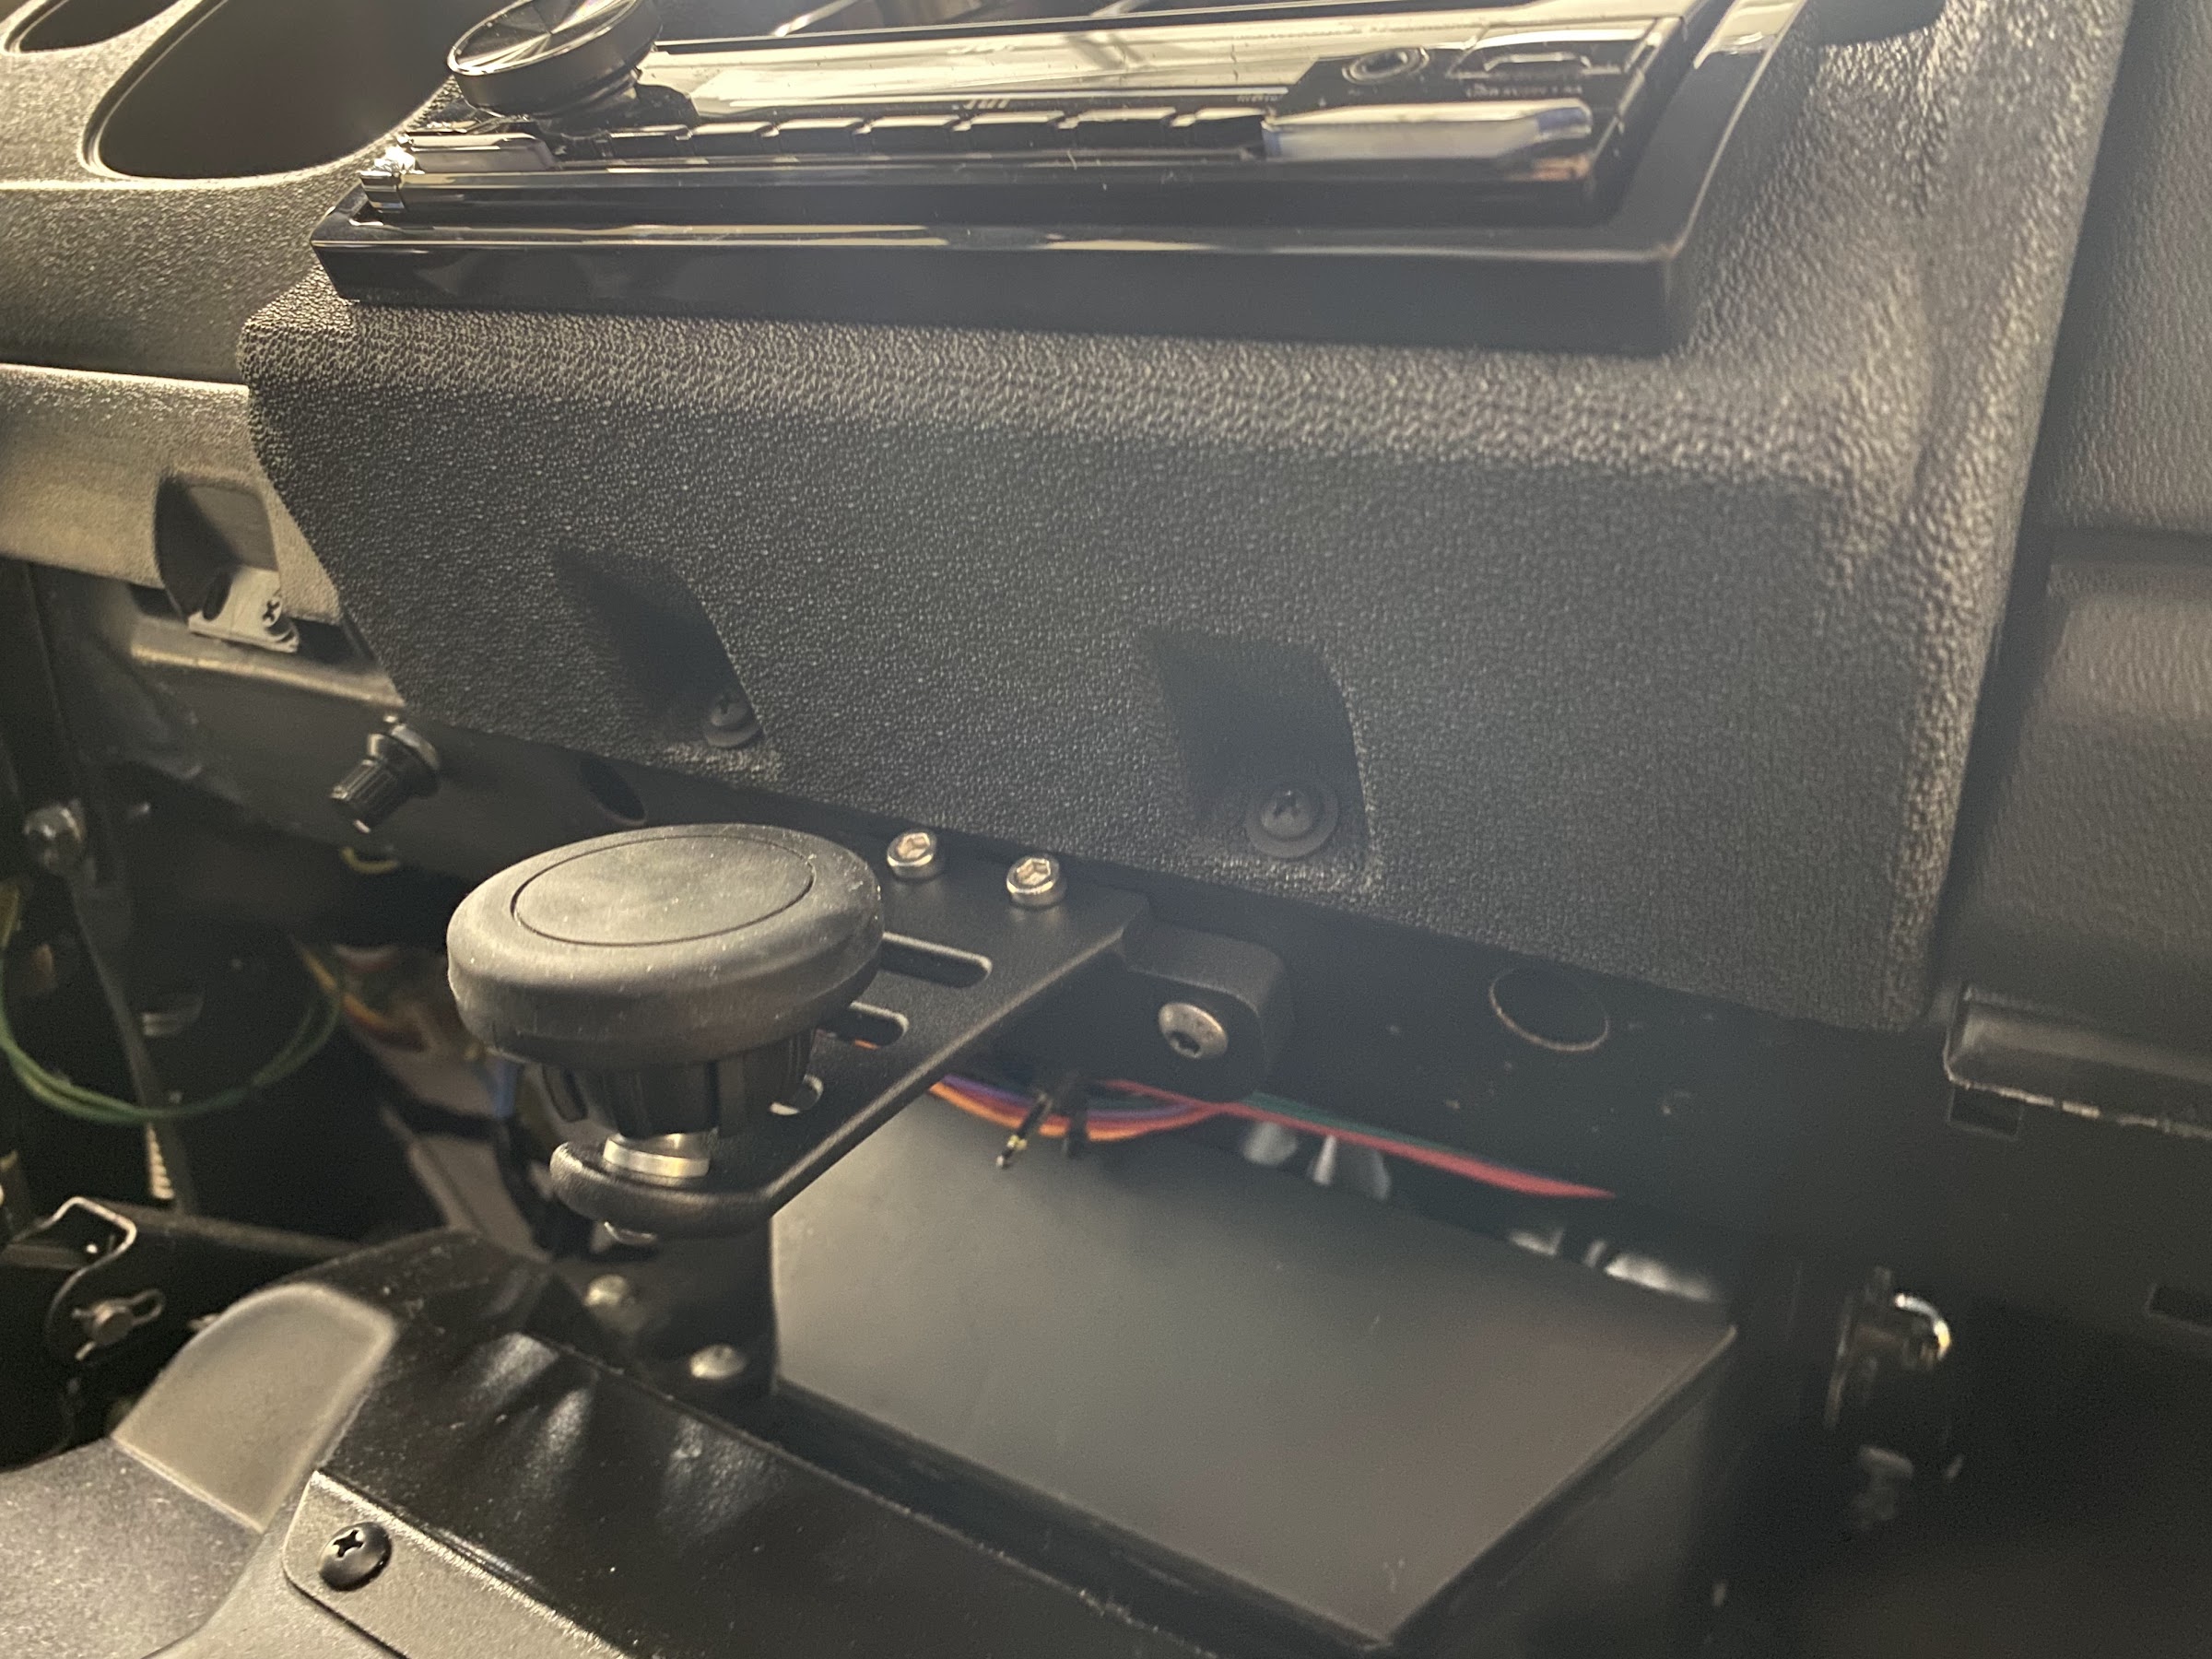
This picture makes it look way more prominent than it is, It really sort of blends into the dark under the dash


The mount is from Course Motorsports for a 2021+ Ford Bronco and has a swivel magnetic head (not the magsafe style, but that is an option). Since it is mounted upside down, I reversed the ball mount. A couple of holes in the lower dash frame and some bolts attach it right under the stereo.
This picture makes it look way more prominent than it is, It really sort of blends into the dark under the dash
Stu
1972 4-door 510
2004 Volvo V70R 6spd manual
Factory Five Racing Cobra
1991 Ford F250 4x4 extended cab
2005 Mini Cooper S - death via forklift :(
1972 4-door 510
2004 Volvo V70R 6spd manual
Factory Five Racing Cobra
1991 Ford F250 4x4 extended cab
2005 Mini Cooper S - death via forklift :(
-
RONSLYCHUK
- Supporter
- Posts: 787
- Joined: 12 Sep 2004 19:42
- Location: Abbotsford B.C.
Re: Stu's 1972 4 Door
Brilliant!
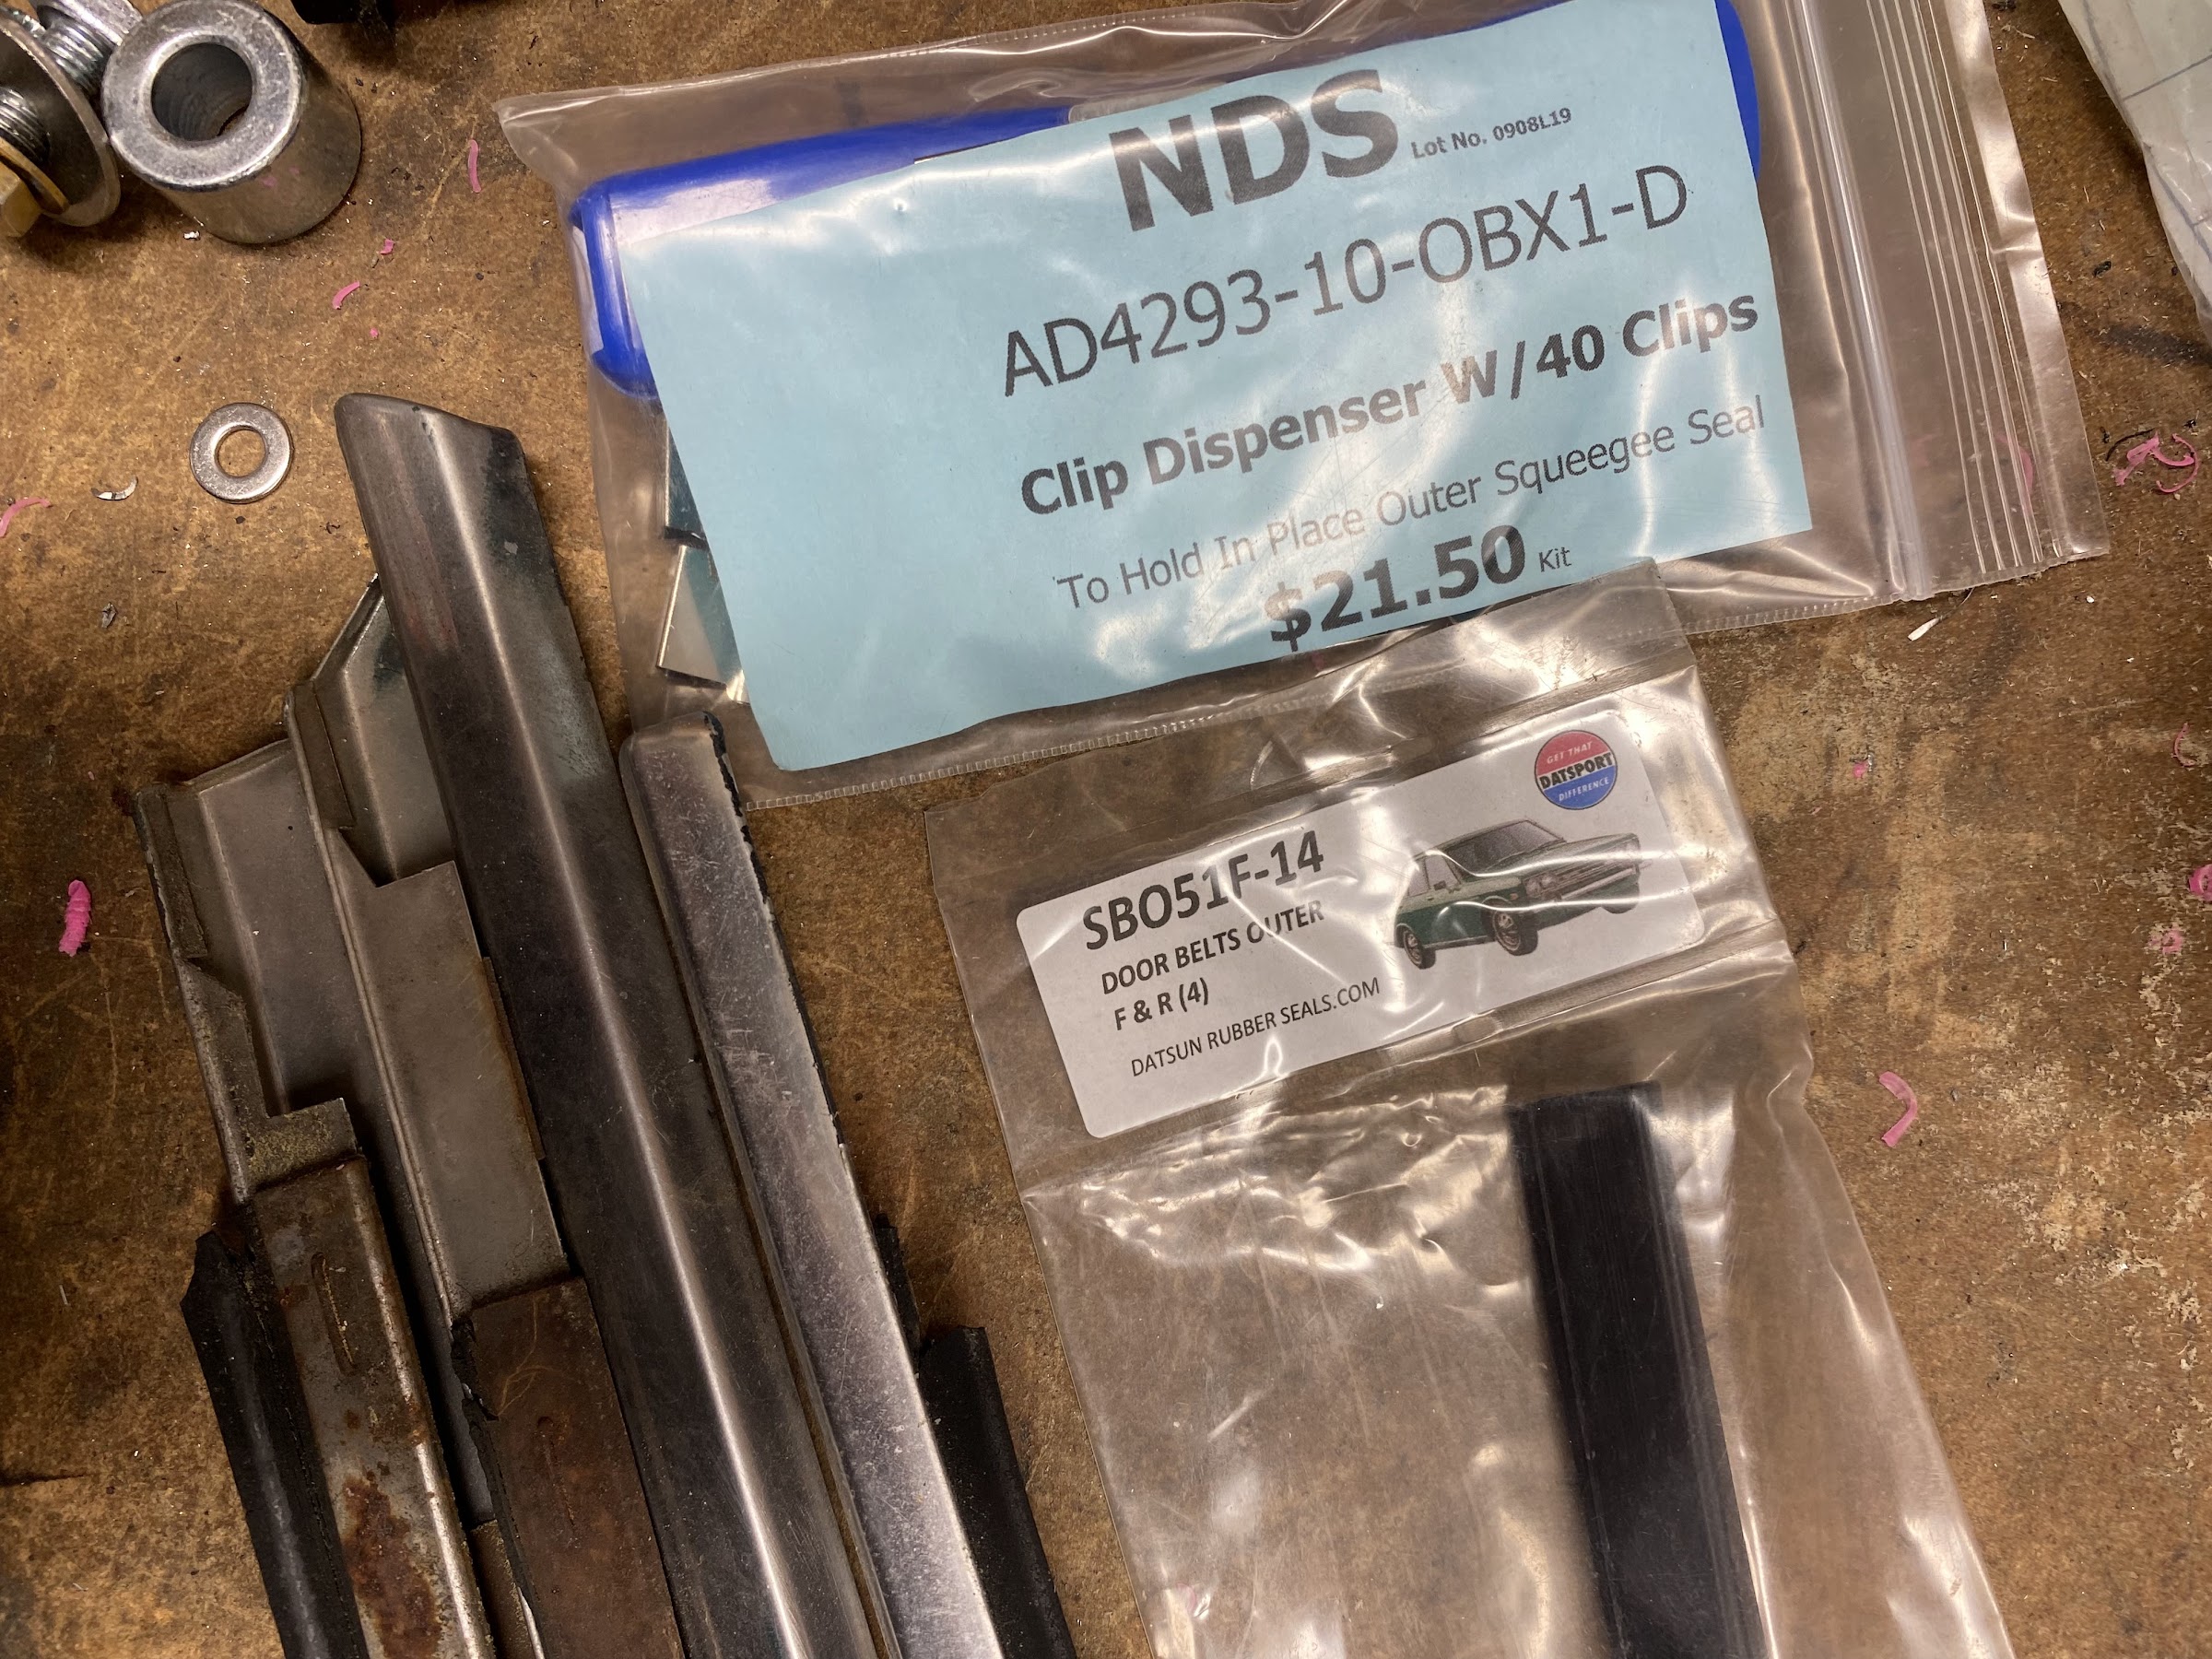
510 outer window squeegee seals belts and trim refresh
My outer squeegee rubbers were hard, brittle and mostly missing. Since I have them off for paint, I freshened them up. I bought the full set of squeegees from Datsport. Since the metal strip that holds the rubber to the trim is stapled on, I bought clips and dispenser from Datsun & Auto Parts Supply (DAPS) rather than trying to redo the factory staples.

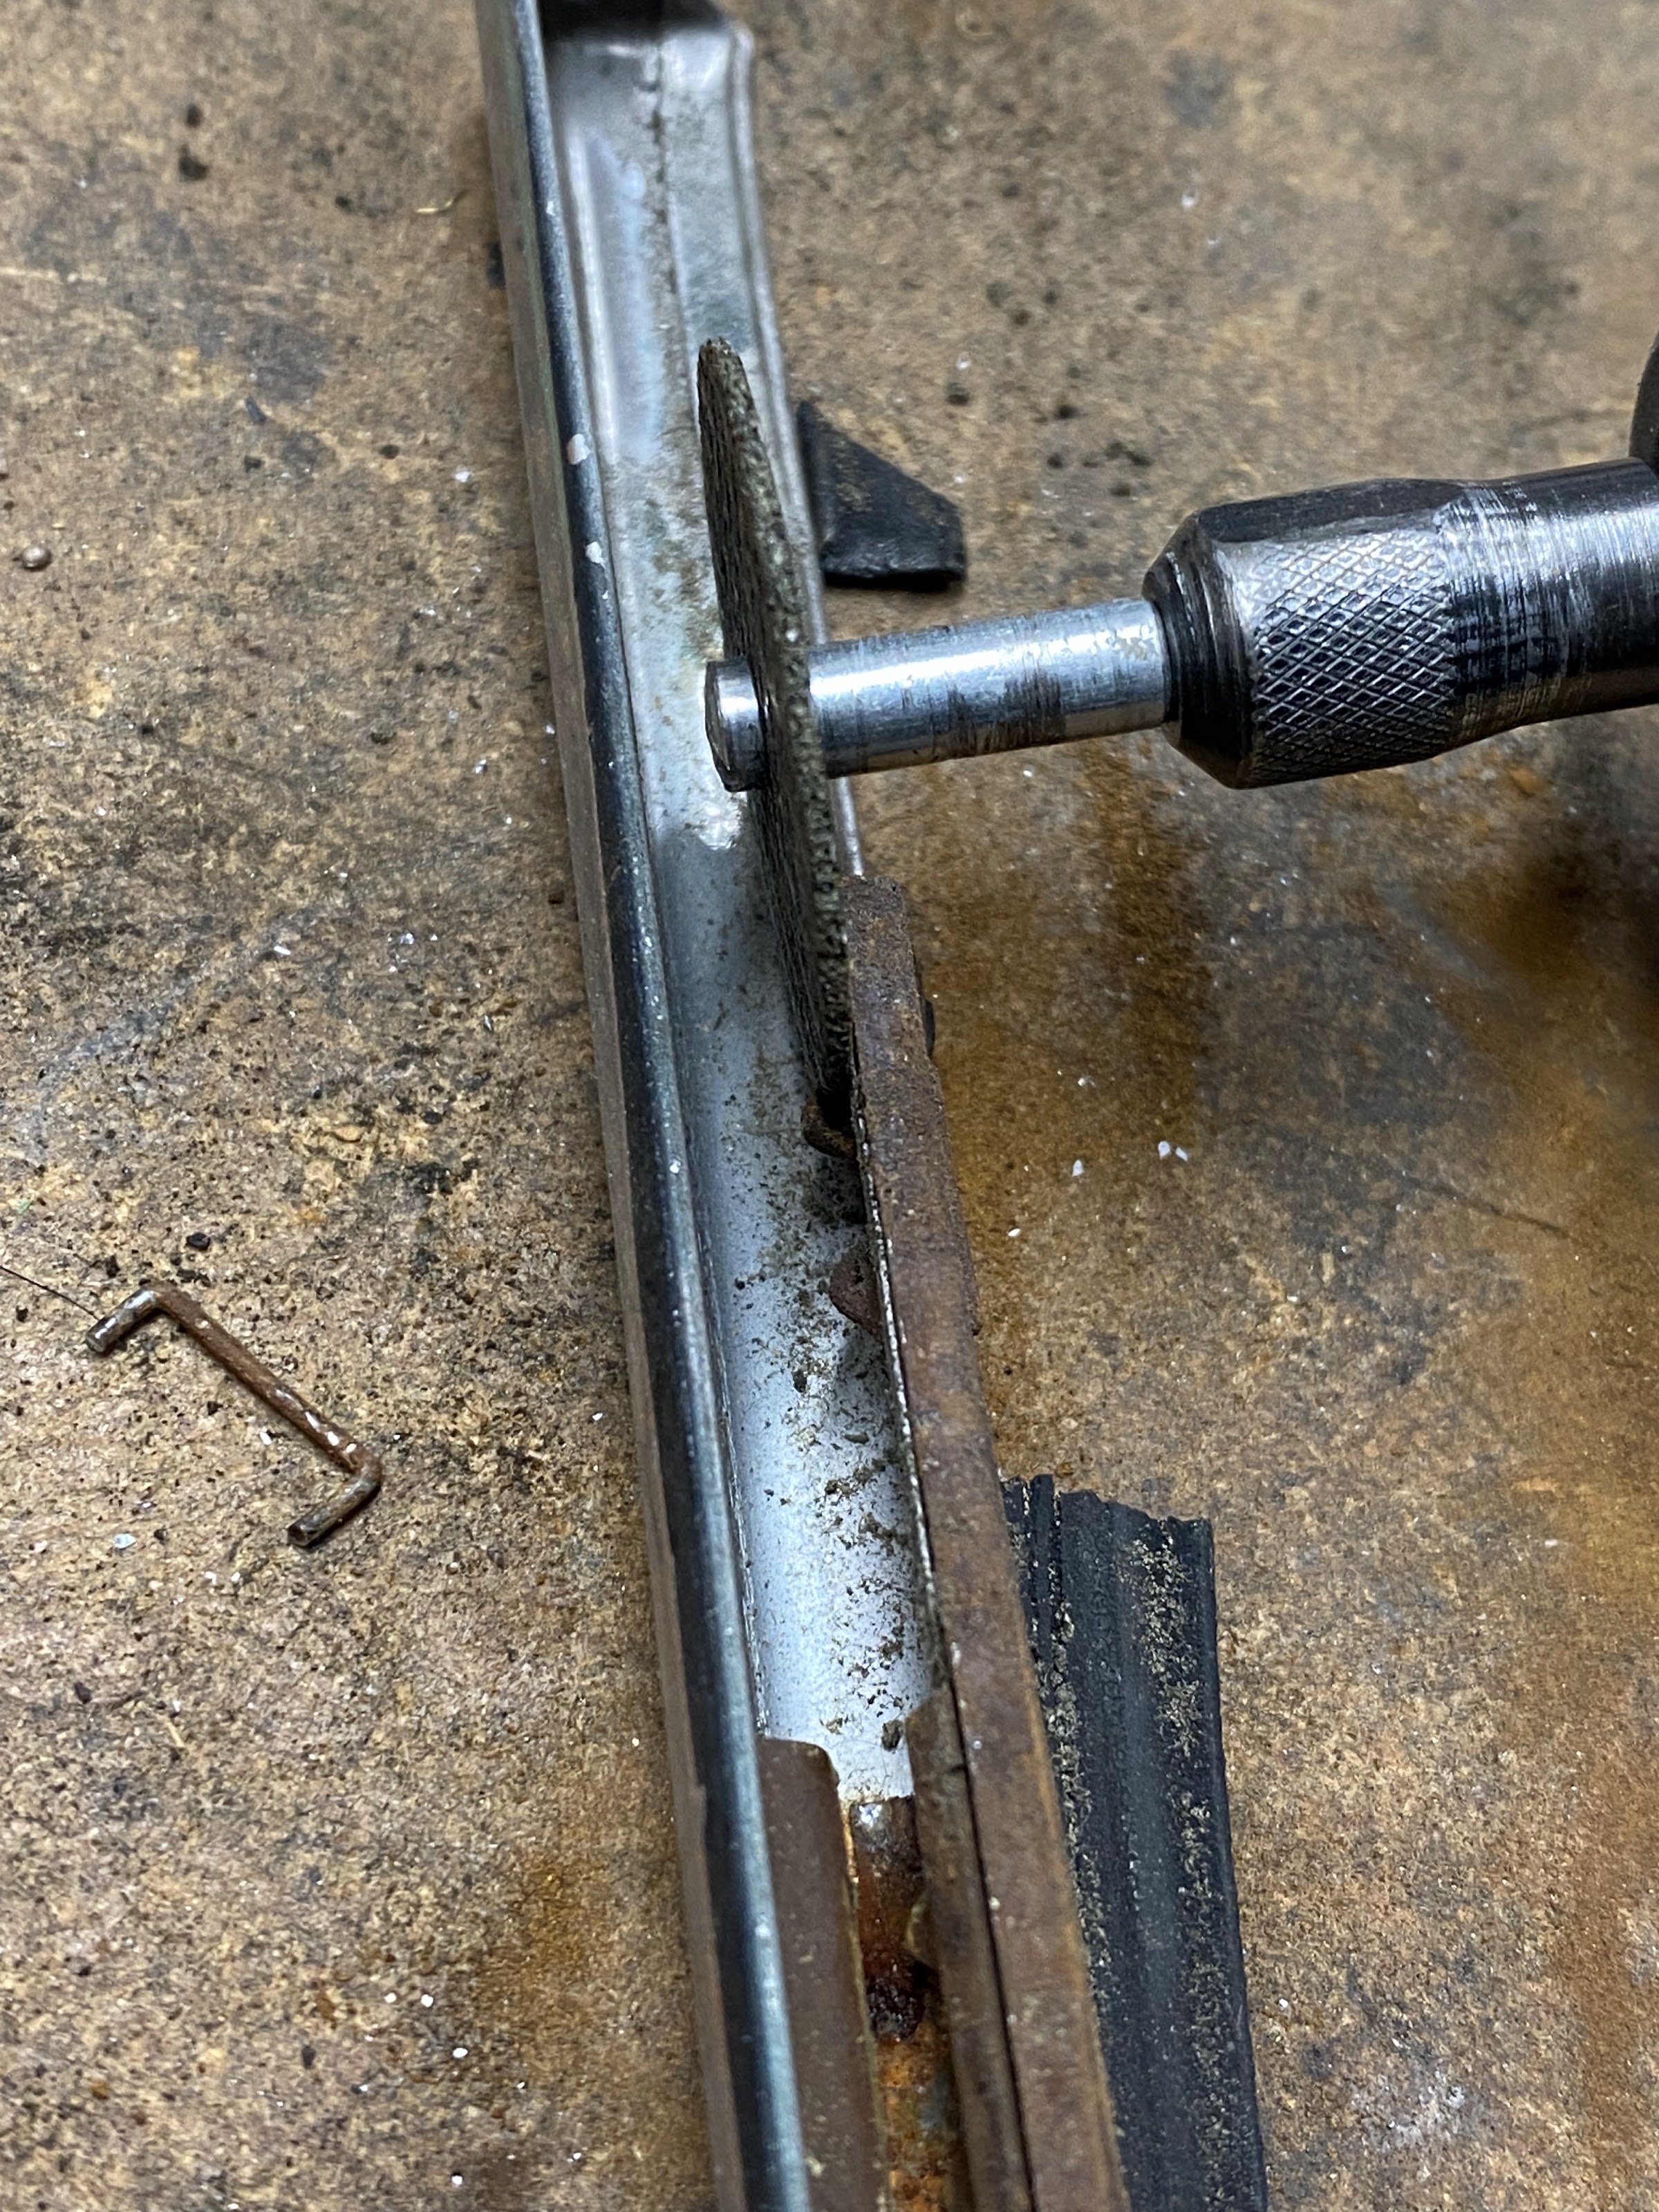
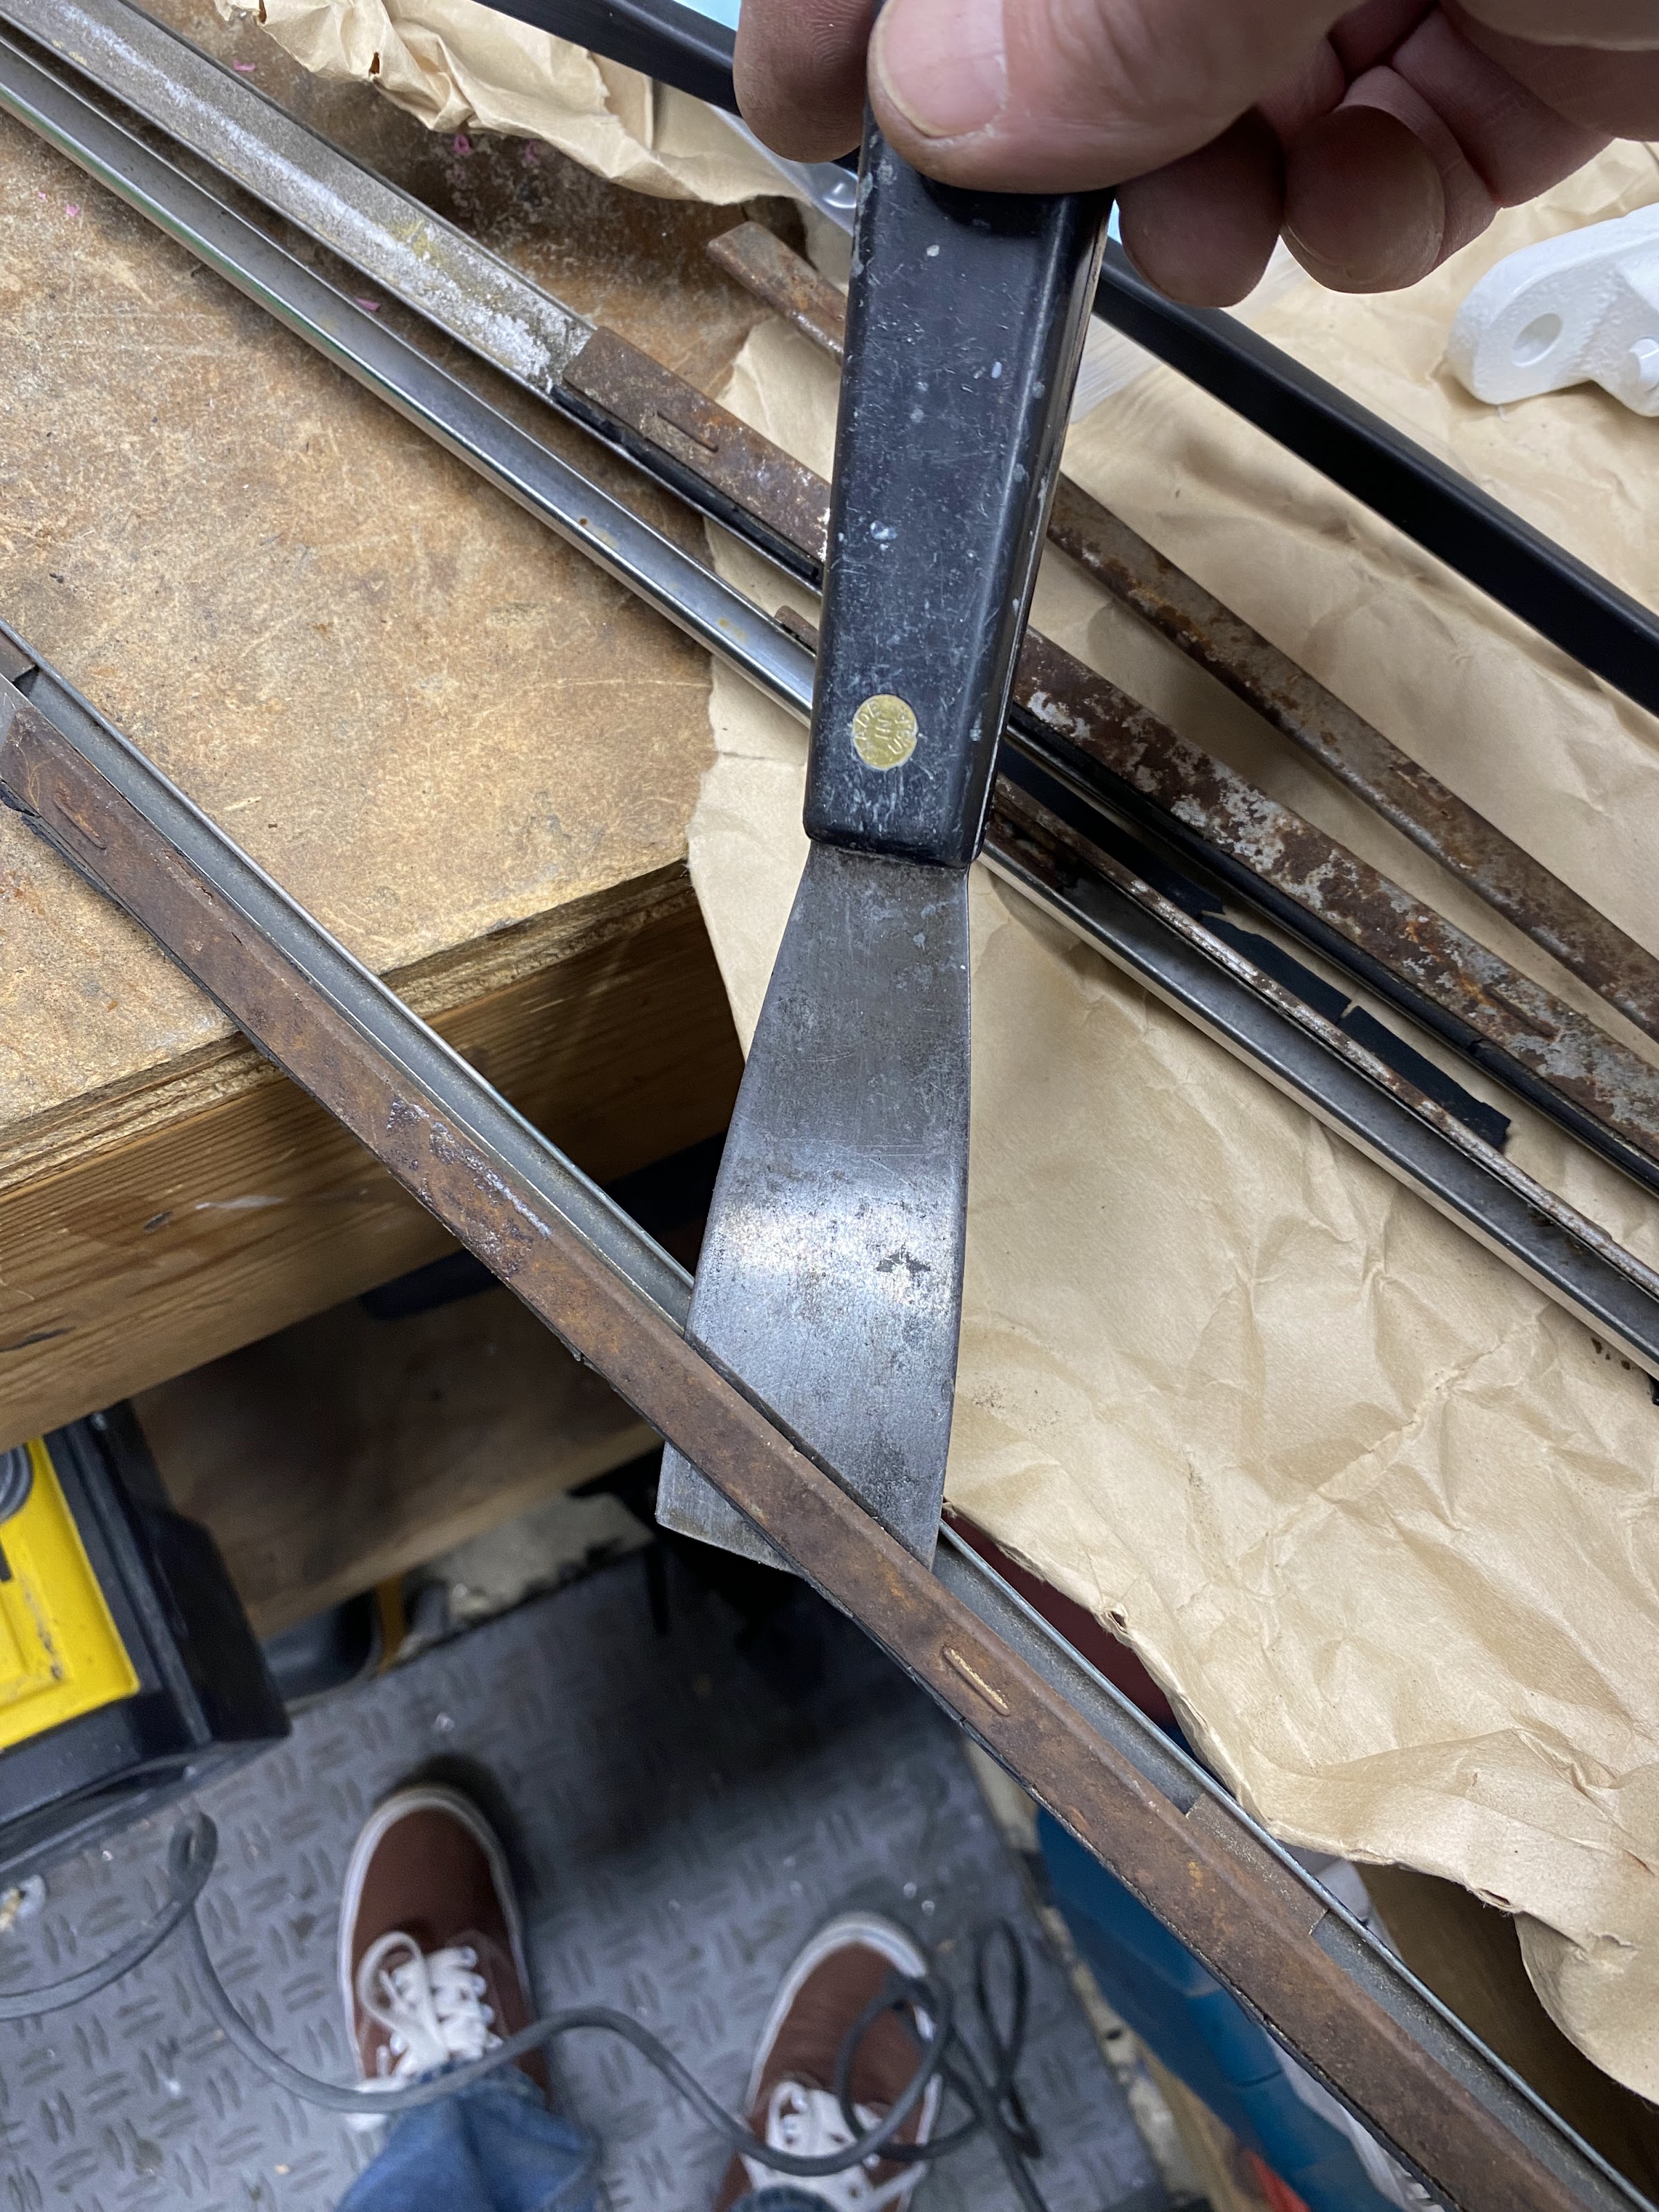
Since the metal strip is very thin and I did not want to bend the crap out of them 'pulling' the staples, a small cutoff disk on my Dremel was perfect to just cut the bent legs off. A wide putty knife helped gently separate the parts.

After removing the remaining parts of the staples, I bead blasted and painted the metal strips. I removed some overspray from an earlier paint job and buffed the stainless trim.

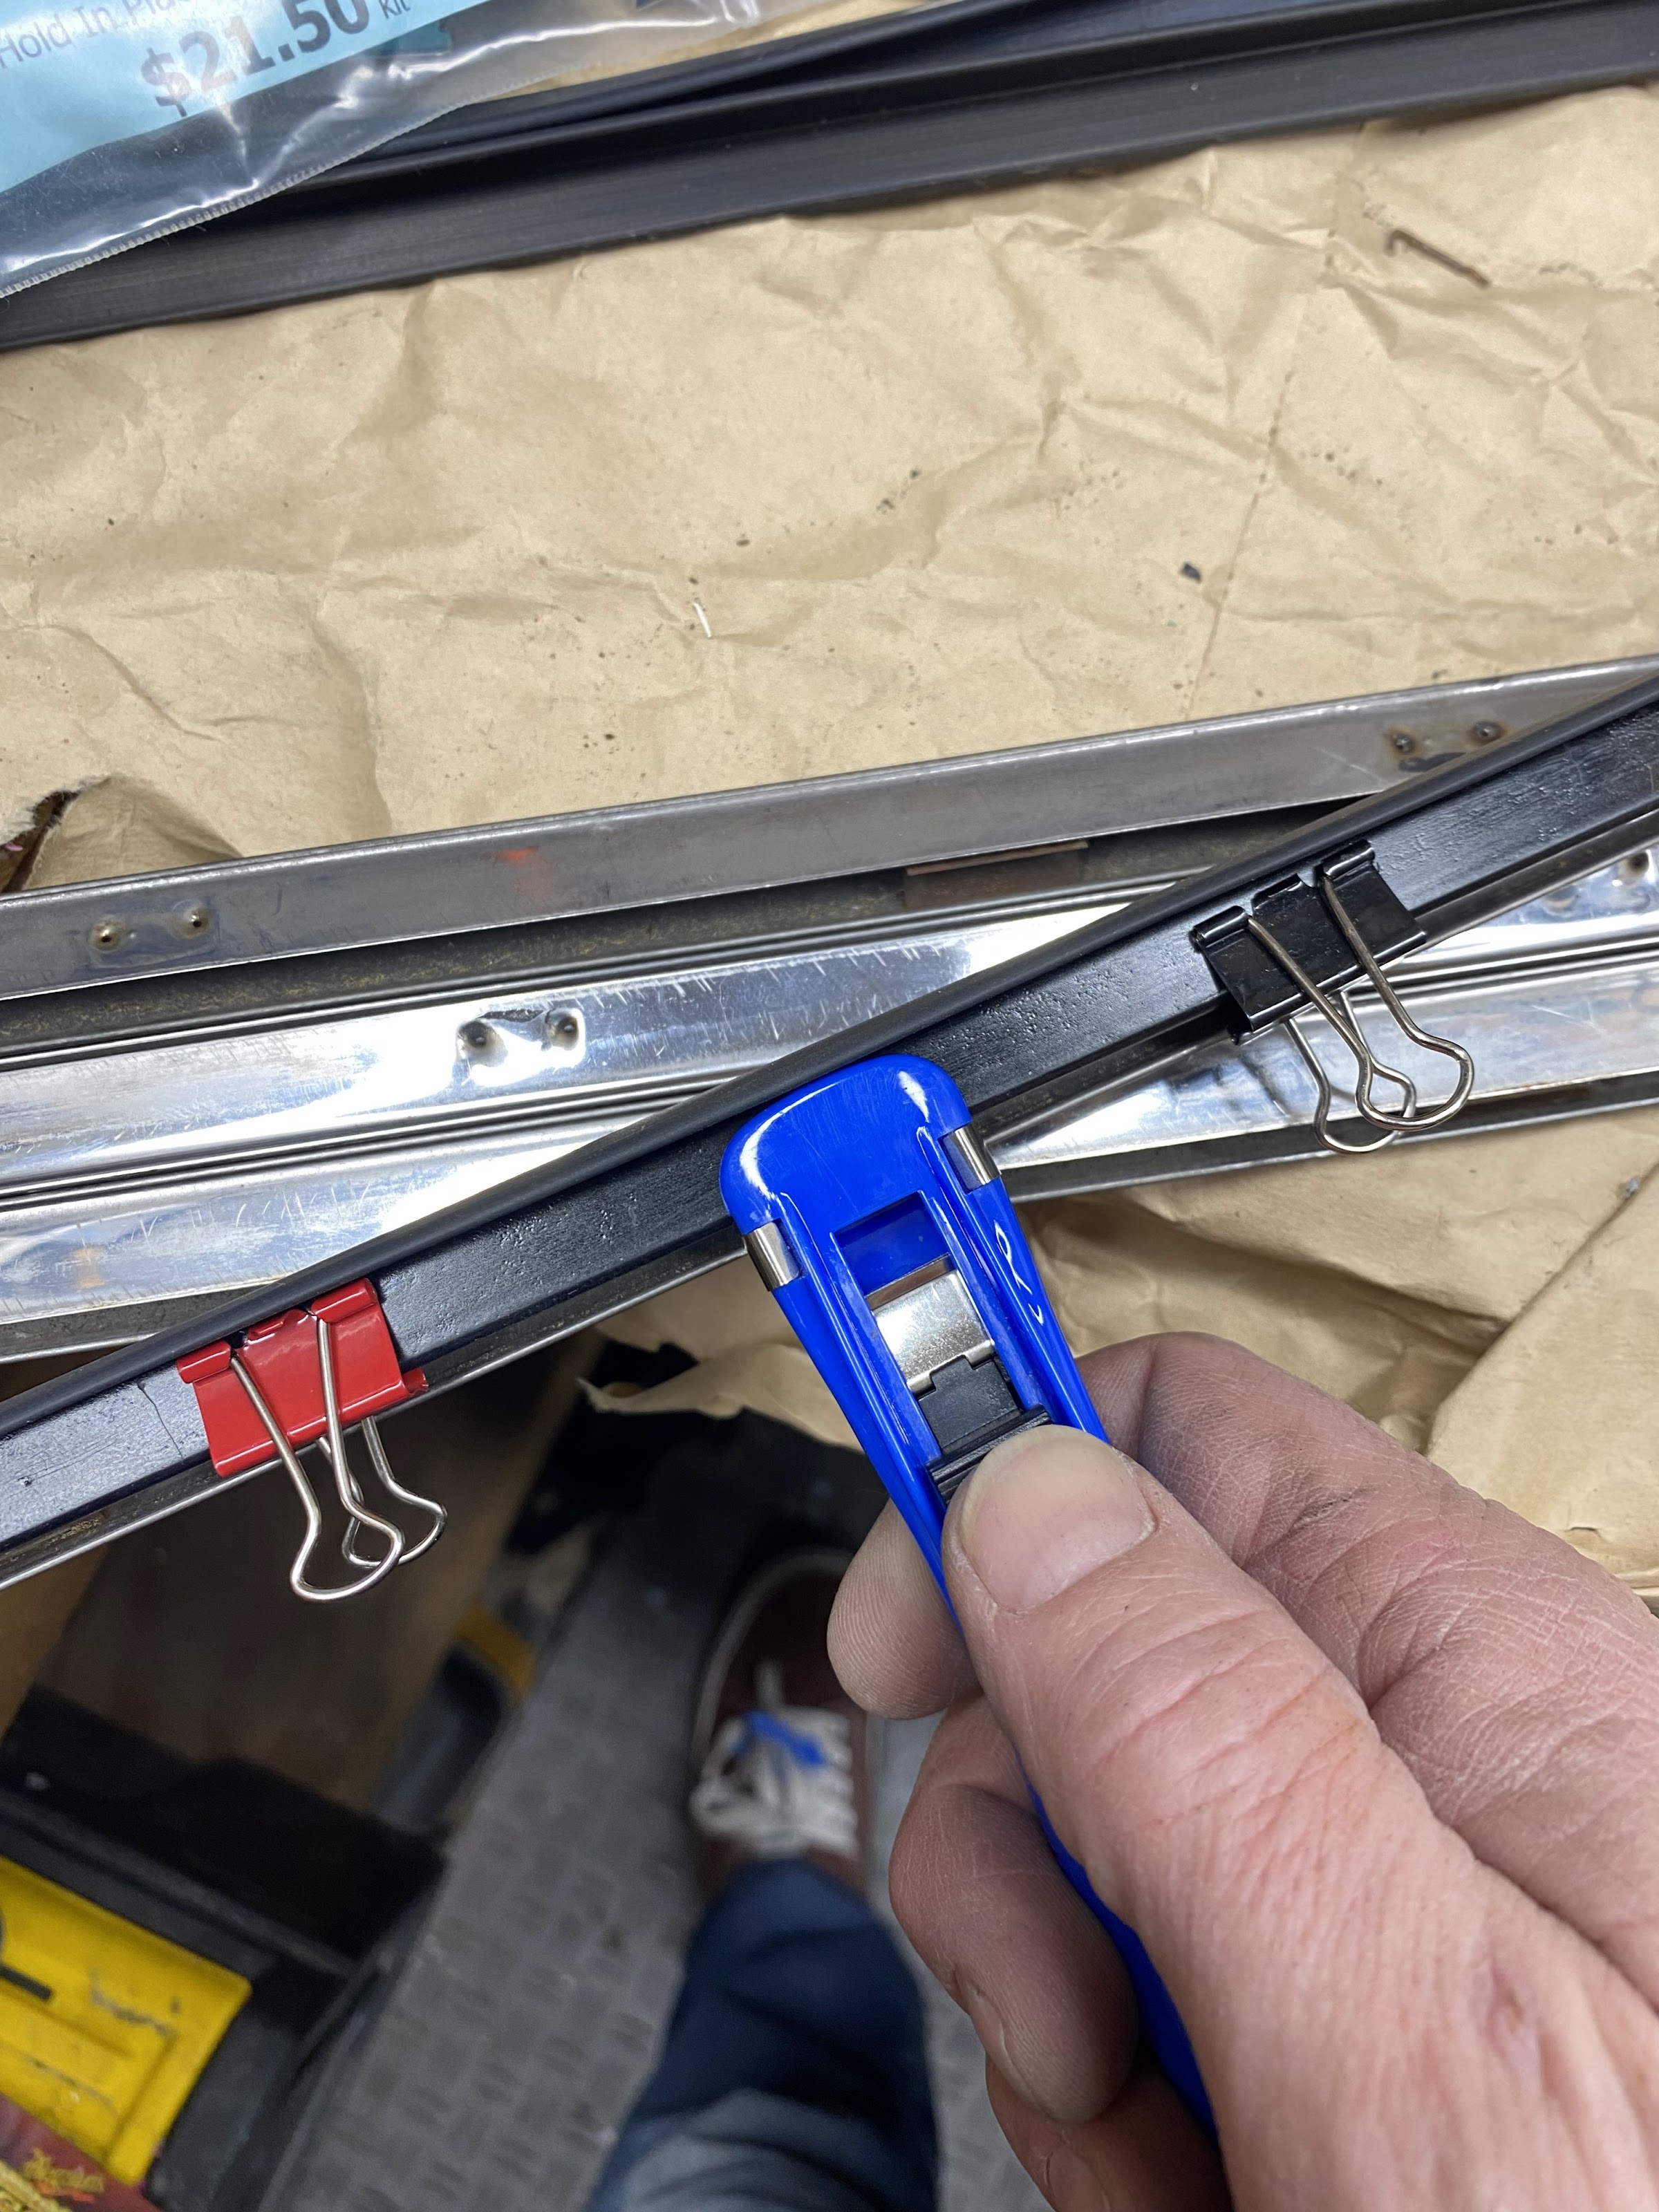
When putting everything back together, I lined up the old staple holes and used small spring clips to hold everything in place while the final clips are installed. The clip dispenser is odd to use the first time but you load them from the back and just push one clip forward once it clicks into the pusher.

Initially I only put the clips where the old staples were, but that leaves a lot of extra clips from the kit. I used the most of rest of the clips, but they are not perfectly spaced. If I was going to do it again, I'd put more time into even spacing, but you can't see them anyway, so they just need to evenly retain the rubber/metal.


Since the metal strip is very thin and I did not want to bend the crap out of them 'pulling' the staples, a small cutoff disk on my Dremel was perfect to just cut the bent legs off. A wide putty knife helped gently separate the parts.
After removing the remaining parts of the staples, I bead blasted and painted the metal strips. I removed some overspray from an earlier paint job and buffed the stainless trim.
When putting everything back together, I lined up the old staple holes and used small spring clips to hold everything in place while the final clips are installed. The clip dispenser is odd to use the first time but you load them from the back and just push one clip forward once it clicks into the pusher.
Initially I only put the clips where the old staples were, but that leaves a lot of extra clips from the kit. I used the most of rest of the clips, but they are not perfectly spaced. If I was going to do it again, I'd put more time into even spacing, but you can't see them anyway, so they just need to evenly retain the rubber/metal.
Last edited by Stu on 21 Jan 2024 21:11, edited 1 time in total.
Stu
1972 4-door 510
2004 Volvo V70R 6spd manual
Factory Five Racing Cobra
1991 Ford F250 4x4 extended cab
2005 Mini Cooper S - death via forklift :(
1972 4-door 510
2004 Volvo V70R 6spd manual
Factory Five Racing Cobra
1991 Ford F250 4x4 extended cab
2005 Mini Cooper S - death via forklift :(
Re: Stu's 1972 4 Door
Those clips are neat, never seen them.
Progress!
Progress!
Re: Stu's 1972 4 Door
Nice work as usual Stu. Gooned, I think Rush also used those clips on hers.
I just did my second set of 2 door the rubber squeegee replacement. I slightly drilled out the original holes and used staple gun type staples to reattach, installing them by hand through the rubber and the holes in the two parts (retainer and stainless trim). Folding them over manually maybe doesn't get quite the same retention and perhaps I should have added some adhesive. We'll see how they hold up.
After removing some dents and imperfections in the stainless trim, I wet-sanded in stages from 240 to 2000 (400, 600, 800, 1200, 1500). This made the polishing real easy.
Re: Stu's 1972 4 Door
Those squeegees look great, and I wasn't aware of those clips either but I like that idea. I had planned to do something similar to what iceman described with staples.
Chris
'71 510 4-Door Sedan
'76 280z
'71 510 4-Door Sedan
'76 280z
Re: Stu's 1972 4 Door
I saw them 'forever' ago while looking for something else at DAPS and grabbed them knowing that I would forget where I saw them
Thanks. I was too lazy to do all of the sanding that you did so I'm sure yours look awesome after all of that work.iceman510 wrote: ↑22 Jan 2024 06:18 Nice work as usual Stu. Gooned, I think Rush also used those clips on hers.
I just did my second set of 2 door the rubber squeegee replacement. I slightly drilled out the original holes and used staple gun type staples to reattach, installing them by hand through the rubber and the holes in the two parts (retainer and stainless trim). Folding them over manually maybe doesn't get quite the same retention and perhaps I should have added some adhesive. We'll see how they hold up.
After removing some dents and imperfections in the stainless trim, I wet-sanded in stages from 240 to 2000 (400, 600, 800, 1200, 1500). This made the polishing real easy.
I hope the clips work well long term, but they seem way easier than trying to put the staples back in. I think the trim would have ended up with more dents after I threw them across the shop
Stu
1972 4-door 510
2004 Volvo V70R 6spd manual
Factory Five Racing Cobra
1991 Ford F250 4x4 extended cab
2005 Mini Cooper S - death via forklift :(
1972 4-door 510
2004 Volvo V70R 6spd manual
Factory Five Racing Cobra
1991 Ford F250 4x4 extended cab
2005 Mini Cooper S - death via forklift :(