Noobie's 510 project

View and post your 510 project(s)
User avatar
DADZSUN
Supporter
Posts: 581
Joined: 08 Aug 2011 18:35
Location: Ottawa, ON

Alternator upgrade for the KA

Post by DADZSUN »

Model#1.jpg
Model#1.jpg (66.71 KiB) Viewed 2091 times

Finally got around to performing an alternator upgrade for my KA24e.

Comparison.jpg
Comparison.jpg (102.04 KiB) Viewed 2091 times

There's lot on the internet for the 110AMP '97'ish Nissan Quest and for KA24DE DOHCs, but this post will focus on the newer '00 125A with KA24e SOHC.

WeightComparison.jpg
WeightComparison.jpg (85.3 KiB) Viewed 2091 times

Obviously the Quest unit was a bit larger and heavier but not so much it looked out of place in the 510 engine bay.

BossComparison.jpg
BossComparison.jpg (95.29 KiB) Viewed 2091 times

Things were pretty close between the two, including the compatibility to swap pulleys. I was surprised the spindle was dead smooth and not keyed in any way.

Regardless of the similarities, there were 5 steps to get this done:

1) Remove the collar around the new alternator's spindle. Otherwise the V-pulley would be out of alignment to the other pulleys in the engine bay, and when tightened it would jam up to the casing's collar rather than spin freely.

CollarRemoval.jpg
CollarRemoval.jpg (111.07 KiB) Viewed 2091 times

2) The lower pivot holes had to be enlarged to 10mm, 3/8 works with a rat-tail file.

Enlargeholes.jpg
Enlargeholes.jpg (53.2 KiB) Viewed 2091 times

3) The upper tensioner boss on the new alternator would has to be cut 5mm (see circle in second pic). Otherwise it will not slide behind the stock upper alternator bracket.

4) With the boss cut down 5mm it would finally tuck behind the upper stock alternator bracket, but the slot was about 5mm too high.

Misalignment.jpg
Misalignment.jpg (75.41 KiB) Viewed 2091 times

It had to be cut and lowered, along with the lower edge needing a shave to clear the alternator casing.

BracketChange.jpg
BracketChange.jpg (121.08 KiB) Viewed 2091 times

Cue in the usual unexpectancies, like a NICE crack (right through) showing up during primer meant having to notch it and re-weld.

Crack1.jpg
Crack1.jpg (48.34 KiB) Viewed 2091 times

5) Final step is to run a belt 2 sizes larger. Model number in the pic. Any shorter and the belt angle would hit the tensioner bolt/bracket.

UpsizedBelt.jpg
UpsizedBelt.jpg (83.08 KiB) Viewed 2091 times

Everything now runs great. In hindsight, this was a long overdue upgrade.
'72 Datsun 510 - MS KA24e, Watanabe, STI R180 & CV axles, R&P assisted steering
'76 Datsun 620 - VQ35DE, CD009, G35 suspension & brakes.
'76 Datsun 280z - Future track toy
Creativity outlet: www.datsunrestomods.com
User avatar
Byron510
Moderator
Posts: 12658
Joined: 01 Jul 2003 23:06
Location: Maple Ridge, BC

Re: Noobie's 510 project

Post by Byron510 »

Back in the 90’s I ran an AC Delco 125 amp alt in my 510 Rallycar - to keep up with the crazy amount of wattage I ran for lights. I didnt have a decent Japanese built alternative at the time (the then new Maxima alts were 90 amp, and really costly). What I found out was that at full draw/load, the single V belt simply couldn’t drive the alt with any wet, snow or mud environmental change added. Of course, a rally car running on the west coast - I hit it all. The fix would have been to run the double V belt that the tow truck or the camper special trucks had. My work around was to watch voltage, and select lighting where appropriate - charging where I could on all night rallies. The serpentine belt shown on your alt initially, might be required to operate that thing at 80% or higher loads.

Keep us posted On the practical findings.

Byron
Love people and use things,
because the opposite never works.
User avatar
DADZSUN
Supporter
Posts: 581
Joined: 08 Aug 2011 18:35
Location: Ottawa, ON

Loooong overdue 510 update

Post by DADZSUN »

Wow, nearly 2 years since the last update.

Truth be told my 510 has seen little activity. Part of that was due to lack of time, specifically to Project 635 (http://www.the510realm.com/viewtopic.php?f=8&t=32574) and to other customer builds & parts. The main reason was due to some nagging issues which prevented me from running my 510. At the time I chose not to fix my 510 because I already have several Datsuns disassembled in my garage, and as many of you know, taking a car apart chews up a LOT of space...

MyDatsuns.jpg
MyDatsuns.jpg (103.9 KiB) Viewed 1218 times

With my 635 nearing completion (85% assembled), but still requiring many more hours for the little things, I decided to take a brake from it and another 510 build to finally fix my 510. Solo2 starts in a couple of months and I really want my younger son to get some seat time. The plan is to commit the entire month of March to address the following issues.
  • Complete chassis wiring harness replacement
  • Front sway bar to work with JB CoachWerks R&P conversion
  • New seats that work with a harness
Painless.jpg
Painless.jpg (106.95 KiB) Viewed 1218 times

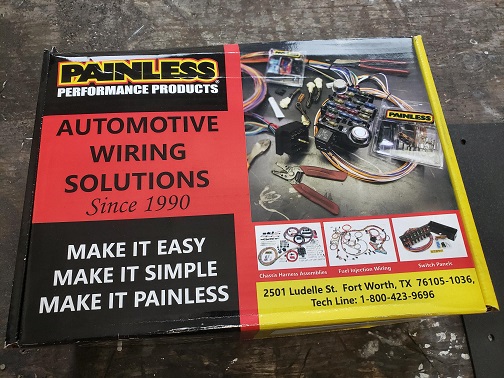
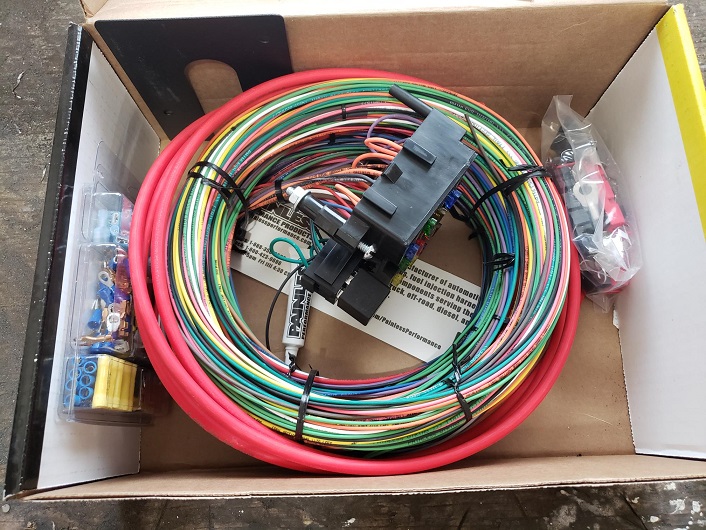
First up is the chassis harness. Honestly, it's a real shame there isn't a turn-key kit out there to purchase and save many 510 owners the hassle of reinventing the wheel (ie: figuring out how a ground-switched headlight setup works...) Unfortunately there is nothing out there so my plan is to run with the painless kit and FULLY DOCUMENT / POST the exact steps I went through. Hopefully this will be a quasi turn-key setup for others down the road.

Painless_2.jpg
Painless_2.jpg (183.74 KiB) Viewed 1218 times

I decided to replace the harness because my lighting suddenly crapped out, and then several months later I had experienced a short which ultimately caused some moderate damage and prevented the car from running. I'm not entirely certain how the short happened but it appears as though one of my (unfused) accessory circuits was rubbing against, then shorted, a panel mounting bolt. It then created enough heat to melt it's housing then some of the OEM harness housings...

IgnitionHarness.jpg
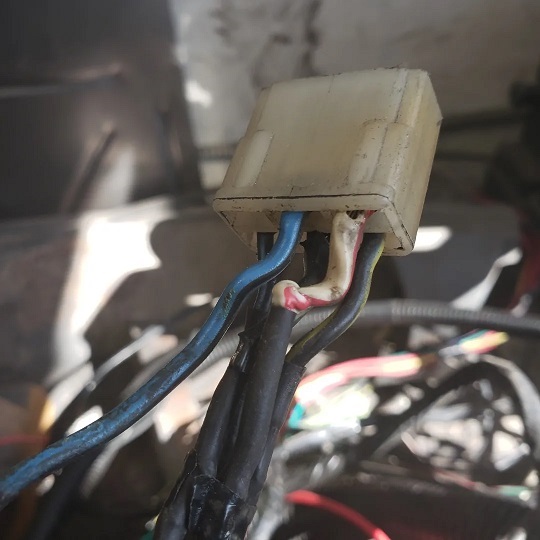
IgnitionHarness.jpg (68.96 KiB) Viewed 1218 times

It didn't take long to remove the stock harness and find some of the collateral damage to my short. This ignition connector is clearly toast, but interesting that the PO had done some work on it. It turns out there was quite a bit of work done to the stock harness so ultimately this was a worthwhile exercise.

Dash.jpg
Dash.jpg (125.72 KiB) Viewed 1218 times

Because wiring isn't exactly the most exciting topic, I'll save the details for a single post. I am a good ways into the task, and so far it's gone fairly smoothly once I figured out how to mount the MegaSquirt stand alone, KA24e CAN-AM fuse/relay box, and the Painless fuse box. Not much room under the passenger dash!

UnderDash.jpg
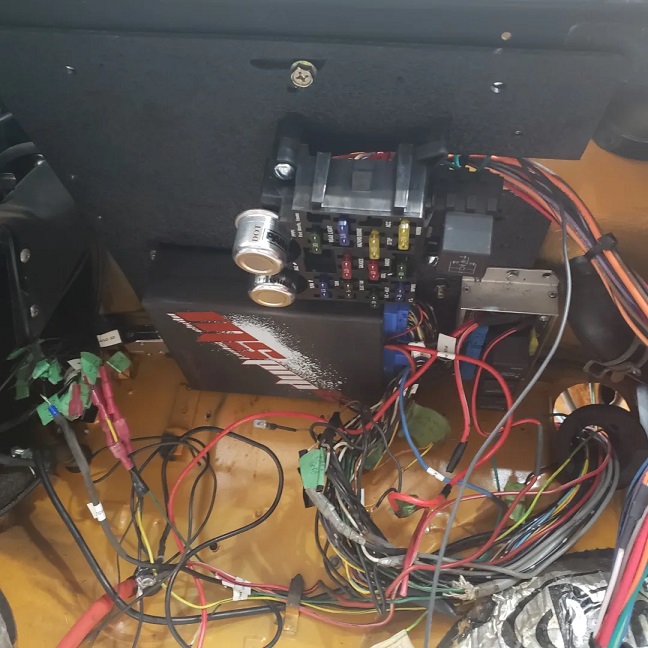
UnderDash.jpg (132.76 KiB) Viewed 1218 times

While I'm redoing the lights I plan on swapping my Hella halogens for LED bulbs. The newer generation bulbs are now designed to work with halogen headlamps and therefore produce a really nice pattern. This will keep the OEM look but provide a much whiter light.

LED_Headlights.jpg
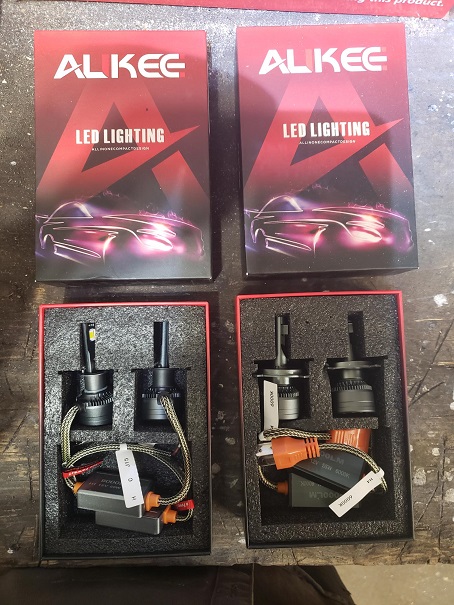
LED_Headlights.jpg (131.88 KiB) Viewed 1218 times

I've also started (and since completed) an experimental sway bar for the front-sump / rack & pinion conversion setup. Since the stock sway bar doesn't clear my setup I had to find another solution. The picture below shows the Futofab front sump bar, and aftermarket stock mount bar, my OEM 510 bar, and finally my solution - in its designed orientation. ;-)

SwayBars.jpg
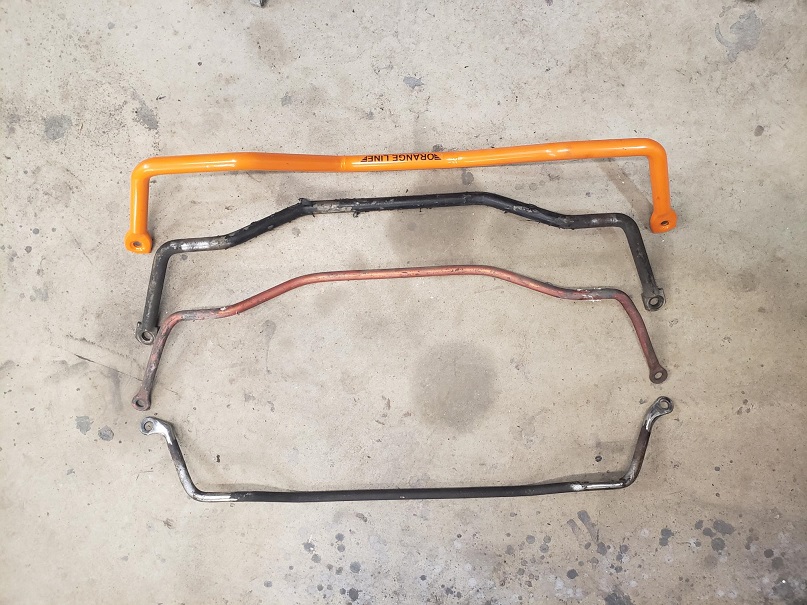
SwayBars.jpg (203.98 KiB) Viewed 1218 times

I've also started modifying my seat rails for the new seats. The plan is to mount my Momo 4 point harness to the un-used rear passenger shoulder mount. Yes, I'm aware that these harnesses are not really intended for street, my plan is to leave the top loose enough so that in an accident my torso will fold over the lap belt to prevent submarining. Should I like the seat & harness setup I will eventually move to a Schroth Rallye 3 setup which is better designed for my setup. Either way, I'm damn certain that my Momo harness is FAR better than the stock 50 y/o non-reclinable belts.

Recaros.jpg
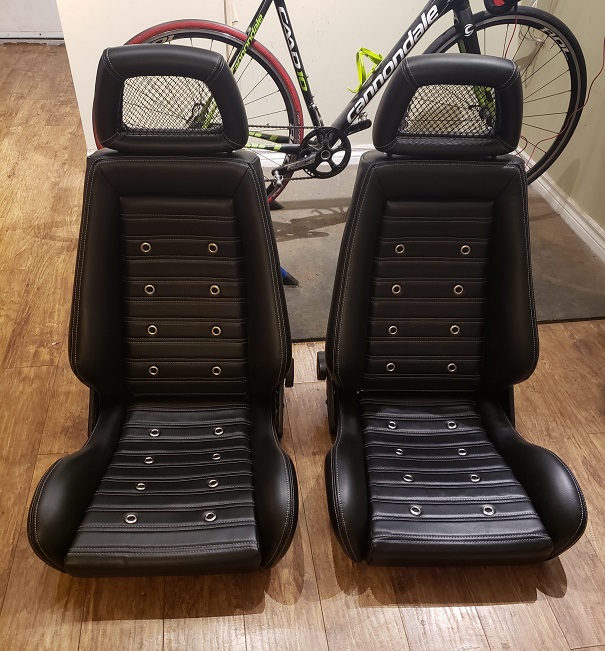
Recaros.jpg (159.19 KiB) Viewed 1218 times

Finding a seat for the 510 hasn't been easy. I don't mind the S30 seat I had before but the integrated headrest didn't allow for shoulder harness belts. These reupholstered Recaros not only look and feel great, but had the necessary pass-through for should harness.

I'll provide a few more updates in the coming weeks where I'll address each area within a single post.
'72 Datsun 510 - MS KA24e, Watanabe, STI R180 & CV axles, R&P assisted steering
'76 Datsun 620 - VQ35DE, CD009, G35 suspension & brakes.
'76 Datsun 280z - Future track toy
Creativity outlet: www.datsunrestomods.com
User avatar
Doraemon
Supporter
Posts: 138
Joined: 27 Dec 2015 09:05
Location: The Netherlands

Re: Noobie's 510 project

Post by Doraemon »

Yeah the headlight switch circuit is a funny and it took me some time how it worked. It's really weird.

Seats looking great!
User avatar
ostaylor
Supporter
Posts: 415
Joined: 19 Dec 2020 08:40
Location: Victoria, BC

Re: Noobie's 510 project

Post by ostaylor »

Looking forward to the post on the Painless wiring harness... not something I have tackled yet, but I am aware of the challenges navigating this issue.
Regards,
Owen
70 Datsun 510 2 door - SR20DET - https://www.the510realm.com/viewtopic.php?t=34572
64 Studebaker Daytona - Supercharged 289 4 speed
65 Sunbeam Tiger MkI
User avatar
icehouse
Posts: 3894
Joined: 17 Jul 2005 17:06
Location: Everett Wa

Re: Noobie's 510 project

Post by icehouse »

Those seats are rad!!!!!!!!!!
"People don't like it when shit doesn't match their rule of thumb." Sam
Post Reply