abisel wrote:^^^
Looks like you have a ton of clearance. Are you going to mount a K&N filter? Also, I see your MC has the nipples on the outboard side. Can you tell me the MC brand and size?
No I'm going to make some little gauze filters for the stacks and leave them like that.
It's a 7/8" bore master from a 280z I believe. It's stiff. Do a quick search on here for what year you can get, they will bolt on without modification.
Today? Nothing but over the weekend I did install my 9.5-10 OEM `69 top in. The one everyone wanted but said because it was to pricey but were eager to spend $400-$500 on a bumper. But that's ok because it sure looks like new in my 510.
Dash1.jpg (175.29 KiB) Viewed 5476 times
"Lastnight the wife said oh boy when your dead you can't take nothing with you but your soul oh "Think"
- John Lennon
Do you know what happens when previous owners of engines are lazy and they install the knock sensor in the wrong location? Well, if the sensor is in the bolt-hole right next to the location where the engine and transmission meet, your knock sensor thinks you are pinging out at all times, and the timing gets pulled so much you bog out amd have a red-hot exhaust.
Previous owners. Sigh.
Got that fixed today, and NOW I know what an sr20det is supposed to feel like!
I spent a few hours both changing my oil and draining the oil cooler. I let it drain for a day, as it is so cool in the back of my work.
I also changed out the flexible hose between my breather pipe and my catch can. The heat just bakes the plastic tubing and it be comes very hard. I like it to be able to absorb the engine vibration without it transmitting to the catch can too badly.
Next project will be to change out the drivers door seal, as it has gotten very tired after 38 years. I put new ones on when I built the car in 1978.
My vintage Boler trailer also got it's furnace burner assembly fixed, which I am just tickled about. It would be like dragging out an old 1600 motor, rebuilding the carb and throwing some new plugs and wires on it, and then it will pull 100MPH! I have had the trailer for over 20 years now and having some nice warm heat on cold mountain nights keeps things cozy.
Attachments
IMGP0832 (Large).JPG (277.74 KiB) Viewed 5228 times
IMGP0846 (Large).JPG (306.92 KiB) Viewed 5228 times
IMGP0842 (Large).JPG (410.56 KiB) Viewed 5228 times
IMGP0841 (Large).JPG (433.69 KiB) Viewed 5228 times
"Racing makes heroin addiction look like a vague wish for something salty" - Peter Egan
Keith Law
1973 2 Door Slalom/hill climb/road race / canyon carver /Giant Killer 510
1971 Vintage 13' BOLER trailer
Added a couple electric fans 'cause the Champion 3-row radiator left no clearance for the stock fan and an aftermarket fan was heavy and slightly out of balance.
A pair of Spal 9" pushers.
2 Relay harnesses.
A 2x2 sheet of 13 gauge 1/2" expanded sheet metal from hardware store.
A couple strips of aluminum to mount the expanded metal to the front of the radiator support.
A 4-way ATO fuse box with double sided tape to hold fuse box in place.
Radiator hose thremoswitch with 185/165 set-points.
Assorted crimp connectors and heat shrink tubing.
Assorted stainless steel metric fasteners.
Assorted tools.
Zip ties.
A can of Rustoleum satin black.
The system is wired so the fans will run when ignition is turned off. Also have a by-pass switch on the dash to operate the fans independent of the thermoswitch.
Spal recommended 15 amp fuses, but each fan is rated at 6 amps continuous, so I tried a 7.5 amp fuse which failed at fan start-up (motors draw the largest current at start-up). Went to 10 amp fuses and fans start and run just fine. Fuses are meant to protect the wiring, not the component, so the smallest fuse is best.
Works good. Need to see how it performs this summer. Also, the thermoswitch is a good way to see if your stock temperature gauge is accurate.
IMG_20160313_103312031-1.jpg (477.6 KiB) Viewed 5111 times
IMG_20160313_103554926-1.jpg (447.9 KiB) Viewed 5111 times
IMG_20160314_082934946_HDR-1.jpg (482.32 KiB) Viewed 5111 times
IMG_20160314_082948632_HDR-1.jpg (476.87 KiB) Viewed 5111 times
just curious on the placement of the fan switch thermostat. Is that it on the upper rad hose, or is that sensor for the gauge?
What is the consensus on the best practices placement of the fan controller thermostat? Wouldn't you want the trigger to be measuring as the water exits the radiator at the botom of the rad? If the temp there is above x* the fans would switch on as the convective cooling is no longer keeping up.
I have heard both arguments about where to place the fan thermoswitch. I chose the upper radiator hose to catch the water temperature as it exits the engine into the top of the radiator. To give the fans a chance to cool the radiator more than if the thermoswitch were in the bottom radiator hose because the water temperature would be much hotter than 185 at the top of the radiator than the bottom.
I would like to find a thermoswitch to put in the thermostat housing instead of the upper radiator hose. I think a Z-car thermoswitch would work, but don't know the set-points of those switches. Does anybody know?
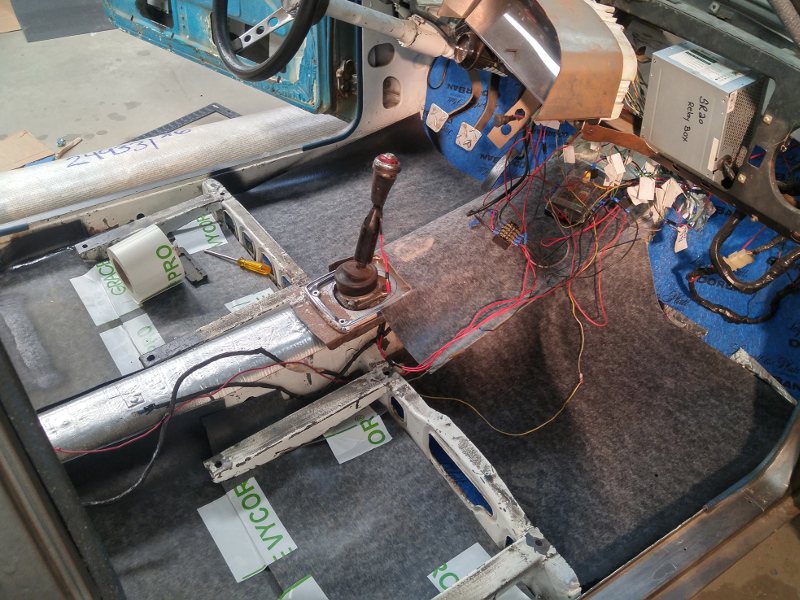
First things first, I had to replace a floor pan that was poorly installed. I picked up a bead-roller and rolled some beads into the sheet. Nothing too fancy - just enough to give it some rigidity.
With a proper floor, I got to work on some sound deadening. This first shot shows the different layers of sound reducing materials: deadener (to stop the panels from wobbling), mass-loaded vinyl (to stop sound from penetrating through), and a decoupler (to separate the MLV from the sheet metal).
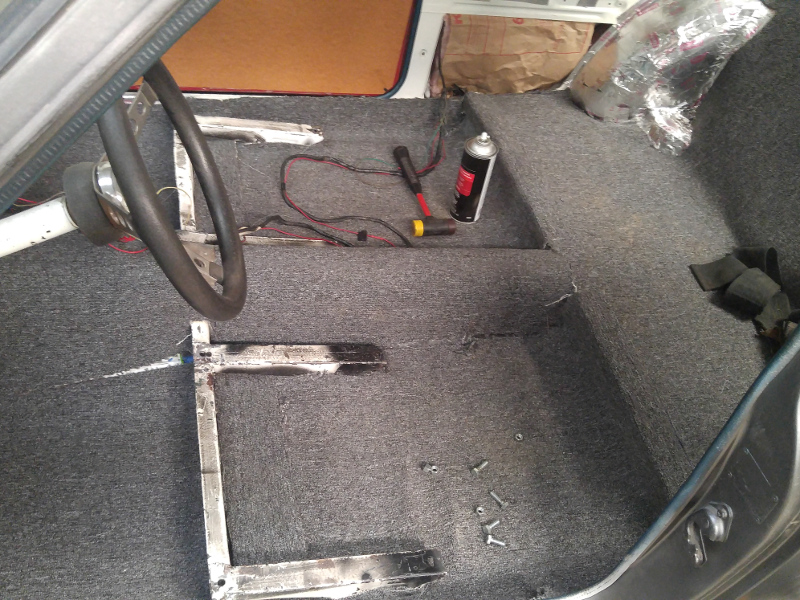
MLV over every square inch:
Home Depot carpet laid out:
Same carpet tucked in:
My wife found some stock floor mats for me a few years back: