What time are you planning on coming through Whidbey? I am heading out to do some junk yarding tomorrow, so I would hate to miss you.
Jordan's '72 2 door KA project
Re: Jordan's '72 2 door KA project
Man, I had to catch up your thread, It looks like you got it all together! Very cool stuff going on here. Yea, that was me that chopped out the fuel pump at Lake Stevens. 
What time are you planning on coming through Whidbey? I am heading out to do some junk yarding tomorrow, so I would hate to miss you.
What time are you planning on coming through Whidbey? I am heading out to do some junk yarding tomorrow, so I would hate to miss you.

Re: Jordan's '72 2 door KA project
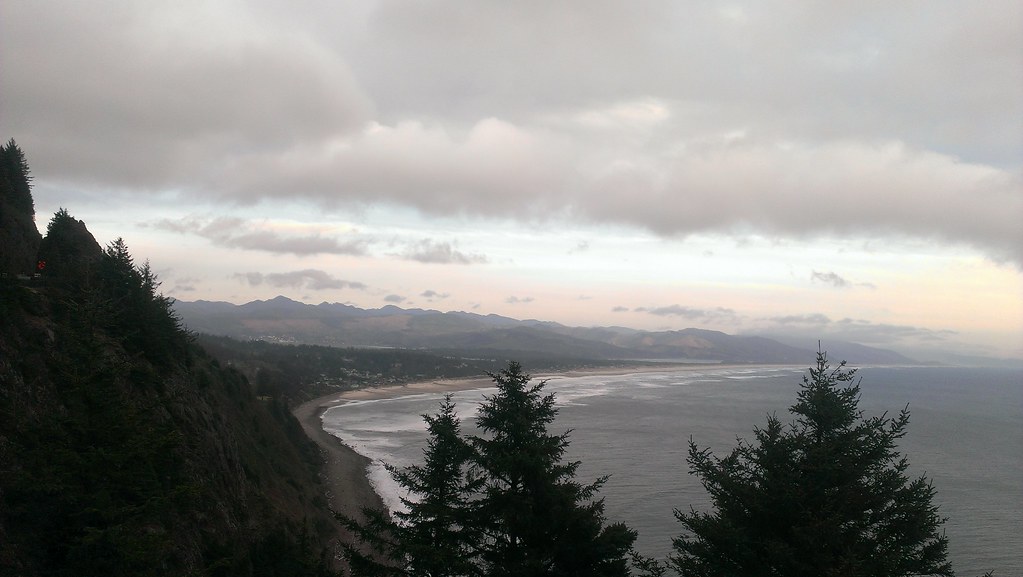
Thanks Ron. We actually camped at the campground just south of Ruby Beach. It was a super nice area! The beach sunsets there are pretty spectacular.RONSLYCHUK wrote:Hey Jordan,congrats on getting your dime done. You will enjoy the drive down to Portland. If you have time check out Voodoo Doughnuts in downtown Portland. If you have not been to the Olympic Penninsula before I think that you will see some awesome sights. Check out Ruby Beach for sure. Cheers Ron.
Thanks Bryan. The trip was pretty tight for timing. I would like to venture out that way sometime though!510tdi wrote:Since joining the Realm I 've enjoyed skimming through folks build threads and just caught up on yours last night. Super impressive. Not only because of the finished product but also the attention to detail and sheer tenacity to get it done. 5 years, right?.Congratolations! Have a great drive.
You ought to make a side trip out I-84 towards the Columbia River Gorge while you're here in the Portland. Great roads and views. You could even stop by our farm then give me a ride around the neighborhood in your dime. Just sayin'.
Drive skillfully,
Bryan
Thanks Joel. Quite a few waves and thumbs up! Haha the 18 hour shakedown turned into a lot more. This weekend was 1550 miles/2500km total! More on that soon.two_68_510s wrote:Nice job Jordan, you are a maniac! Getting any waves and shouts as you drive around?
18 hour shakedown, eh?
I am sure you have rung that thing out in the last couple of weeks, have fun man, that looks like a dream drive to me!
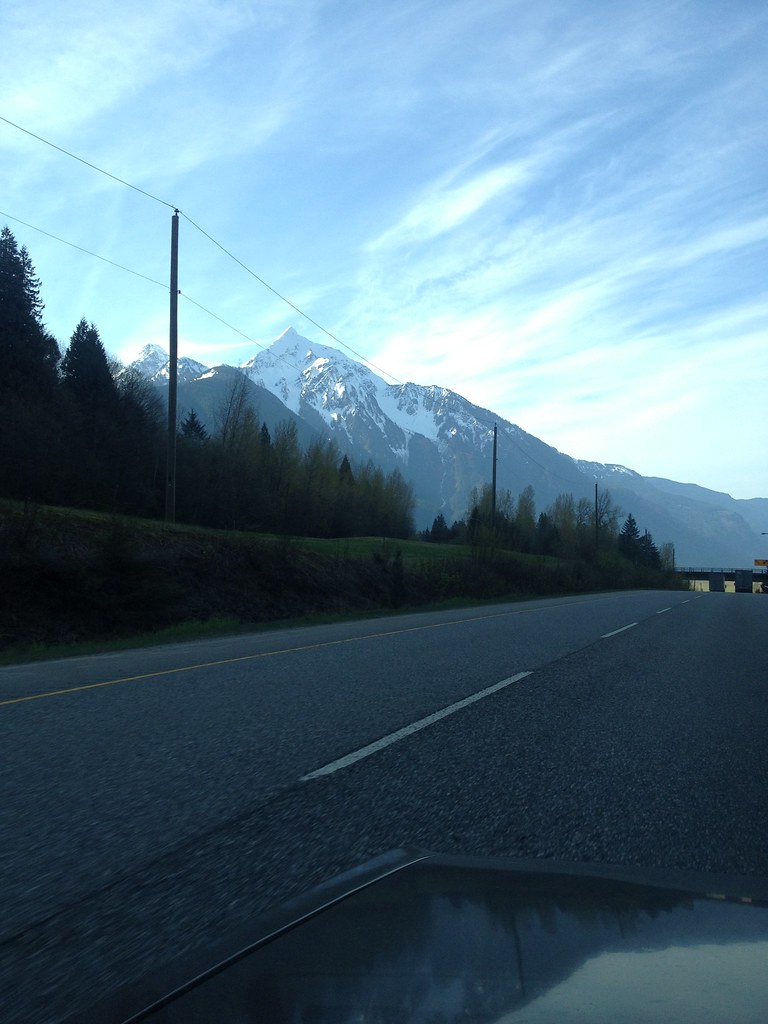
What a gorgeous part of the planet.
You know there's a reason they call BC/PNW the "best place on earth"!
To align the driveshaft, I shimmed up the trans mount as much as I could, moved the nose of the diff up as much as I could (shims beneath the diff), and put spacers above the moustache bar bushings to push the rear of the diff down until I ran out of threads on the moustache bar studs. The phasing should be a non issue since one end is CV or does it need to be aligned specifically with the U joint? I know when I put the CV half shafts together I ensured that the cages were lined up. Those symptoms you listed are definitely what I had before.housew wrote: dumb question though: when you say "align the driveshaft" so you changed the angles of the rear diff or trans to get it "aligned" OR your driveshaft yokes were out of phase?
I have a similarly annoying vibe, usually worse on deceleration (but not with the clutch in) so im thinking I need to reduce the downward angle preload (ie raise the nose of my diff). I've dealt with this in jeep world with a CV at the front of the driveshaft and a u-joint at the rear, and the goal is to align the pinion angle with the shaft angle for the least vibes. I haven't started digging at all yet, but your thread gets the gears in my head turning.
You'll be very grateful if you get the driveshaft alignment all dialled in from the start.
Thanks Rich. We would have loved to stop by but we couldn't make the Port Townsend to Coupeville ferry (5 hour wait was undoable) so we drove down and around but my friend still missed her carpool to Kamloops so we had a late night cannonball run on the Coquihalla to Kamloops. I had great fun driving Highway 8 and the Fraser Canyon this morning in the early am.goichi1 wrote:Man, I had to catch up your thread, It looks like you got it all together! Very cool stuff going on here. Yea, that was me that chopped out the fuel pump at Lake Stevens.
What time are you planning on coming through Whidbey? I am heading out to do some junk yarding tomorrow, so I would hate to miss you.
Here's the route we ended up doing! We dove off of I5 in Sedro-Woolley and took highway 9 which was a nice change from the I5 concrete we'd been through in Seattle. I ran out of map customizations so the highway 8 route from Merritt to Spence's Bridge isn't shown.

For giggles I kept track of some mileage:
40111 Abbotsford, BC 24 MPG
40310 Bellevue, WA 26 MPG
40560 Nehalem, OR 23.3 MPG
40772 Elma, WA 23.4 MPG
40910 Lakewood, WA 25 MPG
41101 Sedro-Woolley, WA 24 MPG
41243 Kamloops, BC 20.5 MPG
41414 Hope, BC 22 MPG
Overall average: ~22.5 MPG which is a little worse than I was expecting but still pretty acceptable considering the amount of fun I had doing it! Maybe winter fuel wasn't helping me out?
Supposedly the biggest Spruce tree in the world!

'72 2 door KA project | S14 Silvia RB25DET | S14 RB26DETT (sold) | '90 Audi 90Q20V (sold)
-
Track Junky

- Supporter
- Posts: 397
- Joined: 14 Feb 2008 02:18
- Location: Chicago Ill.
Re: Jordan's '72 2 door KA project
Whoa! That tree is gnarly!
Scott.
Scott.
Re: Jordan's '72 2 door KA project
You know, it's awesome that you have so much faith in your work that you do a one night test session and then hit the road for some multi day road trip covering some serious mileage. Reminds me of the Bronze. One day out of the shop and I put 500 miles on it through the interior on one of our fun runs.
Very cool, look forward to the trip photos.
Byron
Very cool, look forward to the trip photos.
Byron
Love people and use things,
because the opposite never works.
because the opposite never works.
Oregon Coast
Here are some pictures of the trip as promised.
Bellevue skyline
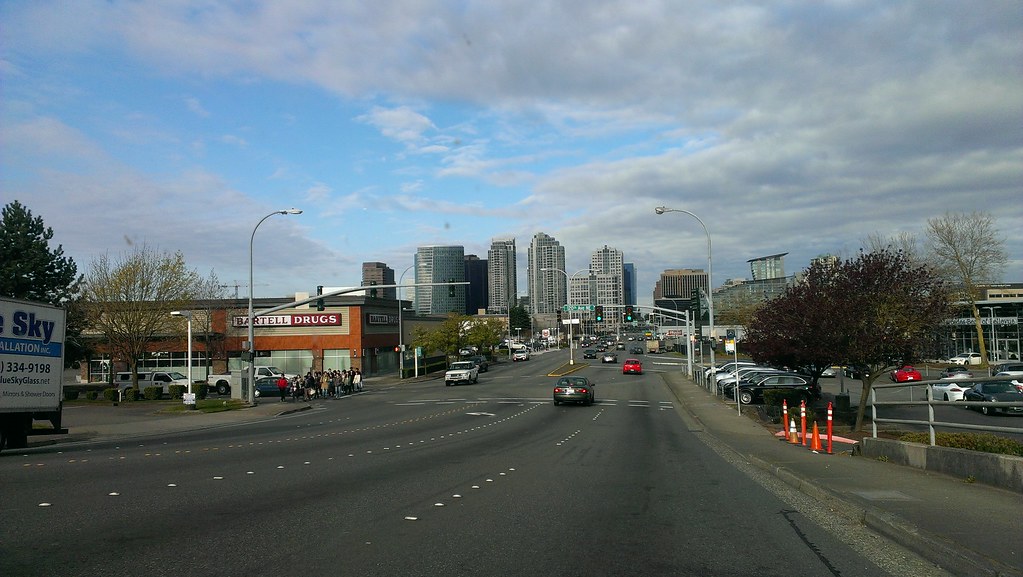 IMAG1631 by kayakdude07, on Flickr
Columbia River Pano
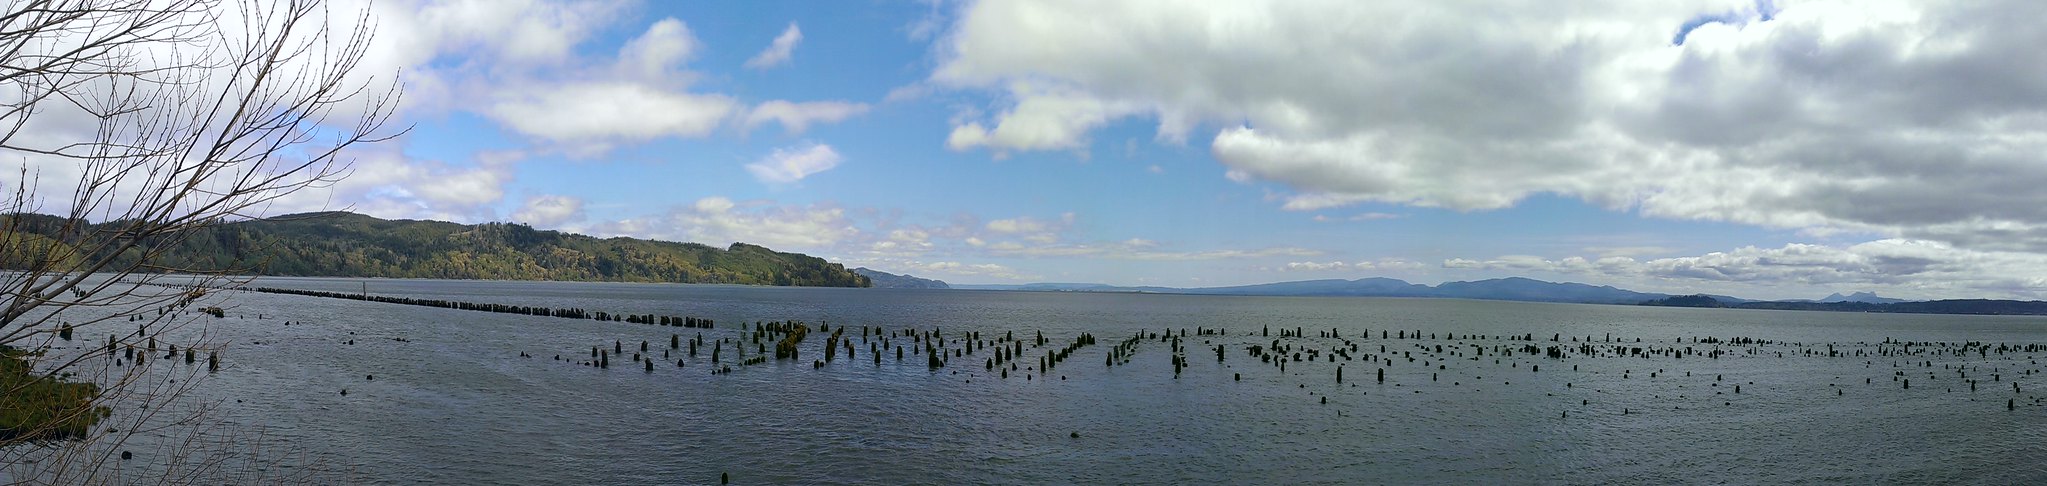 IMAG1647
Columbia River 510
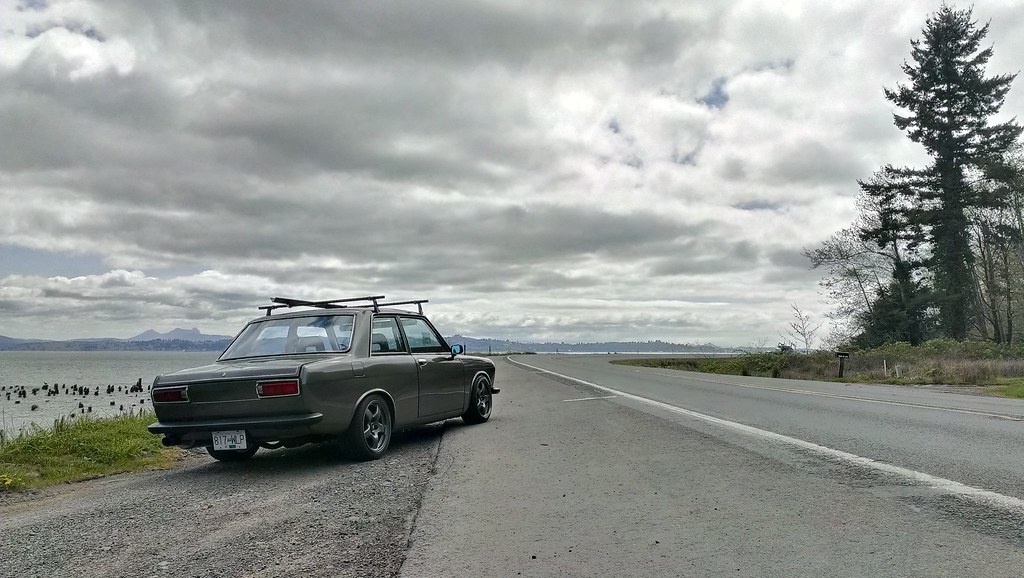 IMAG1648
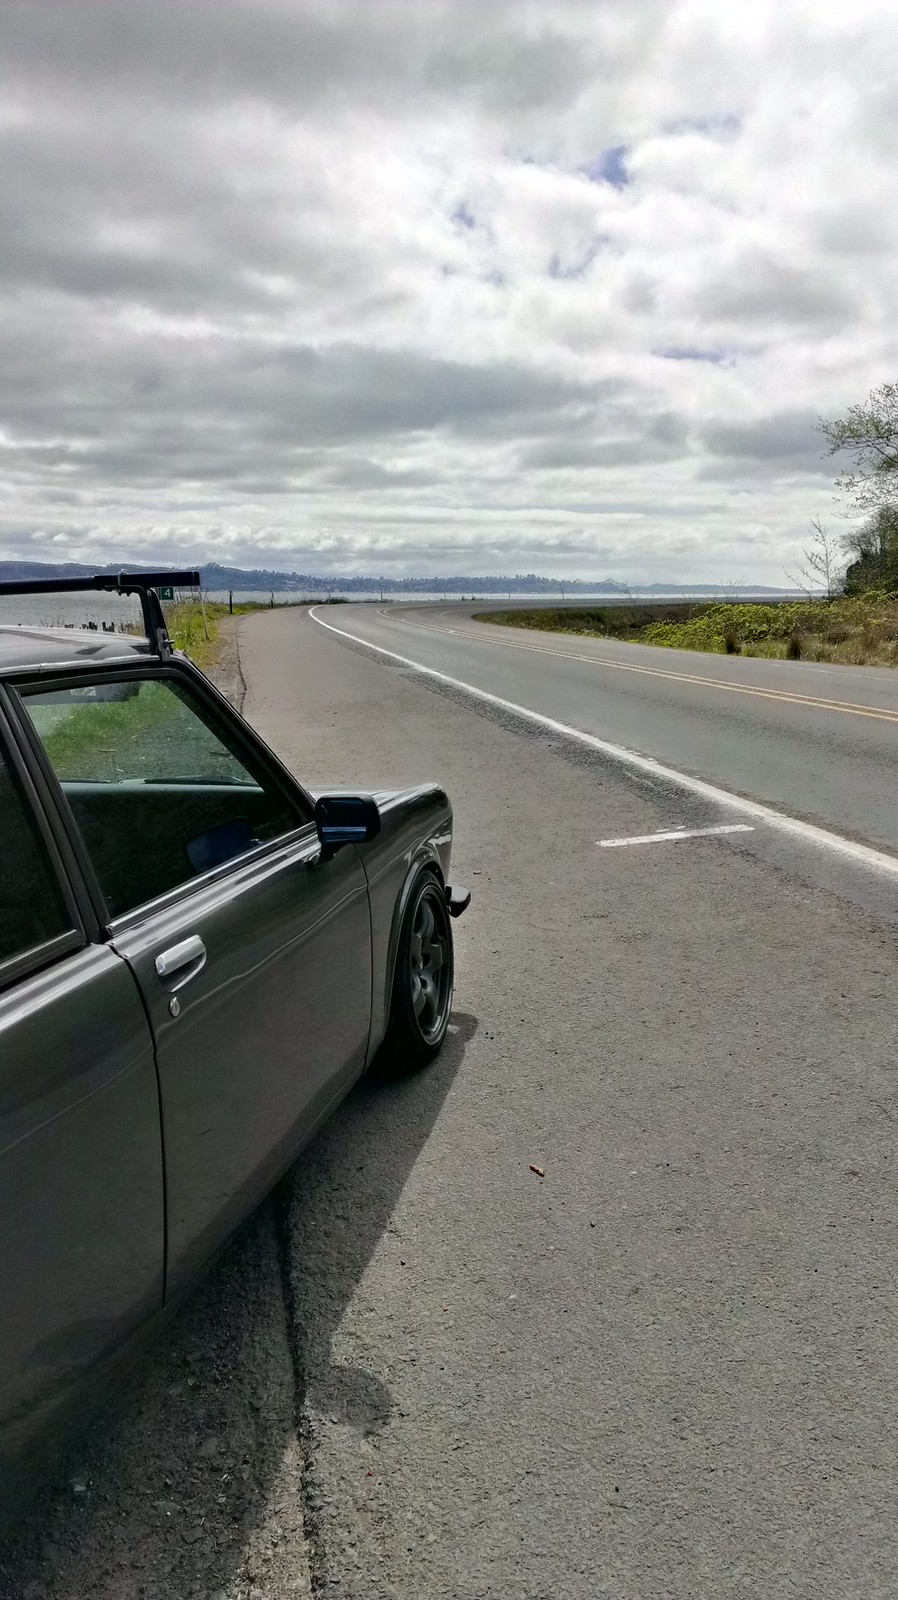 IMAG1649
Cape Disappointment - Not so disappointing.
 IMAG1661
Giant bridge by Astoria.
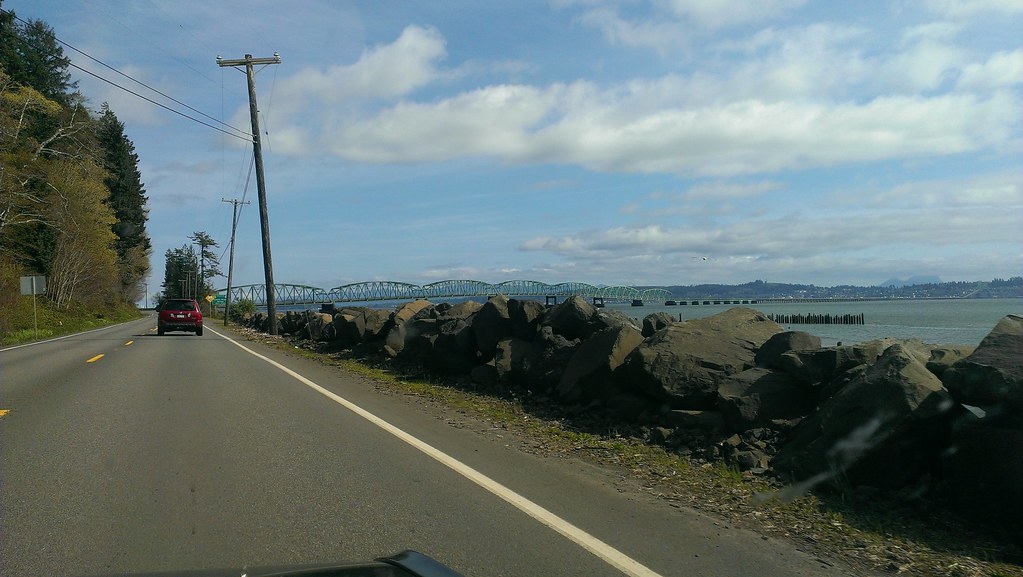 IMAG1679
Cannon Beach funky hotels
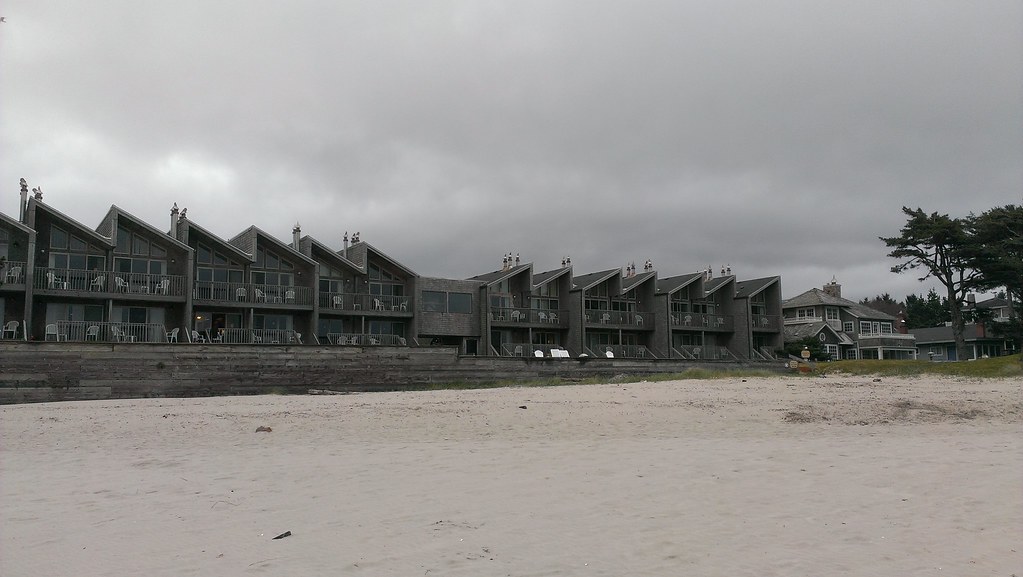 IMAG1687
Cannon Beach w/ Haystack Rock
 IMAG1698
 IMAG1712
For MattnDew at PnP, Portland
 IMG_1705
Can you find the fist pump cloud?
 IMAG1770
Humptulips, WA. lol
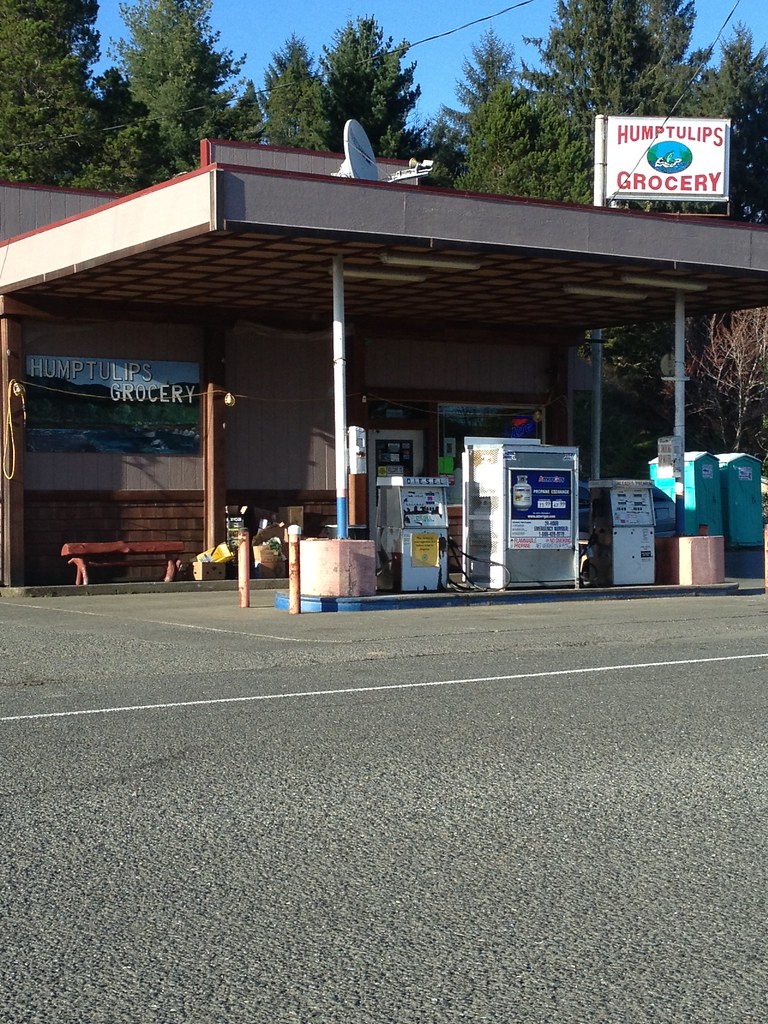 IMG_1706
Ruby Beach Pano
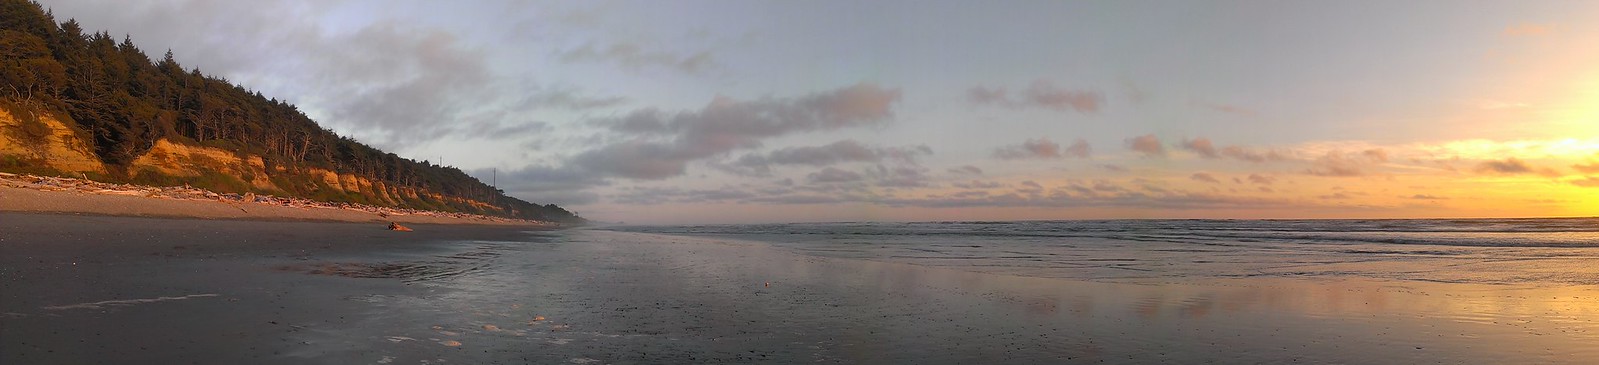 IMAG1799
 IMAG1800
Between Forks, WA and Port Angeles, WA
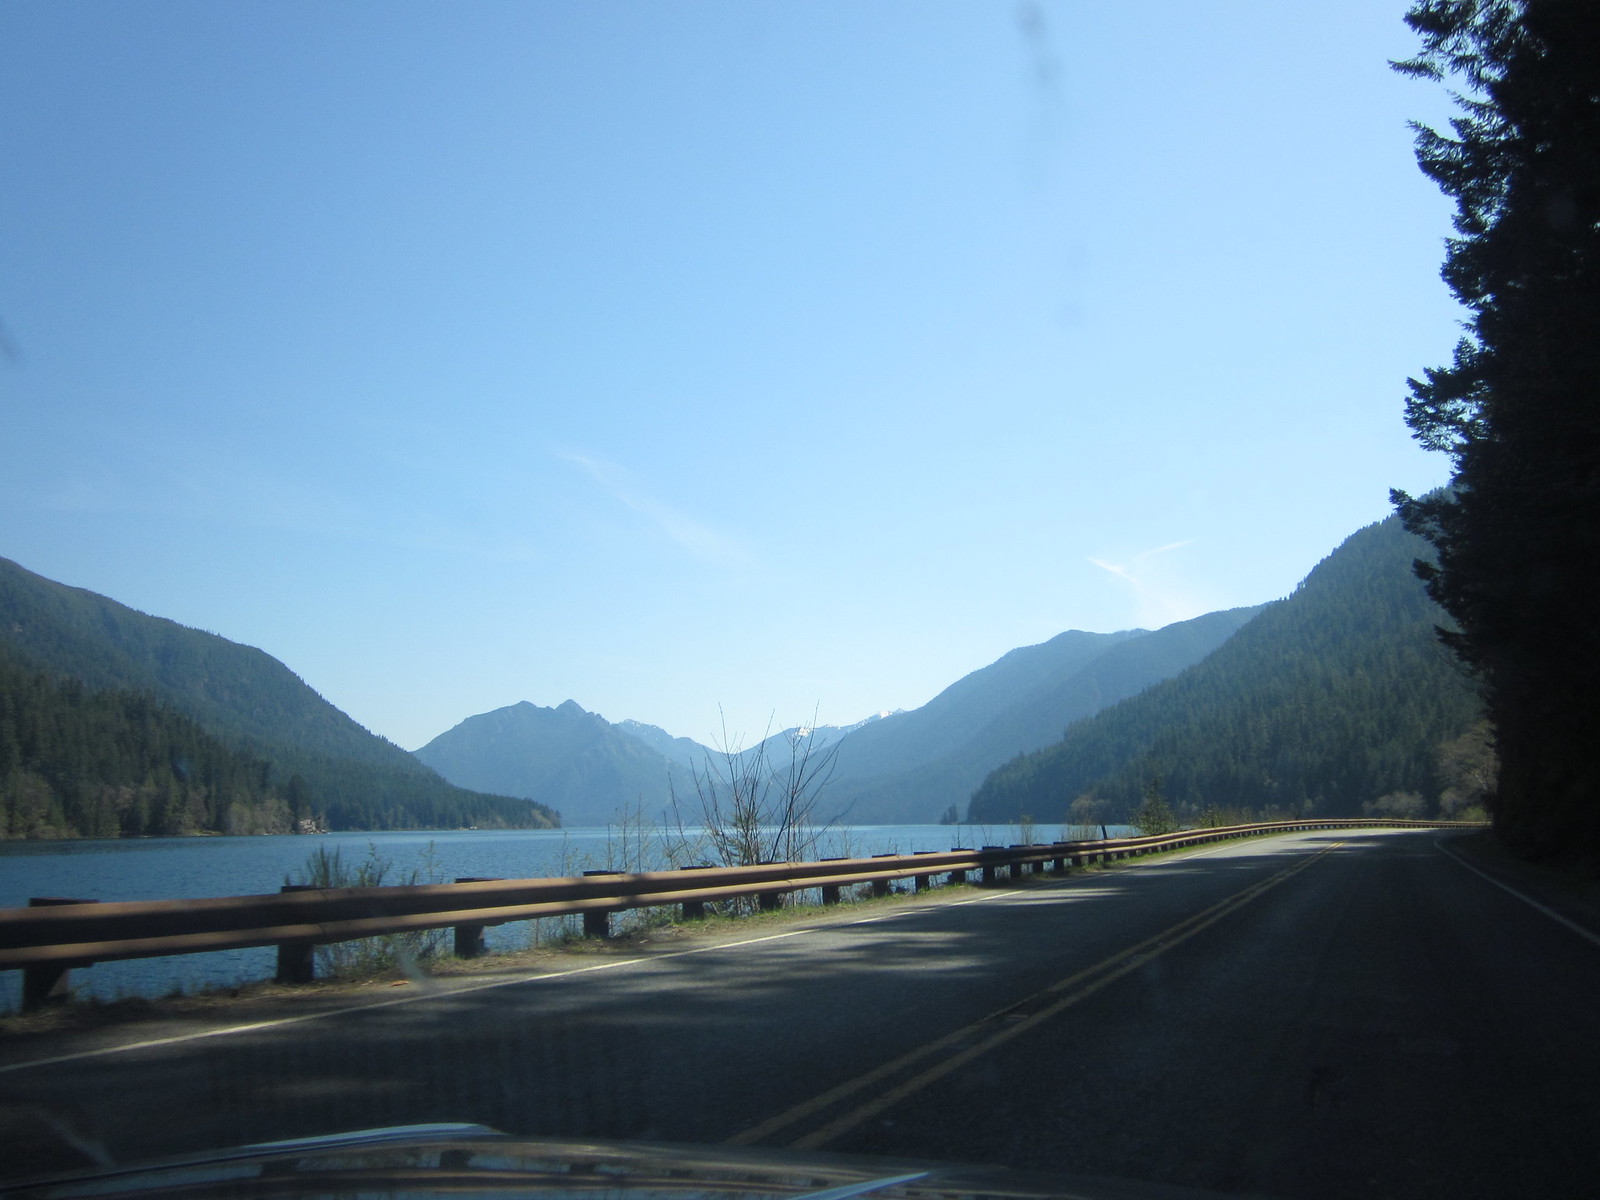 IMG_0015
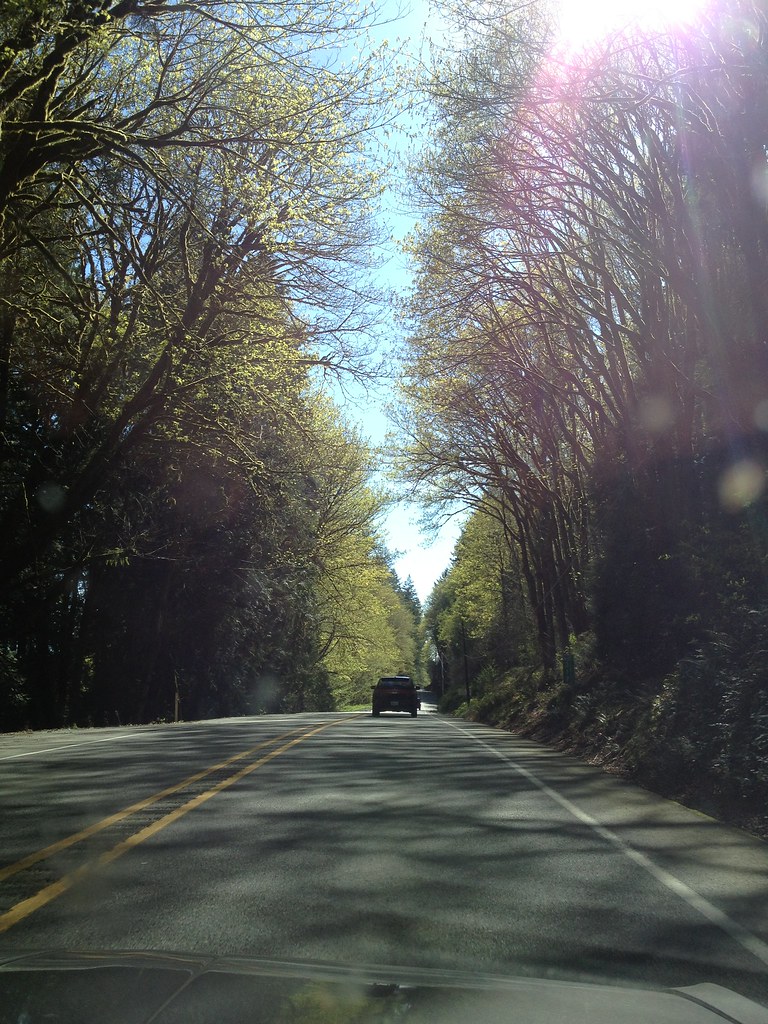
Classic Olympic Peninsula forest
 IMG_1708
 IMG_1715
Spring has sprung near Shelton, WA
 IMG_1721
Back to the great white north near Hope, BC
 IMG_1729
Bellevue skyline
IMAG1631 by kayakdude07, on FlickrColumbia River Pano
IMAG1647 Columbia River 510
IMAG1648IMAG1649 Cape Disappointment - Not so disappointing.
IMAG1661 Giant bridge by Astoria.
IMAG1679 Cannon Beach funky hotels
IMAG1687 Cannon Beach w/ Haystack Rock
IMAG1698 IMAG1712 For MattnDew at PnP, Portland
IMG_1705 Can you find the fist pump cloud?
IMAG1770 Humptulips, WA. lol
IMG_1706 Ruby Beach Pano
IMAG1799 IMAG1800 Between Forks, WA and Port Angeles, WA
IMG_0015 Classic Olympic Peninsula forest
IMG_1708 IMG_1715Spring has sprung near Shelton, WA
IMG_1721Back to the great white north near Hope, BC
IMG_1729'72 2 door KA project | S14 Silvia RB25DET | S14 RB26DETT (sold) | '90 Audi 90Q20V (sold)

Re: Jordan's '72 2 door KA project
hey jordan , man if your car doesn't win the james award at the ajc on the 27. WEEEELLLLL that would be a sad day. 

ding ding dong dong all night long long.
Small update
My clutch master has slowly been dying this spring so this week I managed to get that swapped out in time for the 510 day gathering at Byron's. My clutch requires a normal amount of leg strength to operate it now!
Last night I signed up for Canby 2014 down in Canby, OR. Should be a grand ole time. Last time I was there was in 2010 sans 510 so I'm real excited to go down with a car this time around.
I'm having too much fun these days so my tires are struggling a bit...
I'm going to get my hands on some BFG Rivals in 205/50/15 and install them onto the BBS rims I cleaned up. Very excited to see how the car will do at AutoX this summer with 275# springs up front instead of the 200# springs I had last year and new tires instead of the 15 year old crispies that are on there now.
I'm going to try to fill and restore a cracked dash pad since my dash pad cap has warped and delaminated and is just a huge mess now. We will see how that goes.
'72 2 door KA project | S14 Silvia RB25DET | S14 RB26DETT (sold) | '90 Audi 90Q20V (sold)
-
Mattndew76

- Supporter
- Posts: 1609
- Joined: 23 Jul 2006 18:26
- Location: Creswell, Oregon.
Re: Jordan's '72 2 door KA project
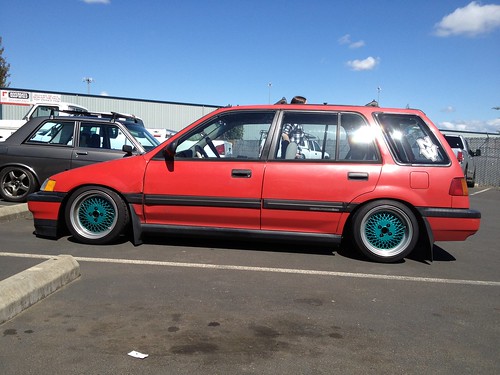
Ha ha ha nice AWD Honda.. To bad I couldn't find one for a reasonable price 
So I went back to the best brand ever Datsun!!!
So I went back to the best brand ever
An Idea doesn't work unless you do.
Dash Pad Restoration
I mentioned previously I'd be working on restoring a cracked dash cap from a parts car to replace my bunged dash with the lifting dash cap cover on it. After doing some research on "Datsun dash repair" I came across a couple different ones that used essentially the same process. This was probably the most helpful one here.
For those who don't want to click the link, here it is in a nutshell:
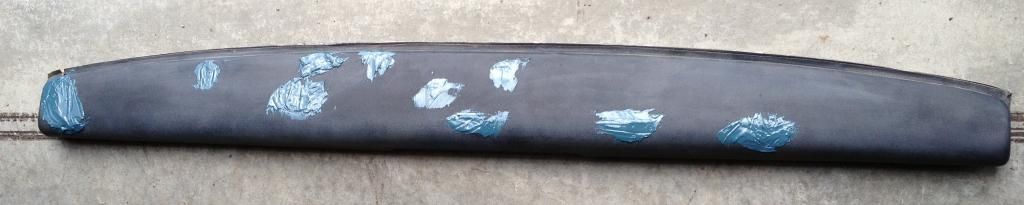
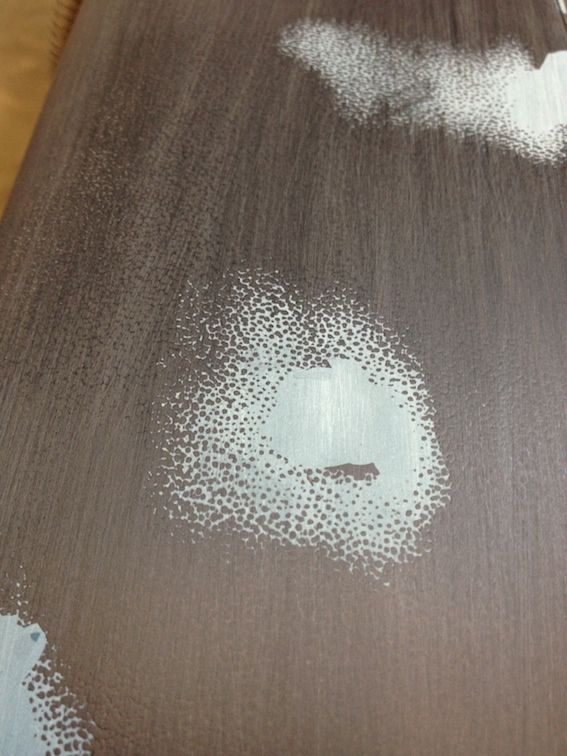
I was a little impetuous so there are no before pictures but here is what it looked like with the first application of the bumper repair cement.

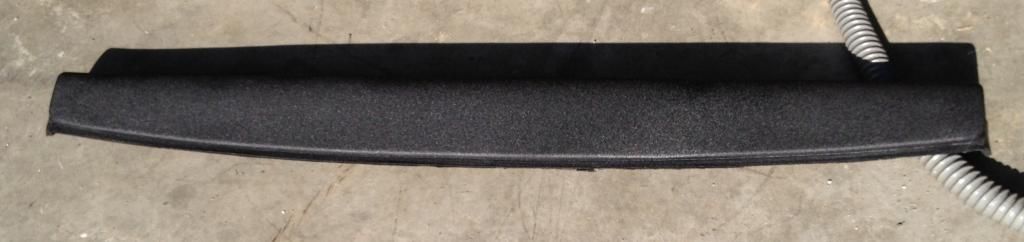
Take it back down with 60-80 grit sandpaper and make sure it is fully filled in.
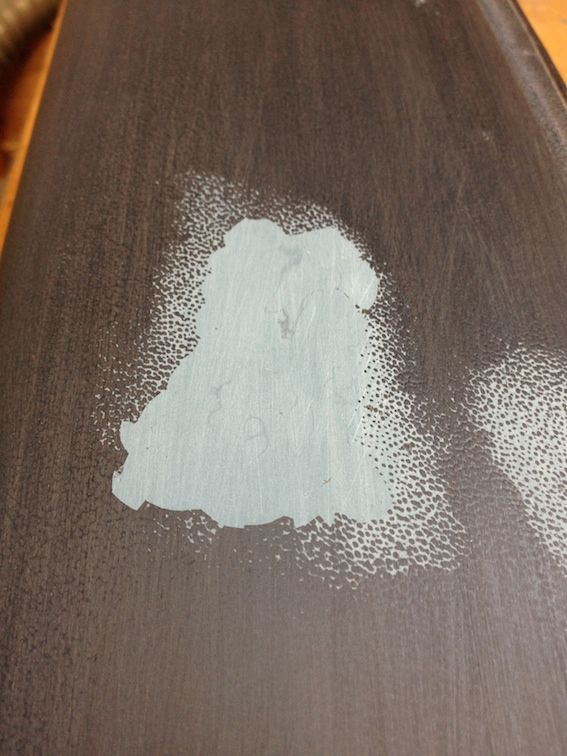
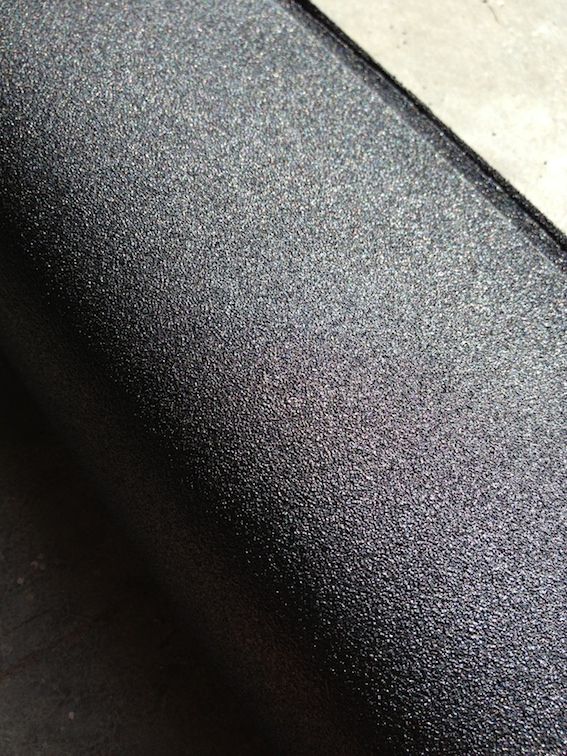
All ready to be textured. It helps if you heat the can in hot water before spraying the coating (much like Plastidip).

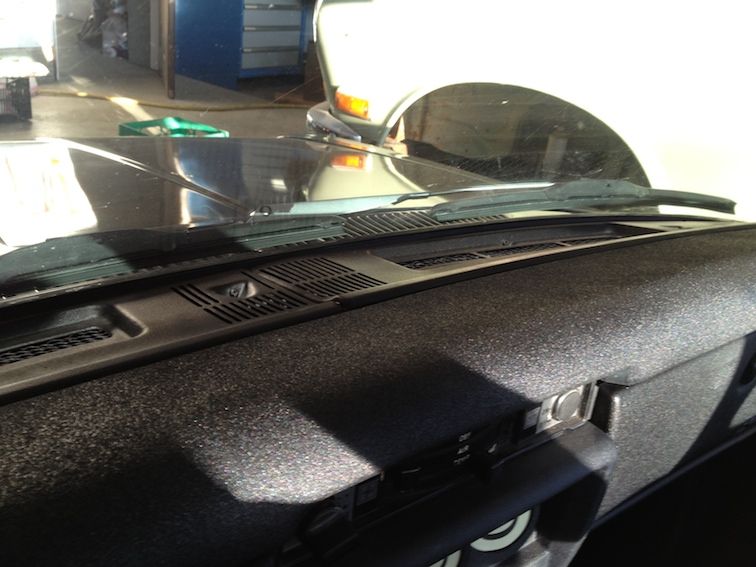
It's not quite the same texture as it was but it is certainly a lot nicer than the lifting/warping dash pad cap I had before. This dash has a bit of the "banana" syndrome with the lifted corners but so do all the other ones I've seen. The texture is a half decent match to the glovebox/gauge surround so it does look like it belongs. I think the SEM texture coating could be used to get something a little smoother and more OEM looking.
You can't tell at all where the dash was repaired. The rougher texture helps but if you're patient with the filler sanding you can get it flawlessly smooth before the coating even goes on.
That's it for now... Back to Goldust!!
For those who don't want to click the link, here it is in a nutshell:
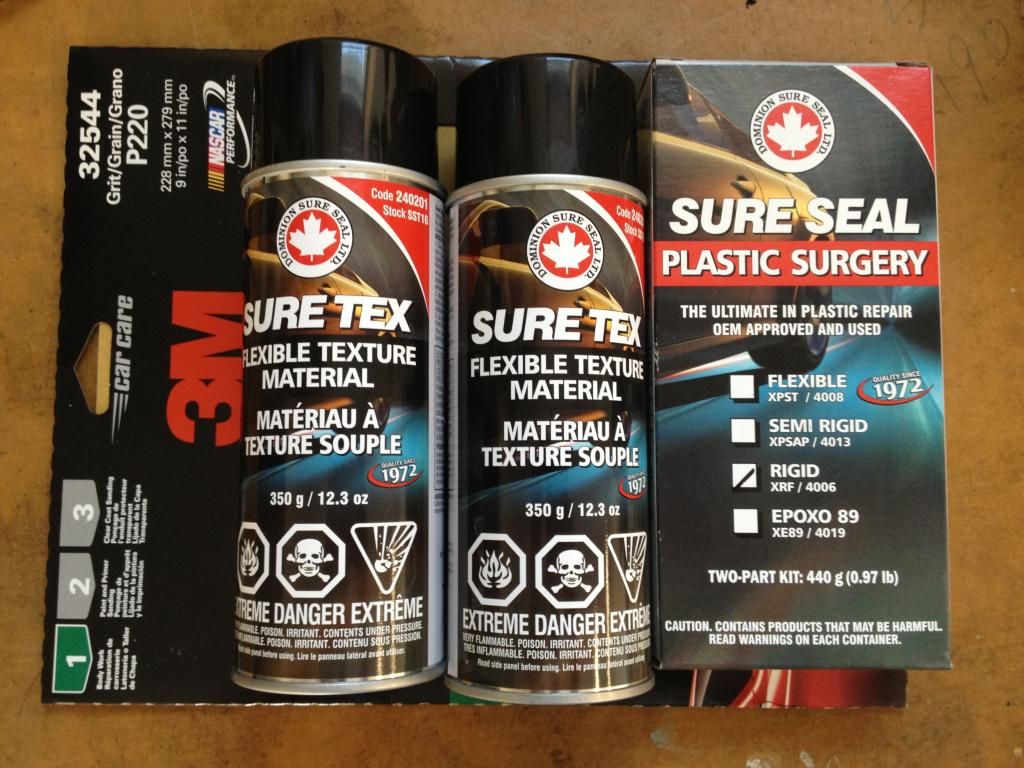
The SEM stuff was ridiculously expensive up here so I ended up using some different (and Canadian woo!) products which seemed to work just fine. Thankfully my dash pad was not cracked into the foam so I didn't need the Great Stuff foam to fill and crevasses. I used 1 can of texture and a little bit of the urethane bumper repair epoxy as pictured below. A few sheets of 60-80 grit sandpaper and a sanding block are great tools to have as well.I bought the following products for this job:
“Great Stuff” foam sealant
SEM Bumper Repair (part #68422)
SEM Texture coating (part #39853)
SEM Plastic and Leather Prep (part#38353)
Step 1:
Disconnect the negative battery terminal.
Remove the dash using the guide on Xenons130’s site: http://www.xenons130.com/dashremoval.html
Make sure you label everything – every bolt, every screw. Take lots of photos to document where things go, and how they go together. I did this, and over 3 months forgot certain steps (I had to remove and install the glove box 3 times to accommodate other parts I didn’t know needed to go on first!). Separate the foam dash portion from the metal part – all of the wire looms are connected to the metal portion of the dash. The foam part has a metal “core” and is flexible – be careful where you store it.
Step 2:
Ream out the cracks in the foam dash pad with a utility knife. Cracks on these dashes are not just straight fissures – the dash separates and the edges turn upwards as they pull apart, so you need to bevel the edges/cut them down so that the dash surface is LEVEL on both sides of the crack.
Step 3:
Clean the surface with compressed air. I used alcohol with a rag as well, since the dash was 3 decades old and wanted to get as much off the dash and exposed foam cracks as possible.
Step 4:
Fill the cracks with Great Stuff. Note, this will expand much more when it dries, so be careful. Don’t worry too much – you can cut it down when it dries. Better to have a little too much than too little. If your dash pad is cracked ALL THE WAY through, you may want to affix some painters tape on the underside to catch the foam and create a “base” for the foam to adhere to.
Step 5:
Cut the dried foam down to a level that is JUST below “flat” on the dash. The bubbly nature of the foam, while not solid, is actually really good for the bumper repair to adhere to. That said, you do want the foam level lower than the final dash level, since the bumper filler will account for some of the depth.
Step 6:
Once you’ve filled the cracks with Great Stuff and cut it down you’re ready to clean it again with compressed air, alcohol, and then fill in the small areas with SEM Bumper Repair. Use a putty knife or similar straight edge when doing this and WORK FAST – it does! Less is more and this dries fast. I didn’t realize this till later so I had to do more, but if I had to do it again, I’d apply smaller coats. I bought FOUR bottles/kits of this (about $8 each on Amazon.com) and it was just barely enough. At that price you might as well get 4 or 5….you may need it later
Step 7:
SAND. I used a Dremel Multi Max oscillating sanding tool and it was perfect for this. Patience is the name of the game here. Take your time. Less is more. Take time to clear the dust with air or a rag and run your hands over it to see if it’s smooth or has high points. Clean with alcohol and re-fill with SEM bumper filler where needed. Then sane again. This is the non-fun part and takes patience.
Step 8:
Prep and paint. Once you’re ready with the texture of the dash, spray the dash pad with the Plastic and Leather Prep from SEM and wipe with a clean rag to get dry. Then spray on the SEM texture coating and let dry. If you want, use something like 3M fine sanding pads to knock down the texture. I kept mine where it was with the can, since it covered up the imperfections I had. Had a done a better job with the surface I would have knocked it down more. Once you have done the texture coating to your liking, do NOT use the Plastic and Leather Prep again, as it will deteriorate the texture coating. Once the texture coating is to your liking, get painting! No real tips here, but less is more and take your time with several passes and about 12 inches of distance between the can and the dash. I also did some SEM clear coat after everything was done. Oh, and I prepped and painted the other trim on the dash (kick panels, under panels, steering wheel housing, etc.).

I was a little impetuous so there are no before pictures but here is what it looked like with the first application of the bumper repair cement.


Take it back down with 60-80 grit sandpaper and make sure it is fully filled in.


All ready to be textured. It helps if you heat the can in hot water before spraying the coating (much like Plastidip).


It's not quite the same texture as it was but it is certainly a lot nicer than the lifting/warping dash pad cap I had before. This dash has a bit of the "banana" syndrome with the lifted corners but so do all the other ones I've seen. The texture is a half decent match to the glovebox/gauge surround so it does look like it belongs. I think the SEM texture coating could be used to get something a little smoother and more OEM looking.
You can't tell at all where the dash was repaired. The rougher texture helps but if you're patient with the filler sanding you can get it flawlessly smooth before the coating even goes on.
That's it for now... Back to Goldust!!
'72 2 door KA project | S14 Silvia RB25DET | S14 RB26DETT (sold) | '90 Audi 90Q20V (sold)
Re: Jordan's '72 2 door KA project
Haha thanks Rob. Don't know how I missed that post.
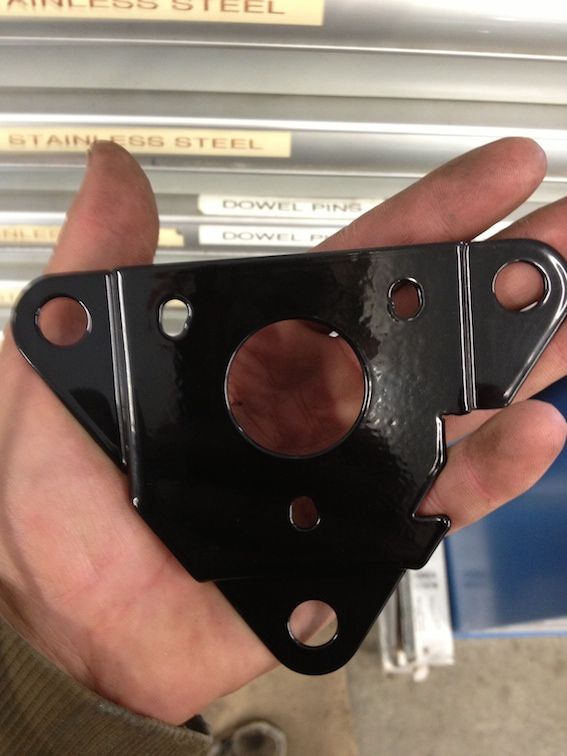
Anyways, got around to finishing off my Mazda wiper motor mod. I'm very happy with my wipers now but I still always hope I won't need em!
I followed the classic how to that's been around forever.
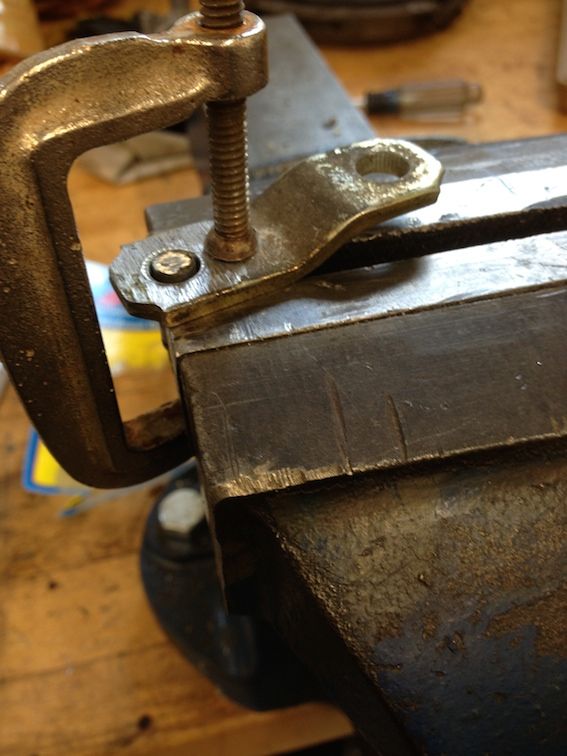
Basically you repin the Mazda connector so the motor works and parks, remove the ball from the wiper arm and weld in the Datsun pin, and elongate the holes on the 510 wiper mounting plate. I powdercoated the wiper mounting plate since it was pretty grungy from before and it looked bad next to the nice wiper motor.
All went quite swimmingly. Here are some pics of the process.
Jigged prior to welding.
Ahh, it points the wrong way!
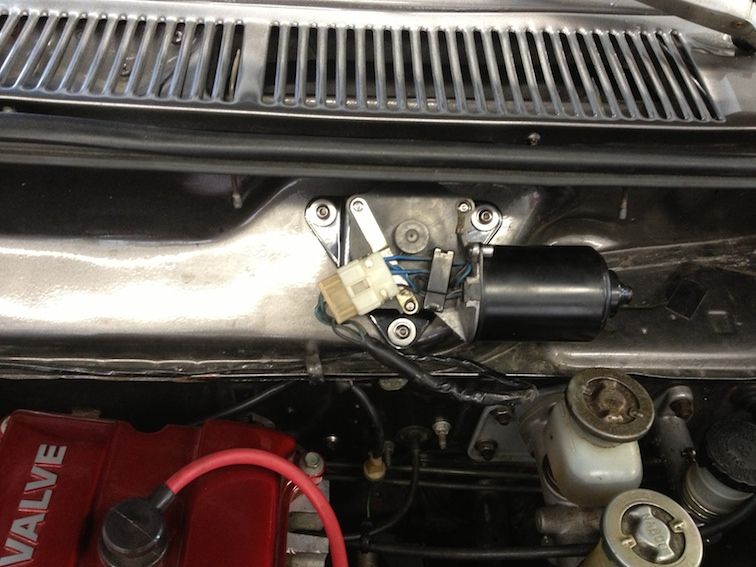
Anyways, got around to finishing off my Mazda wiper motor mod. I'm very happy with my wipers now but I still always hope I won't need em!
I followed the classic how to that's been around forever.
Basically you repin the Mazda connector so the motor works and parks, remove the ball from the wiper arm and weld in the Datsun pin, and elongate the holes on the 510 wiper mounting plate. I powdercoated the wiper mounting plate since it was pretty grungy from before and it looked bad next to the nice wiper motor.
All went quite swimmingly. Here are some pics of the process.

Jigged prior to welding.

Ahh, it points the wrong way!

'72 2 door KA project | S14 Silvia RB25DET | S14 RB26DETT (sold) | '90 Audi 90Q20V (sold)
-
PoorMtnKid

- Supporter
- Posts: 1219
- Joined: 28 Aug 2010 14:43
- Location: Las Vegas NV
Wooden luggage rack!
Thanks PMK. I'm really happy with how it turned out.
Ended up being out in the downpour on Thursday eve and the new wiper motor was da bomb!
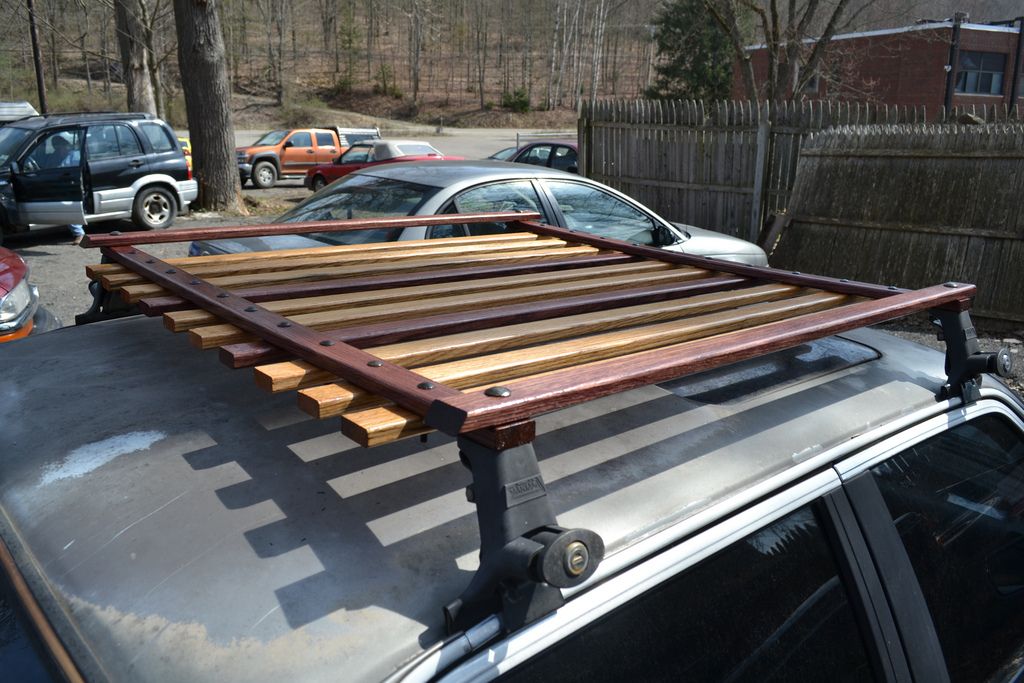
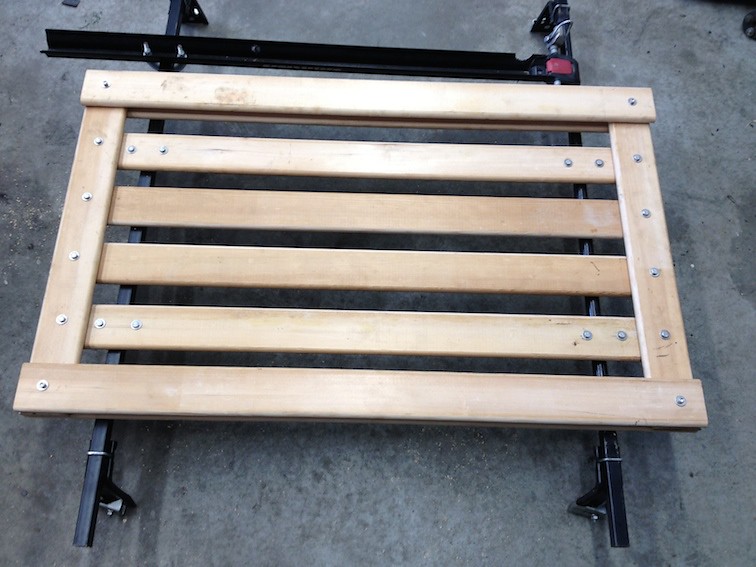
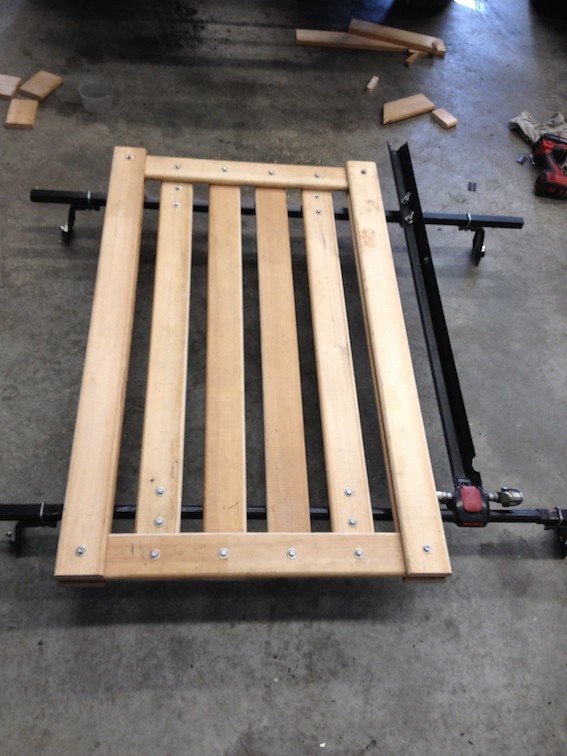
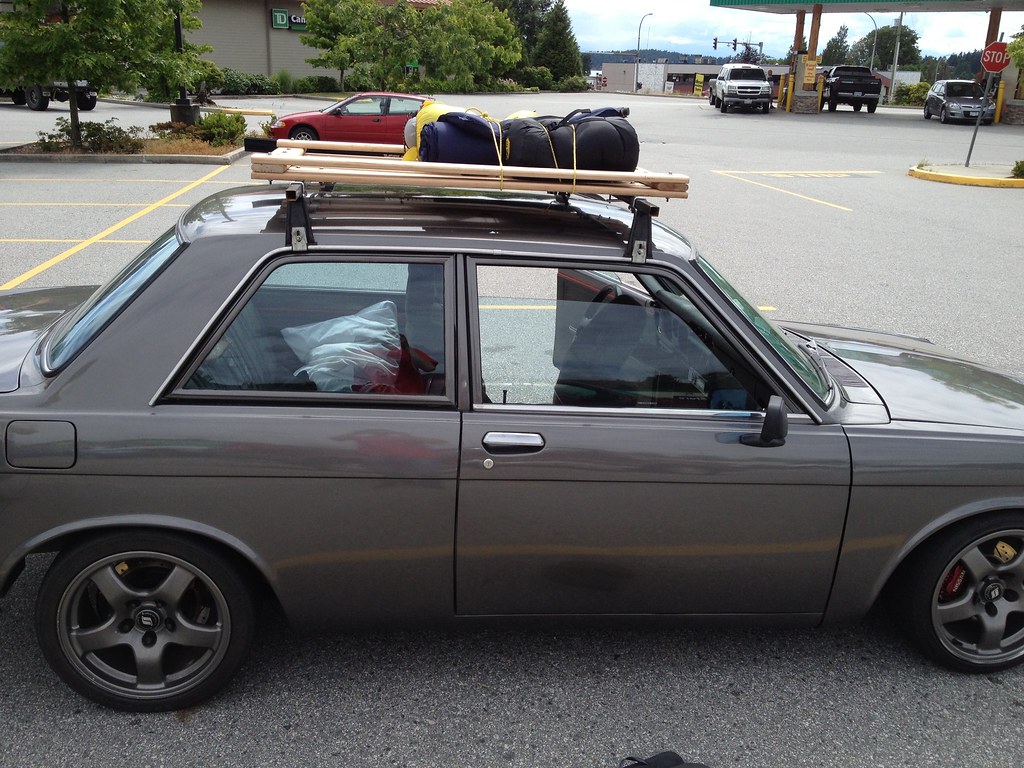
On Thursday I planned a spur of the moment trip to the Sunshine Coast (Sechelt) with some friends (4 of us total) and wanted to take my little 510. We were unsure about being able to fit all the stuff so I agreed to make a luggage rack for storing stuff to make packing less painful. Building a wooden roof rack has always been churning in my head but it was never given much priority until now. I got up at 6:30 on Friday before we left and had the rack finished off and on the car by 10:30. I even had time to change the rear coilovers and adjust them up 20mm for excess cargo/passenger carrying capacity. We left around 11:30 with a few items on the roof so it all worked out!
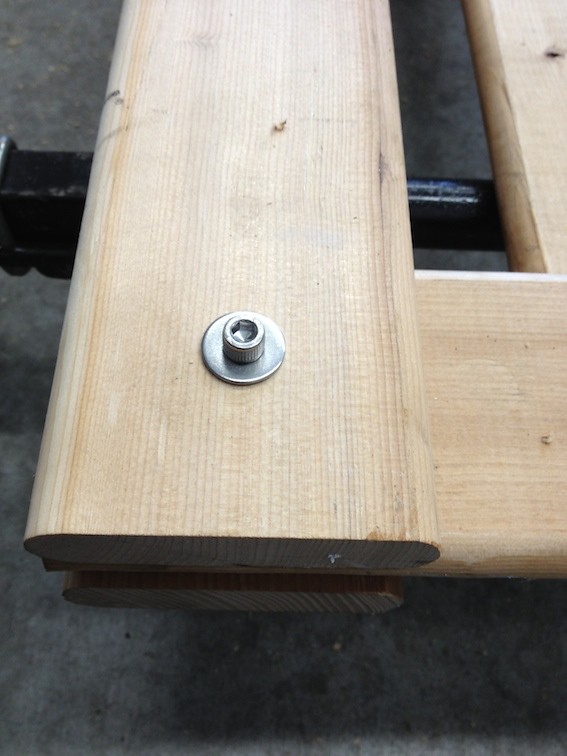
I used some Hemlock ladder material we had around and all stainless hardware. The wood is pretty splitty so all fasteners are machine screws and drilled straight thru the wood. I would have stained it but I needed to use is it immediately after construction so staining will wait for now.
Pops helped by making a jig for the router so we could make nice rounded edges on both sides of the wood since the ladder material came rounded on only one side. It would have been tough to meet the deadline without the routering help!
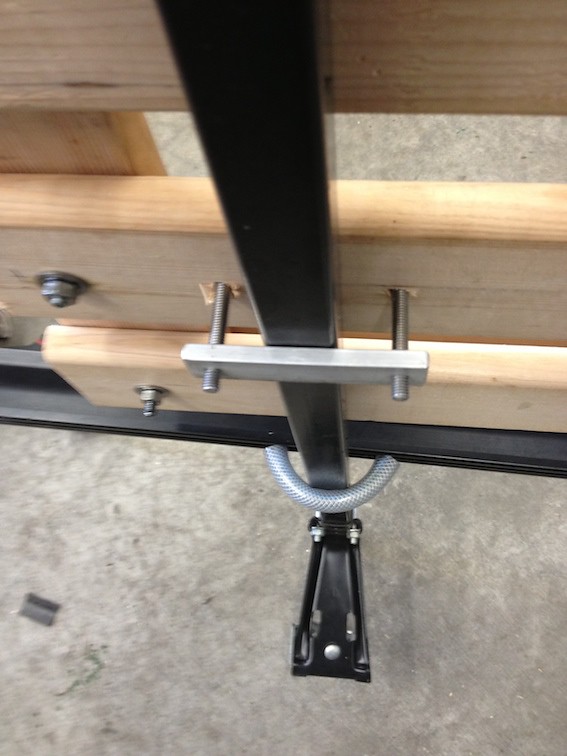
I hate messing around with wrenches and stuff under the roof rack next to the paint so I drilled and tapped some 1/4x7/8" aluminum bar for machine screws and used that to attach it to the existing gutter clip roof rack.
Pretty happy with how it turned out. Gives it a cool, old, beachy sort of feel IMO. All I need is a surf board.
Here's a pic of the inspiration (Thanks Google )
Pics!
Ended up being out in the downpour on Thursday eve and the new wiper motor was da bomb!
On Thursday I planned a spur of the moment trip to the Sunshine Coast (Sechelt) with some friends (4 of us total) and wanted to take my little 510. We were unsure about being able to fit all the stuff so I agreed to make a luggage rack for storing stuff to make packing less painful. Building a wooden roof rack has always been churning in my head but it was never given much priority until now. I got up at 6:30 on Friday before we left and had the rack finished off and on the car by 10:30. I even had time to change the rear coilovers and adjust them up 20mm for excess cargo/passenger carrying capacity. We left around 11:30 with a few items on the roof so it all worked out!
I used some Hemlock ladder material we had around and all stainless hardware. The wood is pretty splitty so all fasteners are machine screws and drilled straight thru the wood. I would have stained it but I needed to use is it immediately after construction so staining will wait for now.
Pops helped by making a jig for the router so we could make nice rounded edges on both sides of the wood since the ladder material came rounded on only one side. It would have been tough to meet the deadline without the routering help!
I hate messing around with wrenches and stuff under the roof rack next to the paint so I drilled and tapped some 1/4x7/8" aluminum bar for machine screws and used that to attach it to the existing gutter clip roof rack.
Pretty happy with how it turned out. Gives it a cool, old, beachy sort of feel IMO. All I need is a surf board.
Here's a pic of the inspiration (Thanks Google
Pics!
'72 2 door KA project | S14 Silvia RB25DET | S14 RB26DETT (sold) | '90 Audi 90Q20V (sold)
Re: Jordan's '72 2 door KA project
In classic last minute fashion I decided now would be a good time to redo the front suspension on the car, mess around with rim fitment and get my "new" wheel setup on the car. 3 days til Winthrop!
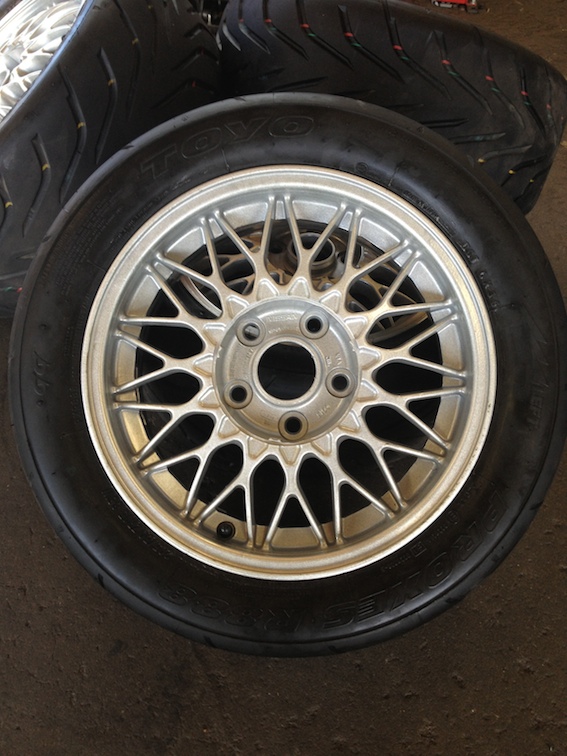
I started with getting my Toyo R888s mounted on the BBS rims I cleaned up and powdercoated. (Thanks Keith!) Fresh off the balancer!
I've been meaning to swap out my front springs from the 8" 200#/in springs I have to 8" 275#/in springs which are more suited to the weight of the KA. Now is the time to do it since I have to adjust my camber plates and lower control arms inward for a bit more tire clearance.
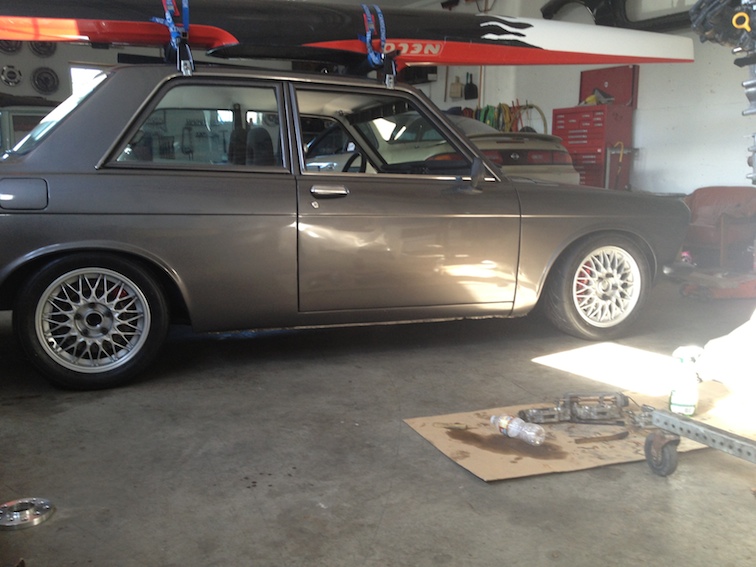
Here's a picture showing the two rim/tire setups. 15x6.5 BBS with 205/50/15 R888 left and 16x8 GTR with 215/40/16 BFG. The widest section of the 205/50/15 is about 17mm narrower than the widest part of the GTR rim/tire except that it is right near the tread whereas the widest part of the 215 tires on the GTR rims is the rim lip. Despite being wider, the GTR rims are easier to fit since the widest part is at a smaller diameter. This is why I'm reworking the front suspension components to gain a bit more fender clearance. The 205/50/15s are a nominal 9mm taller than the GTR rims with 215/40 as well. Once the front is all dialled in again, I'll be able to run a square setup of 205/50/15 with 15mm spacers to +30 equivalent for race and a square 215/40/16 setup on GTR rims (+30) for the street. Quite excited for that except for the pricetag on 4 new tires...

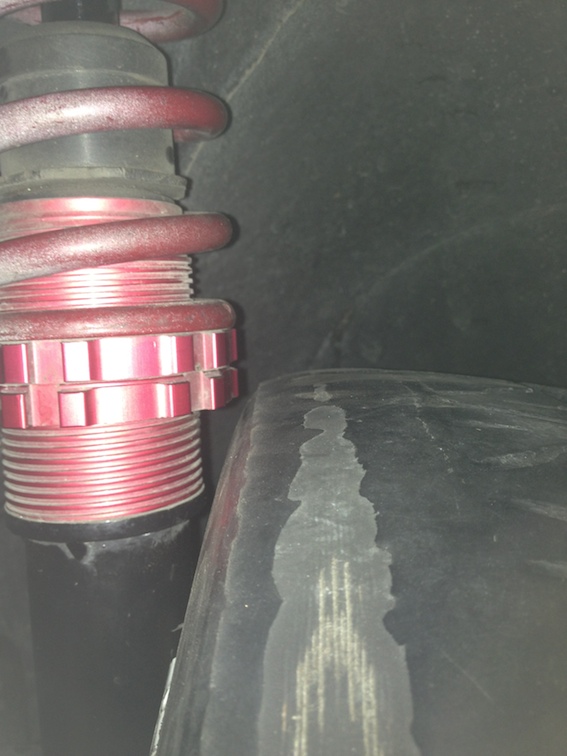
Space is tight. First pic 205/50/15 R888 with 15mm spacer, second 215/40/16 BFG on GTR rim no spacer.
I miss my GTR wheels already! Anyone a meshie fan out there?
I started with getting my Toyo R888s mounted on the BBS rims I cleaned up and powdercoated. (Thanks Keith!) Fresh off the balancer!
I've been meaning to swap out my front springs from the 8" 200#/in springs I have to 8" 275#/in springs which are more suited to the weight of the KA. Now is the time to do it since I have to adjust my camber plates and lower control arms inward for a bit more tire clearance.
Here's a picture showing the two rim/tire setups. 15x6.5 BBS with 205/50/15 R888 left and 16x8 GTR with 215/40/16 BFG. The widest section of the 205/50/15 is about 17mm narrower than the widest part of the GTR rim/tire except that it is right near the tread whereas the widest part of the 215 tires on the GTR rims is the rim lip. Despite being wider, the GTR rims are easier to fit since the widest part is at a smaller diameter. This is why I'm reworking the front suspension components to gain a bit more fender clearance. The 205/50/15s are a nominal 9mm taller than the GTR rims with 215/40 as well. Once the front is all dialled in again, I'll be able to run a square setup of 205/50/15 with 15mm spacers to +30 equivalent for race and a square 215/40/16 setup on GTR rims (+30) for the street. Quite excited for that except for the pricetag on 4 new tires...
Space is tight. First pic 205/50/15 R888 with 15mm spacer, second 215/40/16 BFG on GTR rim no spacer.
I miss my GTR wheels already! Anyone a meshie fan out there?
'72 2 door KA project | S14 Silvia RB25DET | S14 RB26DETT (sold) | '90 Audi 90Q20V (sold)
-
bertvorgon

- Supporter
- Posts: 12034
- Joined: 04 Aug 2003 20:45
- Location: White Rock, B.C. Canada
Re: Jordan's '72 2 door KA project
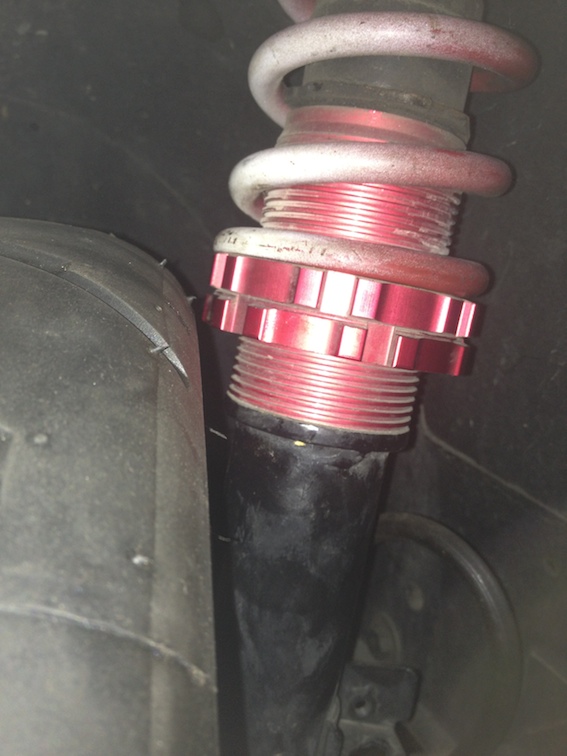
You will have to give us an update as to what you think of those tires. I would start at maybe 38 PSI and go from there.
Hopefully you can get more clearance at the locking rings, as that tire will hit it under deflection.
I know on my strut, as the collars are higher than yours, I ground the threads smooth, so for the odd time the tire deflection was huge, it would just burnish the strut, instead of the threads eating the tire.
"Racing makes heroin addiction look like a vague wish for something salty" - Peter Egan
Keith Law
1973 2 Door Slalom/hill climb/road race / canyon carver /Giant Killer 510
1971 Vintage 13' BOLER trailer
Keith Law
1973 2 Door Slalom/hill climb/road race / canyon carver /Giant Killer 510
1971 Vintage 13' BOLER trailer