David's VG33 Swap Finally Begins

View and post your 510 project(s)
qwik510
Supporter
Posts: 3216
Joined: 29 Oct 2006 18:51
Location: Maryland - East Coast USA

Re: David's VG30 Swap Finally Begins

Post by qwik510 »

hang_510 wrote:
qwik510 wrote:I know I am long overdue for an update. I will try to update this soon.
the title too ;)

Fixed the title. Update soon.
Enjoy The Ride!
David
ImageImage
User avatar
510Finn
Supporter
Posts: 23
Joined: 30 Aug 2009 21:02
Location: Nor*Cal - SF Bay Area

Re: David's VG33 Swap Finally Begins

Post by 510Finn »

Any updates?
1972 4dr KA24E-T
1972 Blue WaGoon
qwik510
Supporter
Posts: 3216
Joined: 29 Oct 2006 18:51
Location: Maryland - East Coast USA

Re: David's VG33 Swap Finally Begins

Post by qwik510 »

510Finn wrote:Any updates?
Unfortunately no.

I have been busy / not motivated to work on it for quite a few months. Now that is it getting hot, we have had over 19 days in June at 90 degrees or hotter, I just haven't motivated myself to get out there and wrench on it.

I just picked up a modified 510 gastank that is ready for the Z31 intank pump so when that comes in, I would like to get back to it.

I need to finish up the fuel system, then finish mounting the radiator and hoses and I will be able to start on the wiring. Having 3 other Datsuns to drive is a good and bad thing. In the case of this project, it is bad because when I feel the urge, I just jump in one of them and go for a cruise. Usually my LS1 powered 240Z.

I promised myself I would start getting back to this one soon.
Enjoy The Ride!
David
ImageImage
qwik510
Supporter
Posts: 3216
Joined: 29 Oct 2006 18:51
Location: Maryland - East Coast USA

Re: David's VG33 Swap Finally Begins

Post by qwik510 »

Time for a much overdue update.

I have been working on the car slowly. I have been trying to work on one system at a time in preparation for firing it up.

So I worked on the cooling system. It is finally complete.

VW VR6 Radiator with dual 12" fans. I needed to have some custom mounts made for the bottom and modify stock VW mounts for the top. All of the hoses are cut from other hoses I had or found at the auto parts store that would work. Heater hoses were pretty hard to get in place as there was not much room back there.

I didn't get enough pics of it all but here are a few for now. (I wish the Datsun510.com website was back up so all my other pics would show up)


Image
Lower mounts have a rubber cushion that allows for movement.

Image
Thanks to my friend Keith for making up the lower mounts.


Image
Stock VW upper mount that I bent in the bench vise to get the right positioning.

Image

Image

Next I moved onto the fuel system. I picked up a 510 tank that was already modified for a Z31 300ZX intank fuel pump. It was installed in the stock location and new braided stainless 5/16" fuel lines were run to feed the engine. Sorry no pics of this.

Now that the fuel system and cooling systems are complete, I can move onto the wiring. See next post for more.
Enjoy The Ride!
David
ImageImage
qwik510
Supporter
Posts: 3216
Joined: 29 Oct 2006 18:51
Location: Maryland - East Coast USA

Re: David's VG33 Swap Finally Begins

Post by qwik510 »

So next up is the wiring. This is the one area that I was feeling the least comfortable with. First off, I want to give special thanks to Jeff (Icehouse on Ratsun) for putting together a fantastic, easy to understand wiring diagram for installing a VG into a 510.

I have been spending many hours studying the VG FSM and the 510 wiring diagrams from Paolo. After many hours going through them, I finally had an idea of what everything was and what went to where.

So I set up a large table in my basement and laid out the VG ECCS harness and started to identify and label all of the connections. I tore into the 510 engine compartment harness, completely unwrapped it, and got rid of stuff I didn't need and extended and rerouted the wires I needed moved. It was nice to have this setup inside as it is friggin freezing out in the garage.

Last week, it got warmer for a few days, so I took the ECCS harness out to the garage and decided how I would route everything and where I would bring the harness through the firewall and into the car. Then I figured out where I wanted to mount the ECU. I had seen enough rats next wiring jobs to know that I wanted mine to be neat and out of the way of clumsy passenger feet.

My good buddy Lou sent me a link to a website in Australia that does custom ECU wiring and they made a really sweet panel that mounted up under the glove box area.

http://www.plmsdevelopments.com/510_mtg_plate.htm

Image

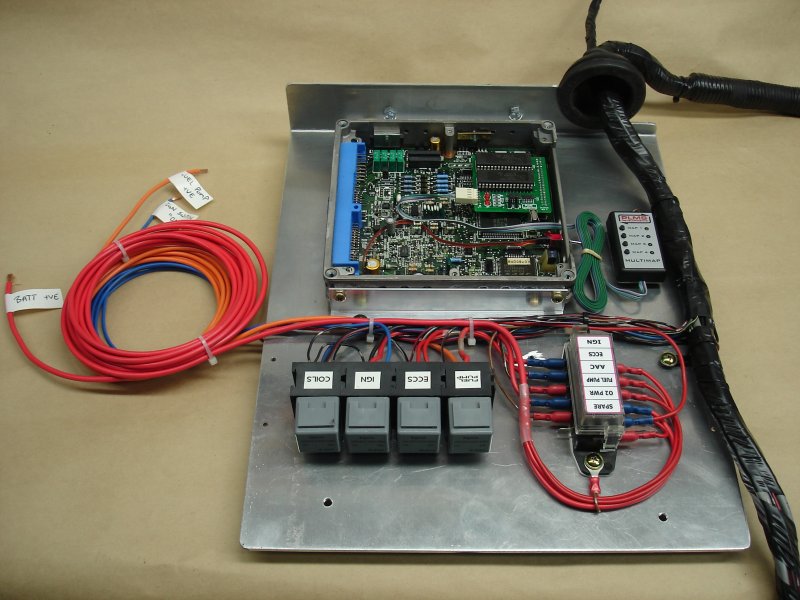
I decided I wanted to mount the ECU in a similar fashion. While I had the warmer weather, I ran all of the wires from the trunk area to the front of the car under the dash. Then I moved onto building my ECU panel. This above panel was my inspiration.

I found a panel (an old computer keyboard tray from a metal desk) and went to work.
Below is the result of too many hours spent on this.


Image

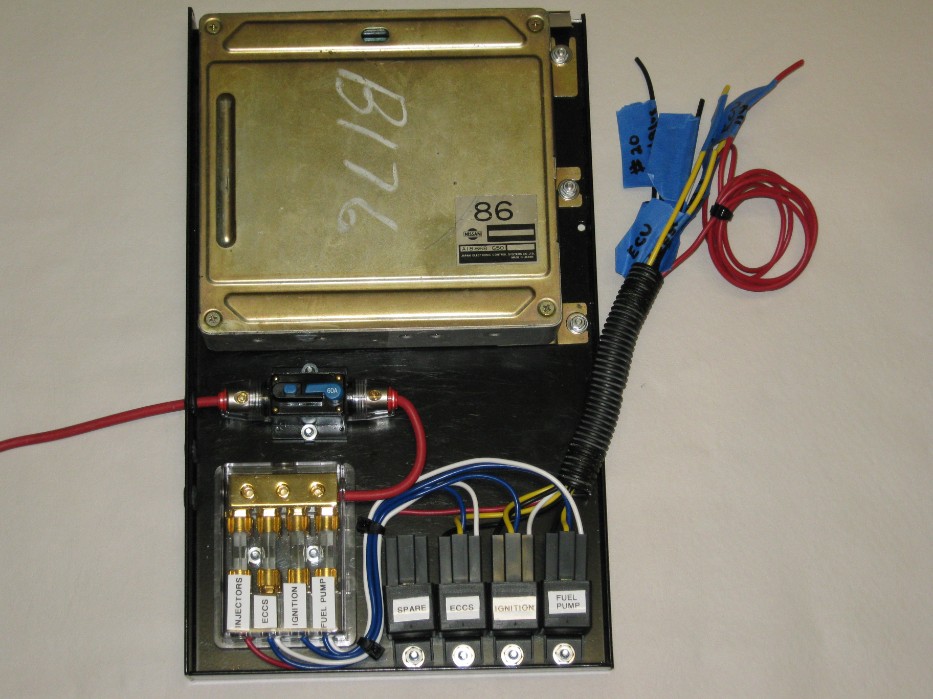
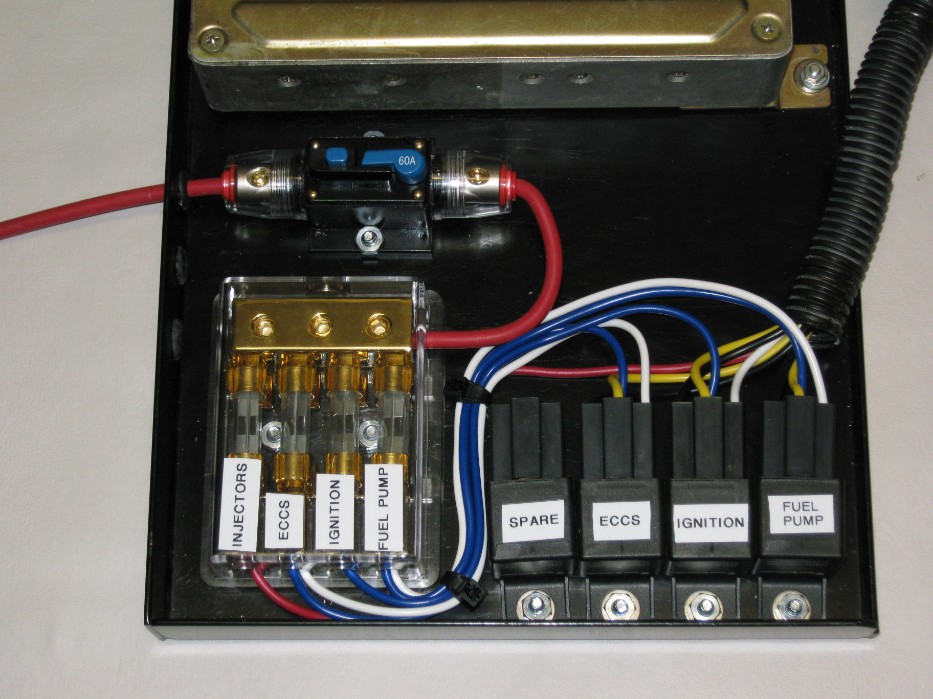
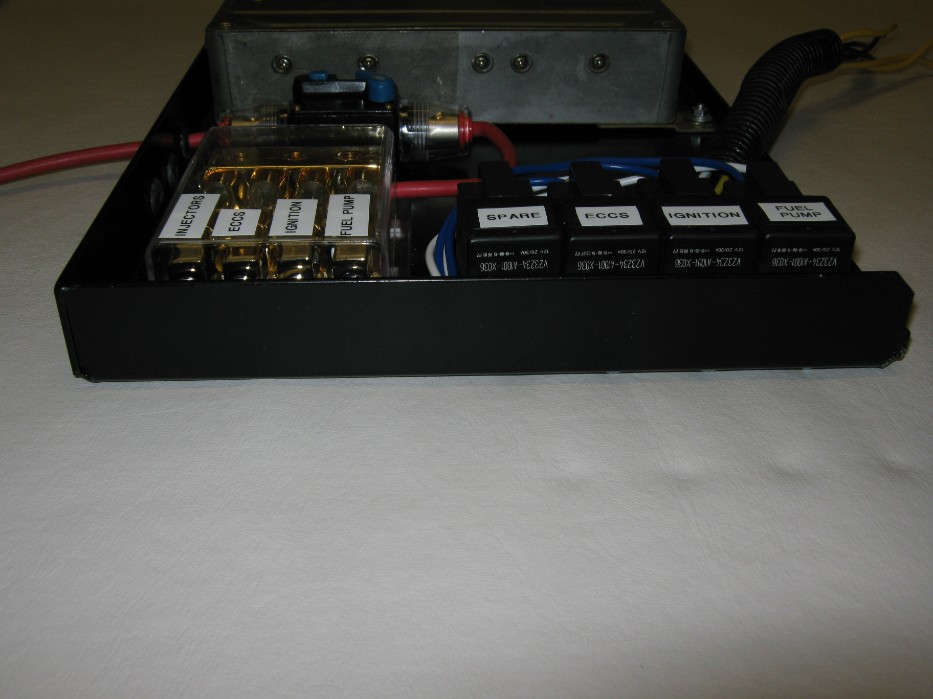
I finalized this ECU panel today. All the connections to the new ECCS fuse box and
relays have been hooked up and tied in.

Image


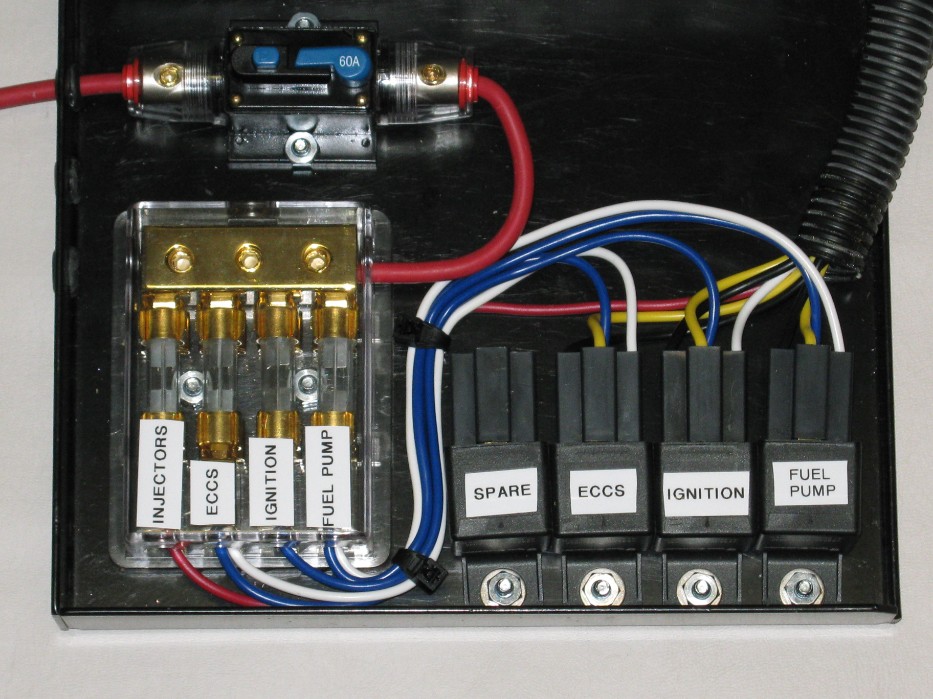
I am using a trunk mounted battery. I will be using a Ford type Starter Solenoid mounted in the trunk, next to the battery, so the main power cable to the starter will only be hot while cranking. You can see the red 8 gauge wire coming in on the left of the ECU panel, that feeds 12v from the trunk mounted starter solenoid. I will have an inline fuse in the trunk to protect the 8 gauge wire. The wire will come through the interior, under the back seat and follow the trans tunnel to under the dash. It then passes though a grommet on the side of the ECU panel and feeds a 60 amp resettable circuit breaker. From there it goes to the fuse box which is also a distribution block. It has 2 more outputs on it. One will feed another 8 gauge which goes to the alternator. The other one will feed the fans, headlights and horn. As you can see, I installed a spare relay in case one goes bad on me while I am away from home. This way, I can just unplug the relay harness and plug it onto the spare.


Image

The 3 connectors from the ECU wiring harness plug in on the right side of the ECU
by those other wires. There are only 8 wires there. I labeled them, 5 of them hook
into the ECU wiring. I will tie them in to the proper wires which I have marked on the
ECU harness.

So it is pretty easy at this point. I am considering using bullet connectors for those
8 wires so I will be able to disconnect them easily if I ever need to service this setup.
That will make the wiring to this panel fully separate except for the 8 gauge wires
which can be disconnected easily. I made sure to leave alot of extra wire so I can have
a service loop when the panel is in the down position.


I mounted a piano hinge on the back of the panel that will mount to the firewall. This will allow the panel to swing down for easy access.

Image

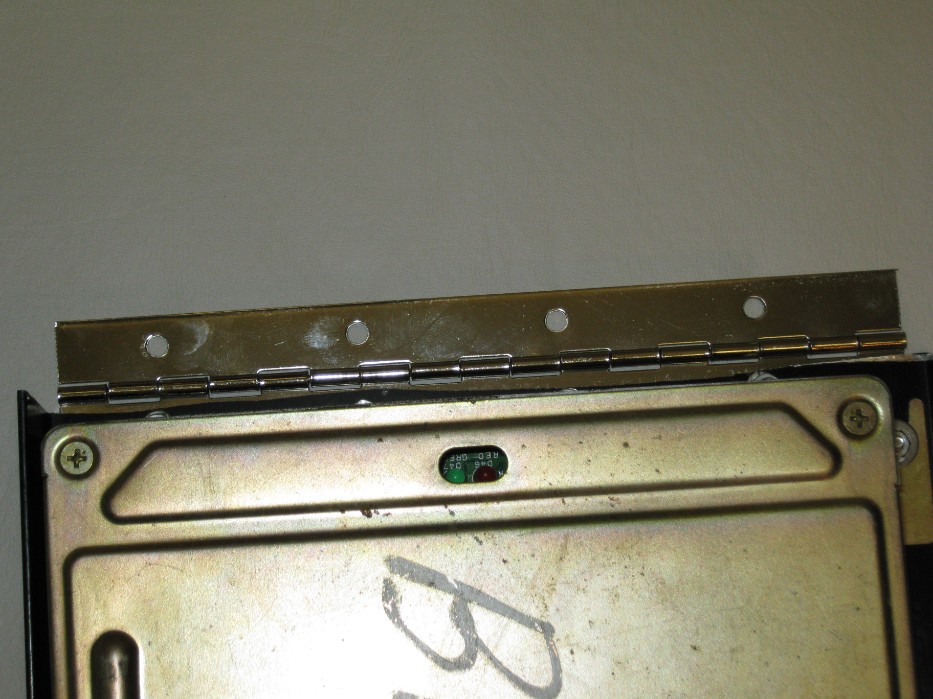
The panel has a nice deep lip on the front so it will all be concealed when in place under the glove box. The front edge of the lip lines up with the edge of the glove box where it meets the dash.

Image

I still need to figure out how I will latch it up so it can be easily released for access. If you have any ideas for a latch, let me know.

I put many hours into making this panel. Time I could have used on other things. Oh well, it is done now and I am very happy with the way it turned out.

Next up, I will be temporarily hooking it all up in the car and testing all of the circuits to make sure everything is working properly. Once that is done, I will wrap the harnesses and finally install them permanently and hopefully be trying to fire it up really soon.

More to come soon.
Enjoy The Ride!
David
ImageImage
User avatar
thisismatt
Supporter
Posts: 3438
Joined: 22 Jul 2006 18:12
Location: Santa Barbara, CA

Re: David's VG33 Swap Finally Begins

Post by thisismatt »

That looks great! I have the same AGU glass fuse distribution block, and I swear I'll never use glass fuses for anything ever again. By design they're prone to failure, especially the higher current ones, since the fuse element is soldered internally to the end caps and the solder joints tend to fail/crack and build up resistance until they fail completely, meanwhile they look perfectly fine and you spend hours trying to figure out what is wrong. I highly recommend ditching the AGU fuseblock for an automotive blade fuse block. The "safety hub" series and fuse blocks from blue sea systems are pretty cool:

http://bluesea.com/category/5
I'm your huckleberry.
qwik510
Supporter
Posts: 3216
Joined: 29 Oct 2006 18:51
Location: Maryland - East Coast USA

Re: David's VG33 Swap Finally Begins

Post by qwik510 »

Thanks. I hear what you are saying about the glass fuses but I am used to them and I will be hearing your words if I have any issues and I will carry replacements.
Enjoy The Ride!
David
ImageImage
blueridgespeed
Supporter
Posts: 121
Joined: 11 Feb 2008 03:58
Location: Asheville NC

Re: David's VG33 Swap Finally Begins

Post by blueridgespeed »

Dave, I was planning on jumping on here and giving you a hard time for not making progress! (I was going to do this to make MYSELF feel better for not making progress, naturally :wink: )

No such luck!

That is some SWEET wiring work you've done. Icehouse has started manufacturing and selling a clean setup for 510 swap wiring for those who aren't motivated to build there own like Dave has. Check out CanAm products in the classifieds over there.

Dave's setup shows that there's no substitute for a truly application-specific design!

This VG33 is coming together nicely. I like the lower rad support bracket design, too - a nice, light, clean functional design incorporating rubber suspension. Was that your design?
Oh - and the bench-vise mod solution for the top bracket is clever too!

Nice work, inspiring!!

When in the SPEC510 meet at SP this year?
qwik510
Supporter
Posts: 3216
Joined: 29 Oct 2006 18:51
Location: Maryland - East Coast USA

Re: David's VG33 Swap Finally Begins

Post by qwik510 »

blueridgespeed wrote:Dave, I was planning on jumping on here and giving you a hard time for not making progress! (I was going to do this to make MYSELF feel better for not making progress, naturally :wink: )

No such luck!

That is some SWEET wiring work you've done. Icehouse has started manufacturing and selling a clean setup for 510 swap wiring for those who aren't motivated to build there own like Dave has. Check out CanAm products in the classifieds over there.

Dave's setup shows that there's no substitute for a truly application-specific design!

This VG33 is coming together nicely. I like the lower rad support bracket design, too - a nice, light, clean functional design incorporating rubber suspension. Was that your design?
Oh - and the bench-vise mod solution for the top bracket is clever too!

Nice work, inspiring!!

When in the SPEC510 meet at SP this year?
I should be doing more updates as I have alot more that I have done since the last update. I will try to take some pics and update soon.

Thanks for the props on the wiring. I would have bought Jeff's box if it was available at the time I made mine.

My friend Keith designed and made the lower radiator mounts.

Here is a link to the thread for the SPEC510 meet.

http://www.the510realm.com/viewtopic.php?f=12&t=16003

Damn, I need to get going on my car or I will never have it ready in time.

Only 76 more days until SPEC510
Enjoy The Ride!
David
ImageImage
qwik510
Supporter
Posts: 3216
Joined: 29 Oct 2006 18:51
Location: Maryland - East Coast USA

Re: David's VG33 Swap Finally Begins

Post by qwik510 »

And Finally another update.

I had some help a few weeks ago when my friend Keith came to visit so I decided to have him help me swap the rear cross member out. I was able to pick up a nice used Penultimate rear cross member that came with the Maxima disc brakes setup with it. So we pulled to stock rear suspension and installed it. I used the Datsunparts.com Datsun Roadster Super Comp Springs with Tokico Illumina Shocks. I installed my Subi R160 LSD 3.70:1 rear.

Sorry no pics of the install as my camera was not working.

Here is a pic of the rear ride height with my 15" x 6" Panasports.
Image
Image

I spent a few hours today working on the front suspension. I finished struts with coil overs. I am using 280ZX struts with GC coil overs., Hypercoil 200# springs and TTT camber plates. I also installed a new center link, tie rods, ball joints, bump steer spacers and a rebuilt idler arm with the EE kit in it. I installed one of Kelvins steering box braces too.

Still need to do the T/C kit from EE.


Here are some pics:
Image
Before


Image
Image
Image
Image
Image

I also need to install the stainless lines and the new caliper with the Porterfield R4S pads.

More to come soon.
Enjoy The Ride!
David
ImageImage
qwik510
Supporter
Posts: 3216
Joined: 29 Oct 2006 18:51
Location: Maryland - East Coast USA

Re: David's VG33 Swap Finally Begins

Post by qwik510 »

Another update on my progress.

I got the rest of the front brakes installed this weekend. New Calipers with Porterfield R4S pads and stainless braided hoses.
Image

You can see in the pics the steering box brace I installed. I bought it from Kelvin and it is supposed to provide more rigidity to the sheet metal where the steering box mounts. I also installed a polished aluminum steering box brace from Mad Dat that installs on the top of the steering box and attaches it to the strut tower. I should have installed it before the engine went in as there wasn't enough room for my drill to fit in to drill the holes. I tried using a punch and a small hammer to dimple the metal so I could see where to drill from the other side but that metal is pretty solid and I could not get enough of a swing with the limited space. So I thought about it for a while and thought maybe a right angle drill wold work but I didn't own one and didn't know anyone that had one that I could borrow. So I was at sears looking in the drill dept and found a flexible shaft you add to your drill to get into tight places.

Image

Well it worked like a charm. I was able to drill the 3 small pilot holes from the engine compartment and then I made them bigger from the other side where there was plenty of room.

Image
Image

I also installed the upper intake manifold and the powder coated intake cover.

So things are slowly progressing on it and it is starting to look better.

Here are a few more pics. More to come soon.
Image
Image
Image
Image
Image
Enjoy The Ride!
David
ImageImage
User avatar
Jester71
Posts: 15
Joined: 28 Feb 2010 13:36
Location: Jefferons, Or

Re: David's VG33 Swap Finally Begins

Post by Jester71 »

Oh DAAAAAAVE. I think we need an update here brotha.
User avatar
bertvorgon
Supporter
Posts: 12029
Joined: 04 Aug 2003 20:45
Location: White Rock, B.C. Canada

Re: David's VG33 Swap Finally Begins

Post by bertvorgon »

Nice steering box brace! That mod really helps on our 510's.
"Racing makes heroin addiction look like a vague wish for something salty" - Peter Egan

Keith Law
1973 2 Door Slalom/hill climb/road race / canyon carver /Giant Killer 510
1971 Vintage 13' BOLER trailer
User avatar
S15DET
Supporter
Posts: 2561
Joined: 03 Dec 2004 17:02
Location: Waxhaw, NC

Re: David's VG33 Swap Finally Begins

Post by S15DET »

If you can send me two of those covers, I'll return to you one that says V6 3300 on it. That would be cool.

very nice work, any updates from the Thanksgiving break?
qwik510
Supporter
Posts: 3216
Joined: 29 Oct 2006 18:51
Location: Maryland - East Coast USA

Re: David's VG33 Swap Finally Begins

Post by qwik510 »

Well guys, not much to report on the VG33 project. I am newly single as my wife and I split up this summer and the car has just been sitting while I got moved into a new place and started adjusting to single life. I have been getting my new place in order and now I have a shed/garage to put the car in for the winter. I am hopeful that I can have it on the road in time for the SPEC510 meet (East Coast Datsun 510 Meet) next spring.

I have been busy with other 510s and now have 8 510s here at my new home.

I have also acquired another "Project" that will be getting some of the time that should be for the VG33.

This is the newest project.

Image

I hope to have a update for you all soon.
Enjoy The Ride!
David
ImageImage
Post Reply