Great progress.
It looks like the solid mounts go into roughly some 1 x 1 square tubing. I'm just saying as a reminder to gusset them vertically and horizontally. Also make sure you plug weld your solid mounts into the square tubing. Getting penetration in that thick of material is a real challenge. You might want to preheat them before welding also.
Datsun 510 do-over
-
jackedaw11
- Posts: 275
- Joined: 06 Dec 2005 15:26
Re: Datsun 510 do-over
You're exactly right, the solid mounts slide right inside 1x1 ID square tube. I definitely like the idea of plug welding and gusseting. I won't have a practical way to do vertical gussets, but I'll definitely do horizontal ones. Can you recommend a good way to pre-heat? Will a propane torch do the trick, or should I use oxy-acetylene?e510 wrote:Great progress.
It looks like the solid mounts go into roughly some 1 x 1 square tubing. I'm just saying as a reminder to gusset them vertically and horizontally. Also make sure you plug weld your solid mounts into the square tubing. Getting penetration in that thick of material is a real challenge. You might want to preheat them before welding also.
-
McShagger510

- Posts: 1821
- Joined: 26 Mar 2004 20:55
- Location: East Van, Canada
Re: Datsun 510 do-over
Hey Ben! Both would work - just get that steel nice 'n' cherry. Miss ya up here - its been a couple of years. Good to see your still in the game. How about the Sept. All Nissan Show?
James
James
The person with the sun in their eyes has the right of way. - my brother
'72 2dr. 510 Turbo
'73 240Z all stock
'71 2dr. 510 stock......for now
'91 Nissan truck *SOLD*
'02 TOYOTA Tacoma
'78 Kawasaki Z1-R
'84 Kawasaki GPZ750 Turbo
'99 Kawasaki ZRX1100
'72 2dr. 510 Turbo
'73 240Z all stock
'71 2dr. 510 stock......for now
'91 Nissan truck *SOLD*
'02 TOYOTA Tacoma
'78 Kawasaki Z1-R
'84 Kawasaki GPZ750 Turbo
'99 Kawasaki ZRX1100
-
jackedaw11
- Posts: 275
- Joined: 06 Dec 2005 15:26
Re: Datsun 510 do-over
Its been too long buddy! I'm gonna do my best to make the September show, save a spot for me!McShagger510 wrote:Hey Ben! Both would work - just get that steel nice 'n' cherry. Miss ya up here - its been a couple of years. Good to see your still in the game. How about the Sept. All Nissan Show?
James

-
jackedaw11
- Posts: 275
- Joined: 06 Dec 2005 15:26
Re: Datsun 510 do-over
I'll take you up on that Jasonjason wrote:Ben, I'll buy you lunch if you're coming up!
-
jackedaw11
- Posts: 275
- Joined: 06 Dec 2005 15:26
Re: Datsun 510 do-over
Day 10 - Stripping and Test Fitting
Memorial day weekend was really busy, my girlfriend Katie and I put in some good hours on sunday and monday. She's my czar of bodywork, this is her working away at the doorjambs.

She took care of all the bodywork this weekend, the drivers side doorjamb and rear quarter are down to bare metal now. It's nice to get all of the layers of paint and bondo off so I can see what I have to work with. It would have gone a lot faster, but there are at least 5 layers of paint on the car. I'm responsible for the last, and thickest coat. This was the first car I had the pleasure of painting, and I put the paint on THICK.

Even worse, the previous owner installed the fender flares, and used the bondo generously. It took Katie some considerable time to get through it. Here its a quarter inch thick.

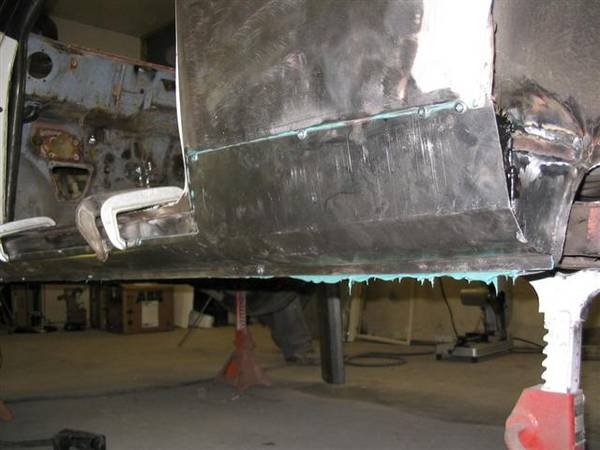
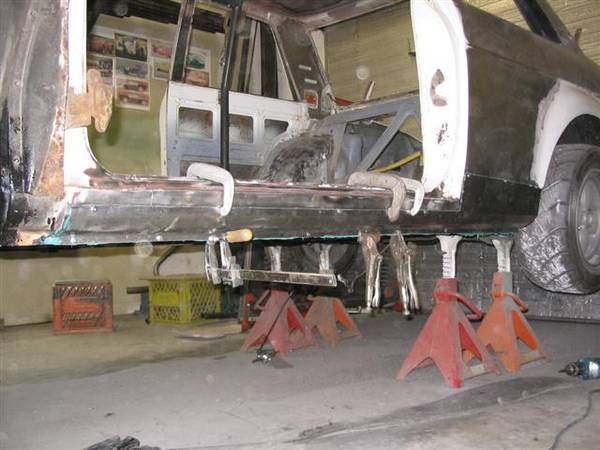
Here's how the car looked at the end of the day:

I test fitted the engine and transmission with the new crossmember. It fits exactly how I'd like it, but its a trick to get to get everything in. There isn't enough clearance to get the engine and transmission in together. The engine goes in first, and then the transmission, which is a tight fit.
Here's the crossmember in the car, and a picture of the engine all bolted up.


Memorial day weekend was really busy, my girlfriend Katie and I put in some good hours on sunday and monday. She's my czar of bodywork, this is her working away at the doorjambs.
She took care of all the bodywork this weekend, the drivers side doorjamb and rear quarter are down to bare metal now. It's nice to get all of the layers of paint and bondo off so I can see what I have to work with. It would have gone a lot faster, but there are at least 5 layers of paint on the car. I'm responsible for the last, and thickest coat. This was the first car I had the pleasure of painting, and I put the paint on THICK.
Even worse, the previous owner installed the fender flares, and used the bondo generously. It took Katie some considerable time to get through it. Here its a quarter inch thick.
Here's how the car looked at the end of the day:
I test fitted the engine and transmission with the new crossmember. It fits exactly how I'd like it, but its a trick to get to get everything in. There isn't enough clearance to get the engine and transmission in together. The engine goes in first, and then the transmission, which is a tight fit.
Here's the crossmember in the car, and a picture of the engine all bolted up.
Re: Datsun 510 do-over
looks really nice Ben.. and the fact that your girlfreind is helping is cool. don't let her get away!! 

Re: Datsun 510 do-over
If the engine/trans is coming out/going in a few more times and you don't want to deal with the hassle of splitting them for installation, I'm a fan of the under-in method. Drop the suspension and crossmember, bolt the drivetrain in, slide it under, lift it up/drop the chassis down. I certainly prefer it to manhandling a 100lb trans under the car, especially when it just won't want to go in.jackedaw11 wrote:It fits exactly how I'd like it, but its a trick to get to get everything in. There isn't enough clearance to get the engine and transmission in together. The engine goes in first, and then the transmission, which is a tight fit.
Because when you spend a silly amount of money on a silly, trivial thing that will help you not one jot, you are demonstrating that you have a soul and a heart and that you are the sort of person who has no time for Which? magazine. – Jeremy Clarkson

Re: Datsun 510 do-over
When dealing with transmissions only I prefer to use a [modified] motorcycle jack:

But for the most part I pull the engine and tranny out from the top at the same time. Helps a lot if you jack up the rear of the car a bunch so there's less tilting.
But for the most part I pull the engine and tranny out from the top at the same time. Helps a lot if you jack up the rear of the car a bunch so there's less tilting.
-
jackedaw11
- Posts: 275
- Joined: 06 Dec 2005 15:26
Re: Datsun 510 do-over
Sheetmetal problems! Need Help!
Katie adn I have spent the last few weeks stripping the car down to bare metal. Nothing much too see, so I don't have any pictures. I'd estimate that we're about 75% done. Most of the exterior has been done, but we're still working on the engine bay, the front fenders, and a few other places.
After removing the paint and some very heavy layers of bondo I found some pretty disheartening issues underneath. The biggest headache will be the rear quarter on the passenger side. It had been crunched pretty hard and never repaired right. In addition, the fender flares were hacked on, so I'm feeling a little over my head right now. I need some good advice on how to go about fixing these fenders.
Here's a shot of how much chopped up metal I removed, I'm not too worried about putting replacement steel in here I think it'll be pretty straightforward. The problems really begin in the next picture.

This shot is take from inside the wheel well looking rearward. The inner and outer fenders were just stuck together with some bondo and silicone caulking which didn't seal it up at all, You can see about 1/4" gap between the two panels.
How should I re-attach the inner fender to the outer fender? I was thinking of clamping the two panels together and weding a bead where they join, would that work?

Here's a picture looking forward, I have similar problems here too.

This picture was taken looking up from inside the wheel well. You can see how there's a gap between the outer fender and the hacked up bracing behind it. I want to re-attach the bracing to the fender, but I'm not sure what the best way would be - it looks like they used a panel adhesive from the factory.

This last picture is going to be the biggest nightmare I think. You can see the beginnings of some really nasty looking rust on the rocker, and creeping up the quarter. Does this look salvagable? I'd be really happy if I could just use rust-converter on it and be done with it. But I don't want this problem creeping back up on me later...

Katie adn I have spent the last few weeks stripping the car down to bare metal. Nothing much too see, so I don't have any pictures. I'd estimate that we're about 75% done. Most of the exterior has been done, but we're still working on the engine bay, the front fenders, and a few other places.
After removing the paint and some very heavy layers of bondo I found some pretty disheartening issues underneath. The biggest headache will be the rear quarter on the passenger side. It had been crunched pretty hard and never repaired right. In addition, the fender flares were hacked on, so I'm feeling a little over my head right now. I need some good advice on how to go about fixing these fenders.
Here's a shot of how much chopped up metal I removed, I'm not too worried about putting replacement steel in here I think it'll be pretty straightforward. The problems really begin in the next picture.
This shot is take from inside the wheel well looking rearward. The inner and outer fenders were just stuck together with some bondo and silicone caulking which didn't seal it up at all, You can see about 1/4" gap between the two panels.
How should I re-attach the inner fender to the outer fender? I was thinking of clamping the two panels together and weding a bead where they join, would that work?
Here's a picture looking forward, I have similar problems here too.
This picture was taken looking up from inside the wheel well. You can see how there's a gap between the outer fender and the hacked up bracing behind it. I want to re-attach the bracing to the fender, but I'm not sure what the best way would be - it looks like they used a panel adhesive from the factory.
This last picture is going to be the biggest nightmare I think. You can see the beginnings of some really nasty looking rust on the rocker, and creeping up the quarter. Does this look salvagable? I'd be really happy if I could just use rust-converter on it and be done with it. But I don't want this problem creeping back up on me later...
-
thisismatt

- Supporter
- Posts: 3438
- Joined: 22 Jul 2006 18:12
- Location: Santa Barbara, CA
Re: Datsun 510 do-over
Do not try to clamp the panels and weld them - you'll really f them up badly that way. Let them lie naturally and use a piece of filler, or bend the inner panel out to meet. Cut the fender well all the way back to that center seam and build out from there - the vertical seam will give you a much better substrate to weld against compared to just butting to that current sheetmetal edge.
On the picture looking towards the back, you may just want to cut out the rest of that upside down triangle of metal (continuing that horizontal cut going left). This will let you see into that void between the outer quarter panel and the plumb panel coming off the trunk floor, which often traps water/moisture and rusts out. You can then prep/paint the inside to prevent future rust issues.
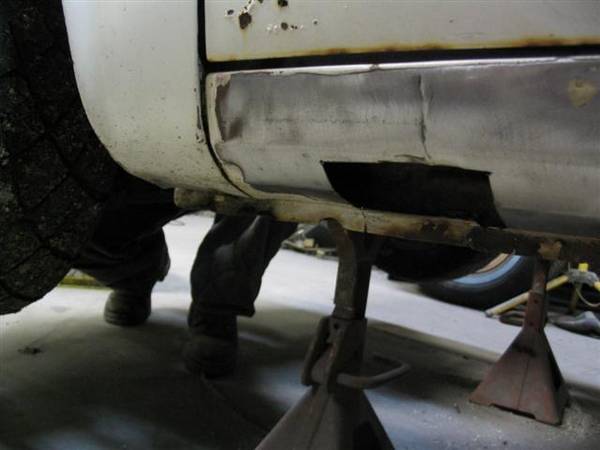
On the picture looking forward you should be able to notice that there are two layers of sheetmetal sandwiched together (three at the back from the wheel well panel). Your last picture shows the rust that is coming from the inside out due to water/moisture being trapped between the panels. Ultimately you need to cut off the outer panel, then cut out the inner panel, clean the area up, then weld the outer panel back on. Otherwise, you will never stop the rust coming out. Cut it out like this in a straight horizontal line at this height (~1/4-3/8" below the door sill edge):
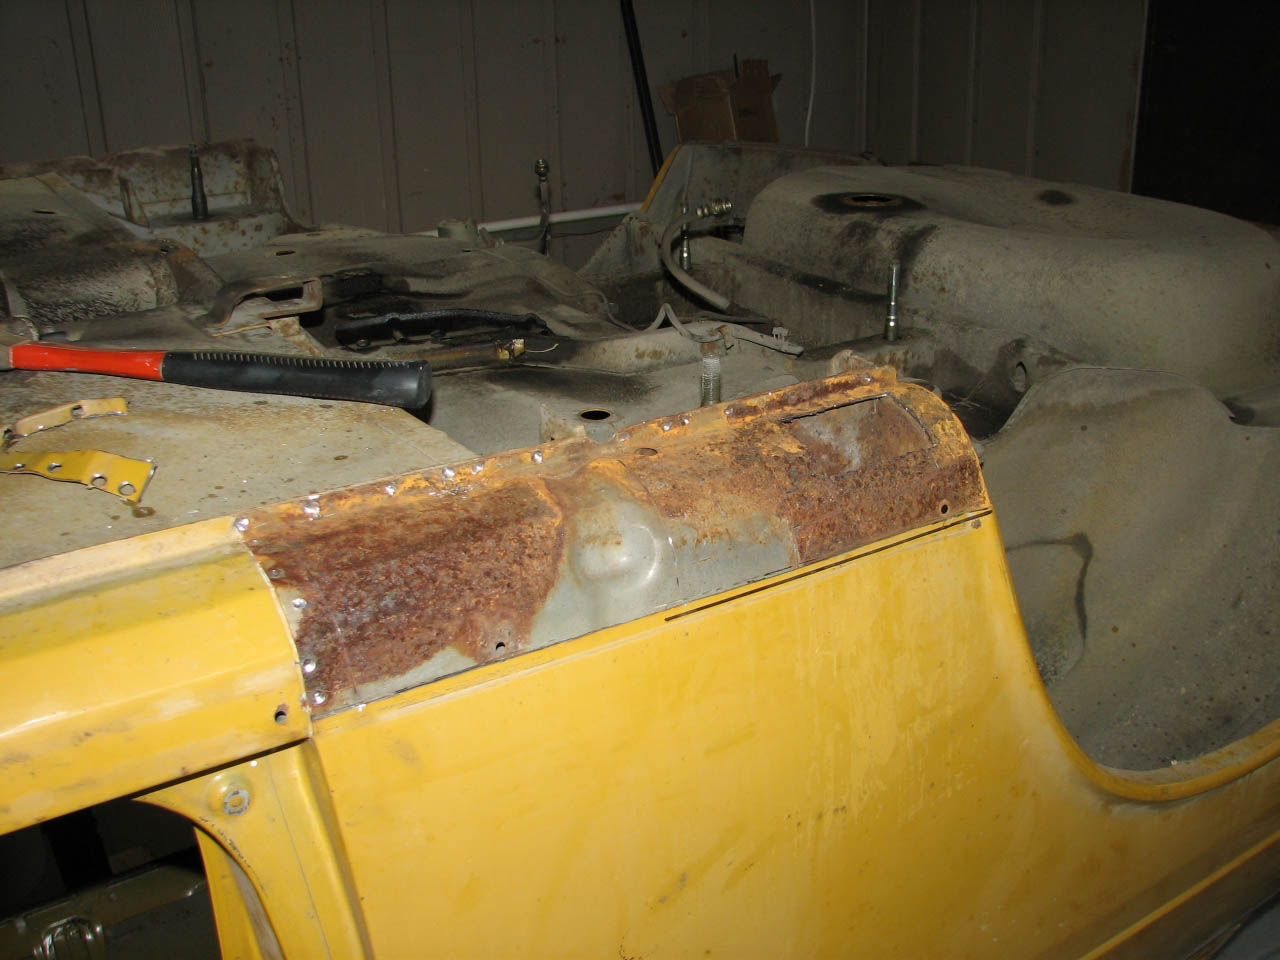
Cut out the interior metal like this:
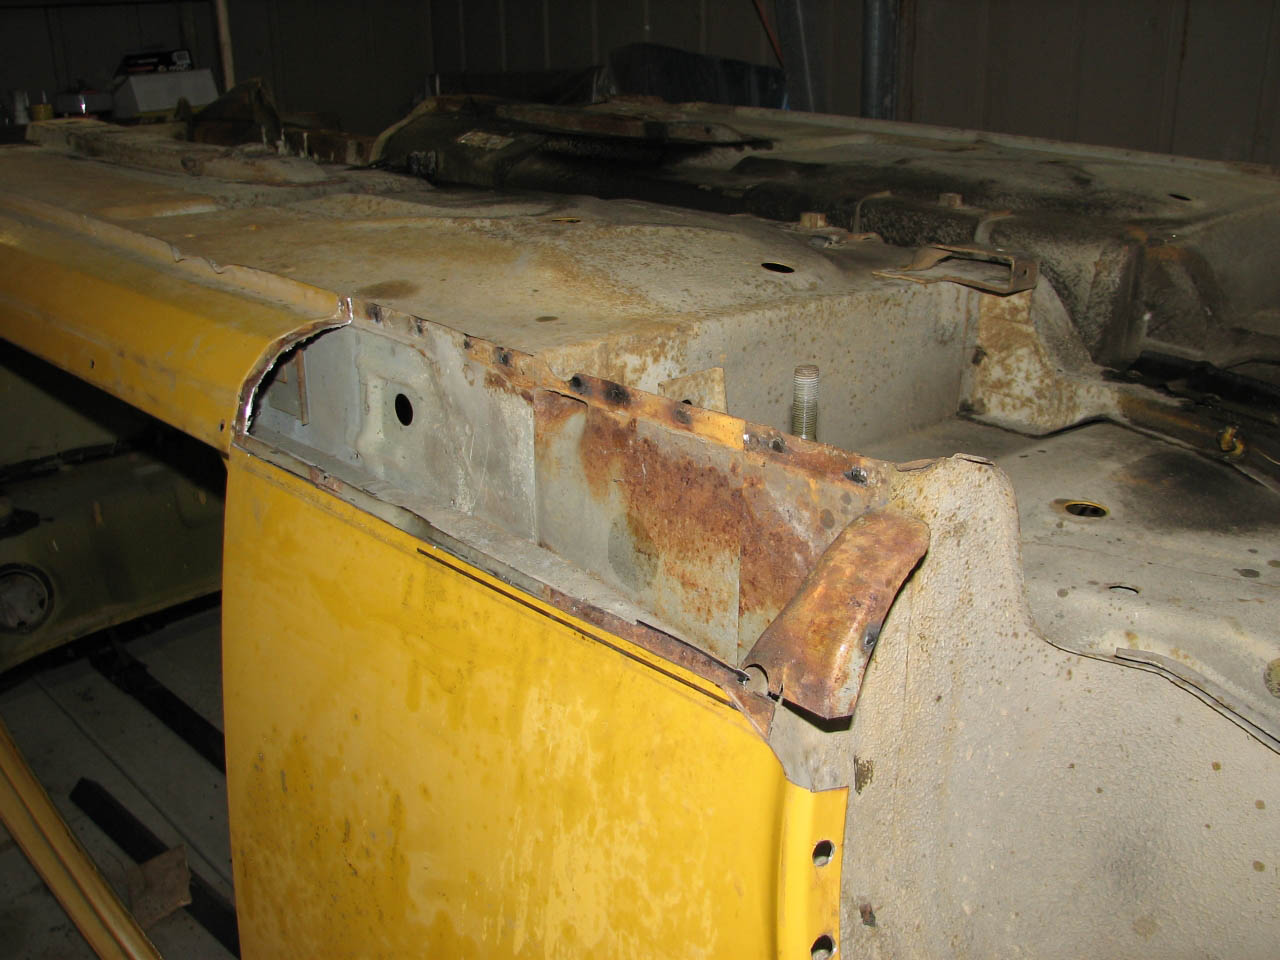
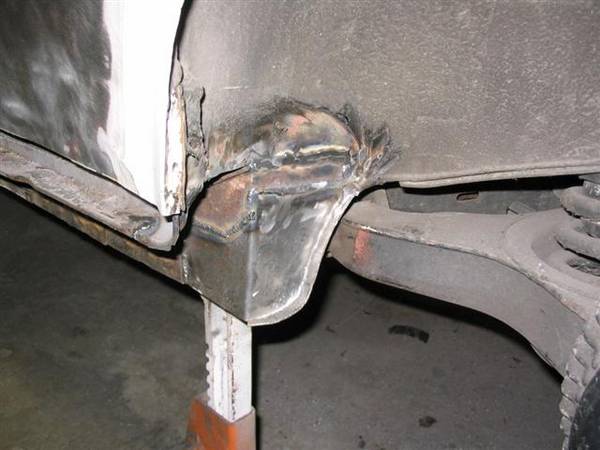
To reinforce the area you can then triangulate the section by welding in a piece diagonally between the lower spot weld seam and the outer corner where the door sill continues back and runs along the quarter panel. These pics/work are by me from my car, so feel free to ask questions.
On the picture looking towards the back, you may just want to cut out the rest of that upside down triangle of metal (continuing that horizontal cut going left). This will let you see into that void between the outer quarter panel and the plumb panel coming off the trunk floor, which often traps water/moisture and rusts out. You can then prep/paint the inside to prevent future rust issues.
On the picture looking forward you should be able to notice that there are two layers of sheetmetal sandwiched together (three at the back from the wheel well panel). Your last picture shows the rust that is coming from the inside out due to water/moisture being trapped between the panels. Ultimately you need to cut off the outer panel, then cut out the inner panel, clean the area up, then weld the outer panel back on. Otherwise, you will never stop the rust coming out. Cut it out like this in a straight horizontal line at this height (~1/4-3/8" below the door sill edge):
Cut out the interior metal like this:
To reinforce the area you can then triangulate the section by welding in a piece diagonally between the lower spot weld seam and the outer corner where the door sill continues back and runs along the quarter panel. These pics/work are by me from my car, so feel free to ask questions.
I'm your huckleberry.
Re: Datsun 510 do-over
I also removed the panel sandwich from the Bronze - that was just simply a very bad design from the get go, and why all 2dr 510's have rust here. Eliminate the inner panel.
In my case I used a panel adhesive and actually glued all this together. You need to buy a structural adhesive for this, and preparation needs to be meticulous. The advantage is that you can pain the backside of all the panels and you won't burn off the paint by welding it back together. Structurally ok? well it's been 5 years on r compound tires... but I do have a cage... however Chev has been gluing on the door hinges on it's trucks for nearly 30 years, and I haven't heard of too many of them falling off...
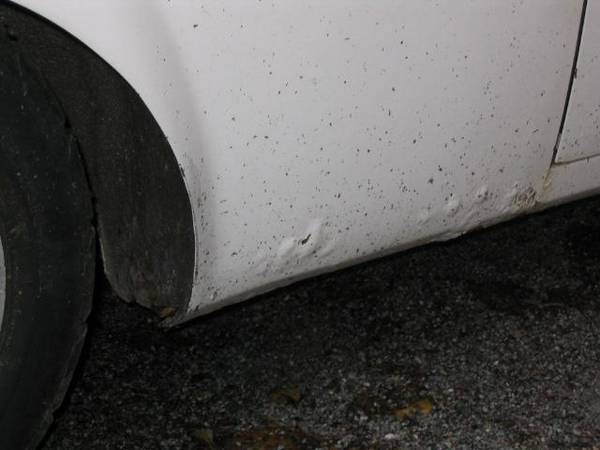
My bubbles looked a little worse than yours, but I honestly did not expect to find what I did! Considering the car had absolutely no rust on the floor pan, under the hood or in the trunk.
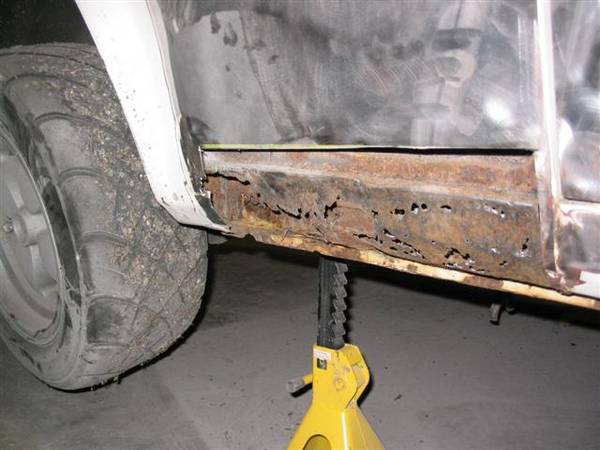
But this is what I found under the same area – worse than Matt’s car….
The rocker up front looked absolutely fine, but I cut a test piece out just to check, and deemed that I would replace this as well as I did not want to come back to this place again!
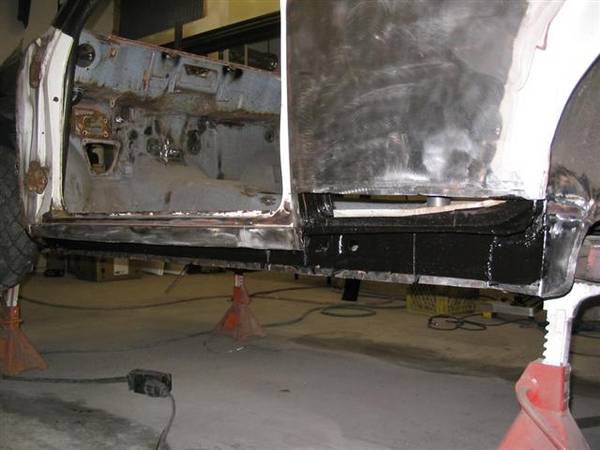
Some repairs were done to the inner rocker area on both sides, but I even formed the lip to make it look factory. After I completed the finishing and paint, you can’t tell I worked on this area.
I then cleaned the inside of the rocked of 40 years of grime, then gave the works a coat of POR15 – EXCEPT where I was going to glue the panels together – this is important.
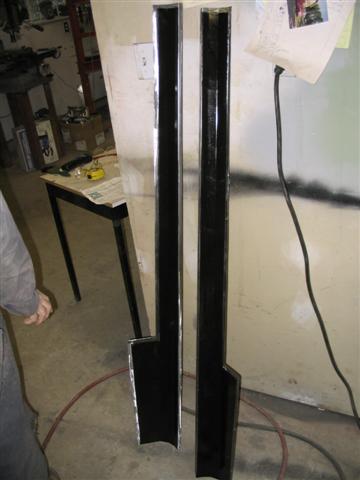
And the backside of the panels I made up
Then it was time to glue the works together. My only regret was that I had to use rivets to hold the panels tight together for the glue to set – those holes were filled over, and paint was blown in from the back side to seal them – but this was the weak link. I’ll bet there is another way, I just couldn’t figure it out at the time. The allowable gap between the panels is quite small for “best” adheasion, but I wanted to follow the instructions to a “T” so I didn’t mess around.
You’ll note the liberal application of glue. This was so that every bare tiny bit of metal was covered. If glue covered the metal, then oxygen and moisture can’t get in to start the rust process. The product wasn’t cheap, and the fitting time was exhaustive – but I was happy with the results. No issues up until today and the car have been good and wet many times. Time will tell, but I’m happy with the results so far.
Just my .02 cents worth, but pictures are worth a thousand words.
In my case I used a panel adhesive and actually glued all this together. You need to buy a structural adhesive for this, and preparation needs to be meticulous. The advantage is that you can pain the backside of all the panels and you won't burn off the paint by welding it back together. Structurally ok? well it's been 5 years on r compound tires... but I do have a cage... however Chev has been gluing on the door hinges on it's trucks for nearly 30 years, and I haven't heard of too many of them falling off...
My bubbles looked a little worse than yours, but I honestly did not expect to find what I did! Considering the car had absolutely no rust on the floor pan, under the hood or in the trunk.
But this is what I found under the same area – worse than Matt’s car….
The rocker up front looked absolutely fine, but I cut a test piece out just to check, and deemed that I would replace this as well as I did not want to come back to this place again!
Some repairs were done to the inner rocker area on both sides, but I even formed the lip to make it look factory. After I completed the finishing and paint, you can’t tell I worked on this area.
I then cleaned the inside of the rocked of 40 years of grime, then gave the works a coat of POR15 – EXCEPT where I was going to glue the panels together – this is important.
And the backside of the panels I made up
Then it was time to glue the works together. My only regret was that I had to use rivets to hold the panels tight together for the glue to set – those holes were filled over, and paint was blown in from the back side to seal them – but this was the weak link. I’ll bet there is another way, I just couldn’t figure it out at the time. The allowable gap between the panels is quite small for “best” adheasion, but I wanted to follow the instructions to a “T” so I didn’t mess around.
You’ll note the liberal application of glue. This was so that every bare tiny bit of metal was covered. If glue covered the metal, then oxygen and moisture can’t get in to start the rust process. The product wasn’t cheap, and the fitting time was exhaustive – but I was happy with the results. No issues up until today and the car have been good and wet many times. Time will tell, but I’m happy with the results so far.
Just my .02 cents worth, but pictures are worth a thousand words.
Love people and use things,
because the opposite never works.
because the opposite never works.

Re: Datsun 510 do-over
That's a nice pictorial Byron, I think I missed that in your build thread... unfortunately, I think I have this in my future.
-
jackedaw11
- Posts: 275
- Joined: 06 Dec 2005 15:26
Re: Datsun 510 do-over
Byron and Matt, you guys are lifesavers! Thanks for posting your write-ups and pictures for me. I've never done sheetmetal work before, so I need all the help I can get - reading through your posts makes me feel much better prepared to tackle my rusty rockers.
I'm going to cut into my panels tonight, wish me luck What tool did you use to cut the panels so cleanly? I'm going to try a die grinder with a cut-off blade, I think that's the best thing I have.
I'm going to cut into my panels tonight, wish me luck